Batch Processing
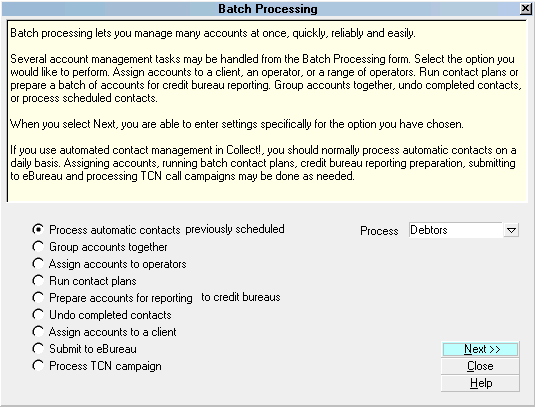
Batch processing lets you manage many accounts at
once, quickly, reliably and easily.
Several account management tasks may be handled
from the Batch Processing form. Select the option you
would like to perform. Assign accounts to a client, an operator,
or a range of operators. Run contact plans or prepare a batch of
accounts for credit bureau reporting. Group accounts
together, undo completed contacts, or process scheduled
contacts.
When you select Next, you are able to enter settings
specifically for the option you have chosen.
If you use automated contact management in Collect!,
you should normally process automatic contacts on a
daily basis. Assigning accounts, running batch contact
plans, credit bureau reporting preparation, submitting
to eBureau and processing TCN call campaigns
may be done as needed.
 Batch processes may tax the system heavily,
simulating the actions of one hundred users at a time! For
fastest batch operations, use EXCLUSIVE mode. You can
speed this up even more if you run batch processes from
your Server, using LOCAL protocol. Please refer to
Help topic, CV11 Server Options for details.
Batch processes may tax the system heavily,
simulating the actions of one hundred users at a time! For
fastest batch operations, use EXCLUSIVE mode. You can
speed this up even more if you run batch processes from
your Server, using LOCAL protocol. Please refer to
Help topic, CV11 Server Options for details.
Accessing Batch Processing
The Batch Processing menu may be accessed in many ways.
Providing you have access to the various menus and forms,
you can use one of the following ways to get to the
Batch Processing form.
1. Using the menu bar at the top of Collect!
select Tools to display the drop-down menu. Select
Batch Processing from this menu and the Batch Processing
menu will appear.
2. Or, you can access Batch Processing from the Main Menu.
Select the Daily Administration button to display the
Daily Administration menu. Select the Daily Batch Processes
button to display the Daily Batch Processing menu. Select the
Batch Processing button to display the Batch Processing menu.
Batch Processing

Process Automatic Contacts
Select this to Process Automatic Contacts that were
previously scheduled. This process can change the
Debtor status, change Operator assignment, close
or activate accounts and write notes to a Debtor's file.
For example, imagine that one of your Contact
Plans sends a letter on Day 1 and that 10 days
later you want the file activated, an Operator assigned
and a review Contact to appear in the Operator's Work
In Progress (WIP) list. You would build a Contact
Plan that schedules these events. Then, as they become
due, this function will process these items as necessary.
You may select DEBTORS from the Process pick list
to process your Debtor contacts or CLIENTS to process
your Client contacts.
Press NEXT to display the Select Contacts To Process form
where you will further define the batch process.
See Also
- Process Automatic Contacts
Group Accounts Together
You can group accounts based on any set of
fields on the Debtor record using logical
AND and OR conditions.
This process checks for matching accounts
based on your conditions, such as Name,
Social Security Number, Address and Home
phones. If a match is detected, the
process groups accounts together.
The search by Social Number must be an
exact match for accounts to be grouped
together.
The Name field search must match on
both the Last Name and the First Name.
Middle initial and other extraneous
information is ignored.
When accounts are grouped, new accounts
that don't have an Operator ID will be
assigned to the Operator of the first
matching account found.
It is typical to run this process immediately
after importing a batch of accounts or after
manually data entering your day's new business.
Assign Accounts To Operators
This process assigns an Operator to accounts.
You may select DEBTORS from the Process pick list
to process your Debtor contacts or CLIENTS to process
your Client contacts.
DEBTORS:
Any pending contacts for the Operator previously assigned
to the account will be rescheduled for the new account
Operator.
Contacts scheduled for Operators other than the original
account owner are not affected. That means you can have
supervisors and legal desks all working this file and then
assign a new Operator without affecting the other work
going on.
If you choose a Team to assign accounts, the new accounts are
distributed across all collectors on the team. Accounts are
distributed to balance the number of active accounts in each
Operator's queue, and equalize the total dollar value of all active
accounts in each queue.
 You can assign a contact plan to run automatically
on each account where the batch process
changes the Operator. This option is set in
System-> Preferences-> Options, Sounds and Colors.
You can assign a contact plan to run automatically
on each account where the batch process
changes the Operator. This option is set in
System-> Preferences-> Options, Sounds and Colors.
CLIENTS:
The Operator ID you select will be entered into the Client
Settings for the Clients you choose. This Operator ID will
be assigned to all new accounts entered for this Client on
a go forward basis. It does not affect the Operator ID for
Debtors already listed in the system.
Press NEXT to display the Select Accounts To Process form
where you will further define the batch process. From this point
forward, Collect! will display forms that are based on this
choice so that you can fill in further details of the batch process.
Run Contact Plans
Collect! allows you to set up your own contact plans to
automatically process hundreds of accounts per minute.
This function runs a Contact Plan on any number of accounts.
You may select DEBTORS from the Process pick list
to process your Debtors or CLIENTS to process your
Clients.
You can pick accounts by listed date or currently assigned
Operator, use search criteria to select accounts in almost
unlimited ways, and even tag individual records to be
processed.
Press NEXT to display the Select Accounts To Process
form where you will further define the batch process. From
this point forward, Collect! will display forms that are based
on this choice so that you can fill in further details of the
batch process.
Prepare Accounts For Reporting
Switch ON this option to Prepare Accounts For Reporting To Credit Bureau.
You can report credit history on many accounts in one quick step.
After preparing the accounts for reporting, (you can prepare many
different groups of accounts), you'll want to be sure the settings in
the Select Bureau Report Details form correctly display the details
you set for reporting to credit bureaus.
*** NOTE : Select Tools from the top menu bar and then select
Credit Reporting to check your default settings.
Press NEXT to display the Select Accounts To Process form
where you will further define the batch process. From this point
forward, Collect! will display forms that are based on this
choice so that you can fill in further details of the batch process.
Undo Completed Contacts
Select this to undo a specific batch that you processed
and unmark the contacts 'completed.' This is very
useful if unforeseen circumstances render your batch
unusable and you have to redo it. Since contacts are
marked done when a batch is run, this option allows
you to 'undo' the completed status. Contacts are now
'active' again and in process. You can redo your batch
as if you had never run it.
You may select DEBTORS from the Process pick list
to process your Debtor Contacts or CLIENTS to
process your Clients Contacts.
Press NEXT to display the Undo Completed Contacts
form where you can choose the types, dates, times
and operators of contacts to unmark.
Assign Accounts To A Client
This process assigns accounts to a Client.
The client information on the Debtor form displays the
new client's Name and Client Number.
Press NEXT to display the Select Accounts To Process
form where you will further define the batch process. From
this point forward, Collect! will display forms that are based
on this choice so that you can fill in further details of the
batch process.
Submit To Ebureau
This process automatically submits a batch of accounts
to eBureau for processing. Results are used to update
accounts automatically, providing scoring and valuable
account information for locating and working debtors
efficiently and profitably. This option is only visible if your
Collect! license enables this add-on extension module.
You must complete the eBureau Setup
before attempting to use this feature. Please
refer to eBureau Module for details.
Process TCN Campaign
Select this to process your TCN call campaigns. You
can schedule a new campaign or process results from
previously scheduled campaigns. This option is only
visible if your Collect! license enables this add-on
extension module.
Please refer to Help topic, TCN Topics for details.
Process
Select either DEBTORS or CLIENTS from this pick list.
If you select DEBTORS, all batch processing functions
you select will be performed on your Debtor accounts. If
you select CLIENTS, all batch processing functions you
select will be performed on your Client accounts.
This pick list is visible when the
Client Management option is enabled
in Collect! Features and you have selected
a batch processing function that may be run
on either your Debtors or your Clients.
Help
Select this button for help on the Batch Processing
form and links to related topics.
Close
Select this to cancel the batch process setup
and return to the previous form.
Next
Select this button to proceed with setting up
the batch process. The form that will be displayed
depends on the type of batch you are processing.
Refer to help on each type of batch process for more
details.
See Also
- Introduction To Management Topics
- Selecting And Tagging Records
- Batch Processing Topics
|
Was this page helpful? Do you have any comments on this document? Can we make it better? If so how may we improve this page.
Please click this link to send us your comments: helpinfo@collect.org