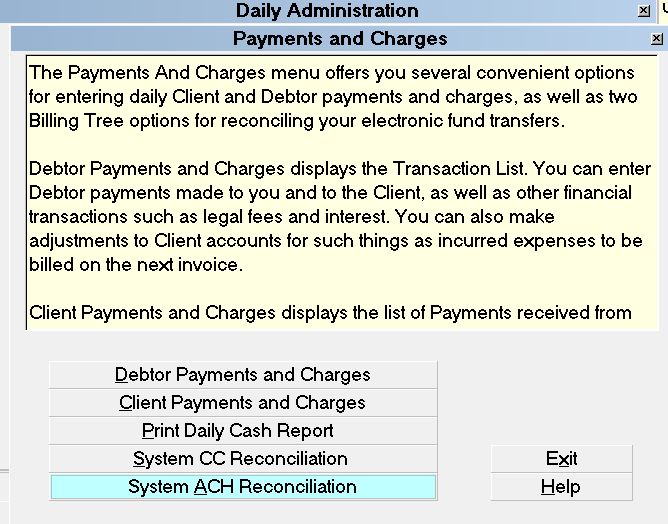
Billing Tree ACH Payments - Quick Tour
This page is a quick tour of the steps involved to use
the ACH functionality of the module, covering:
- The initial setup for ACH payments
- How to do a Single Payment
- How to schedule a recurring payment
- How to setup your Electronic File Transfer(EFT) Notices
- How to reconcile your ACH History
 For more detailed information and instructions,
see the Help topic, " Billing Tree ACH Payments - Step by Step".
For more detailed information and instructions,
see the Help topic, " Billing Tree ACH Payments - Step by Step".
Billing Tree ACH Setup
There are two preliminary steps to complete before being able to
access and use the ACH interface.
You require licensing from Comtech Systems Inc. to enable
the Billing Tree Module for your site. For pricing information
and acquisition, please contact us at 250-391-0466 or email
sales@collect.org.
You require an active ACHNow account with Billing Tree.
They will provide you with all the login credentials necessary for
the module to connect to the ACH Gateway automatically. You may also
use your login credentials for direct/external access to the Gateway via
your Internet browser.
The url is entered into the "Server" field on the Setup screen,
along with a UserID and Password.
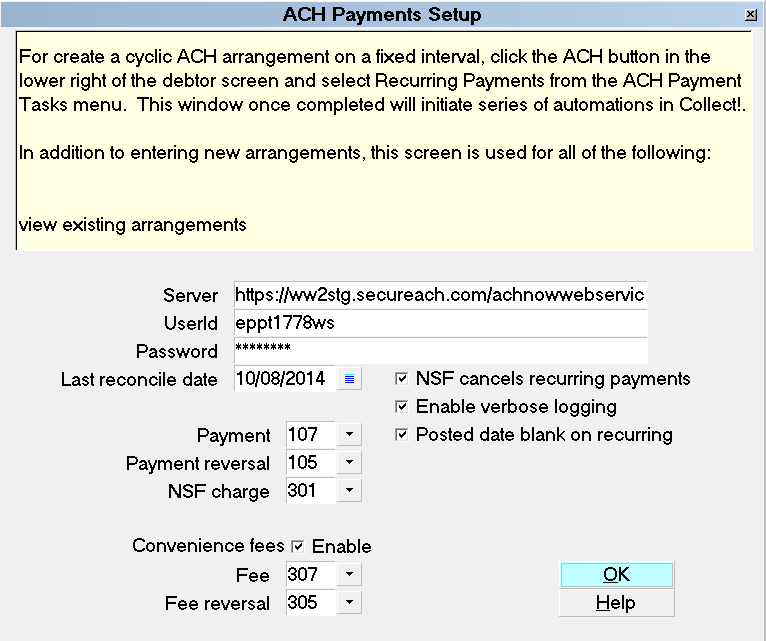
ACH Payments Setup
Other fields entered in this window are described in
detail in the section called "SET ACH LOGIN".

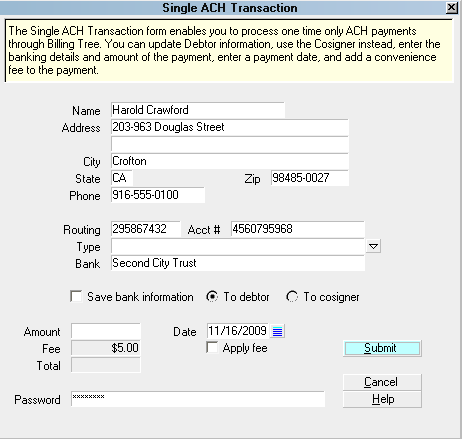
Single ACH Transaction
Click the ACH button in the lower right corner of the Debtor
screen to access the ACH Payment Tasks window, then click the 'Run
a Transaction' to open the Single ACH Transaction window.
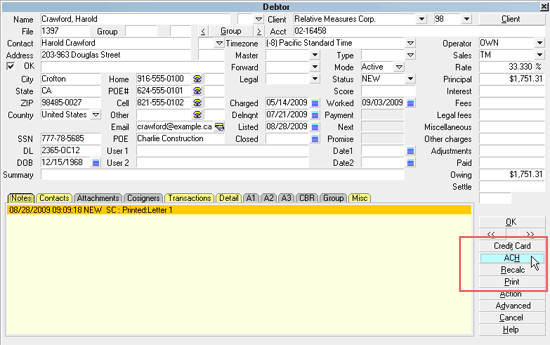
Select the ACH button
If this is the first time you are accessing this screen,
after signing into Collect!, you will be prompted to
enter your ACH UserID and Password.
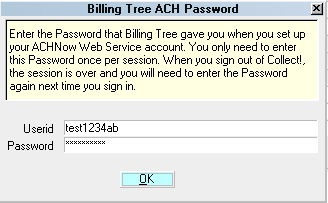
Billing Tree ACH Password
Once you enter your UserID and Password, they stay in
effect until you sign out of Collect!.
 If you have entered a system-wide Password into the
ACH Payments Setup screen, you will not
be prompted to enter a Password unless you
are in any of User Levels 1, 10 or 99.
If you have entered a system-wide Password into the
ACH Payments Setup screen, you will not
be prompted to enter a Password unless you
are in any of User Levels 1, 10 or 99.
Click the ACH button on the Debtor screen to access
the ACH Payment Tasks menu.
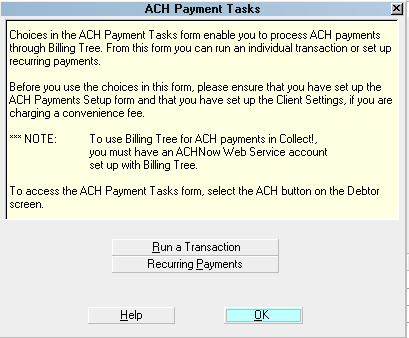
ACH Payment Tasks
Click RUN A TRANSACTION to open the Single ACH
Transaction window.
Single ACH Transaction
Some of the fields will be auto-filled for you on the screen.
Banking information is stored in the Debtor Detail tab.
If you already have banking information for this debtor
correctly entered into the right fields in the Detail tab,
you should see the banking fields also auto-fill with data.
If you wish to charge a convenience fee, you must
have enabled ACH convenience fees in your ACH Setup
screen and also for the individual Clients in the
Advanced Settings screen.
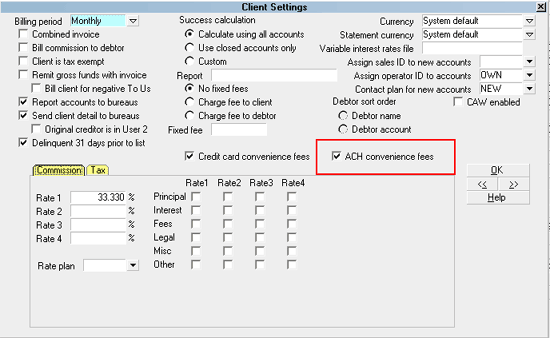
Client Settings
If enabled, you will be able to check the Apply Fee box and
the designated fee amount will auto-populate.
The Apply Fee check-box and Fee amount field both remain
appear greyed out if the convenience fee is not enabled.
You may then fill in other details such as save the banking
and address information to the Debtor or Cosigner and
submit the payment.
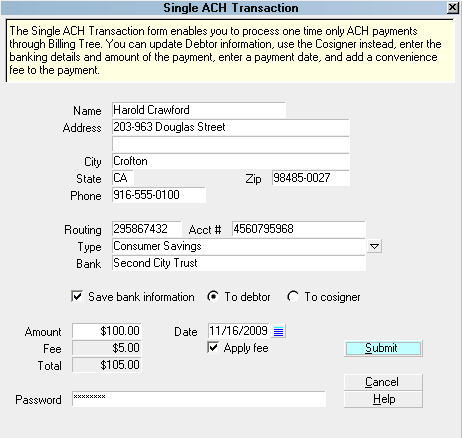
Ready to Submit Single ACH Transaction
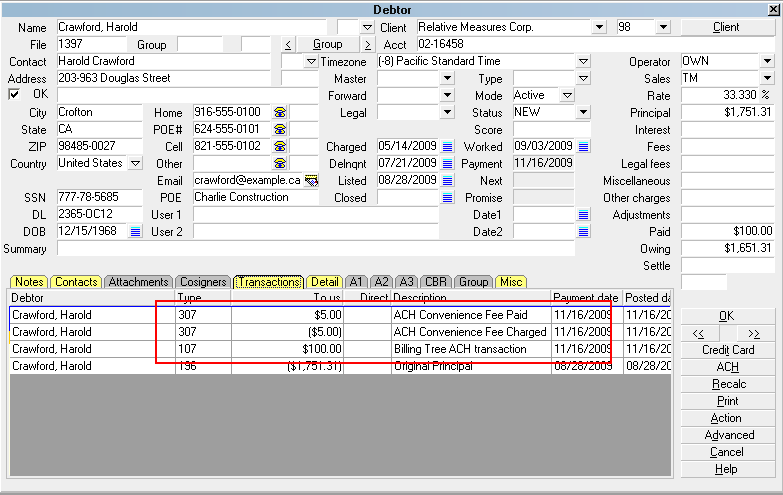
Collect! then posts the payment, and fee if applicable.
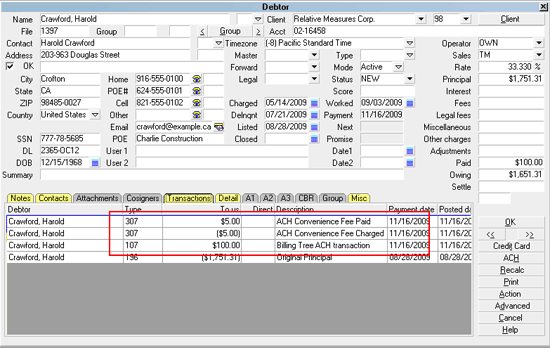
ACH Transactions Posted
Single ACH payments are submitted to Billing Tree
immediately. Any transactions that go NSF
will be reversed in Collect! when you run
Reconcile ACH History.
Recurring ACH Payments
Click the ACH button in the lower right of the Debtor screen
to enter the ACH Payment Tasks menu, then click 'Recurring Payments'.
Select the ACH button
If this is the first time you are accessing this
screen, after signing into Collect!, you will be prompted
to enter your ACH UserID and Password.
Billing Tree ACH Password
Once you enter your UserID and Password, they stay in
effect until you sign out of Collect!.
If you have entered your Password into the
ACH Payments Setup window, you will not be
prompted to enter a Password. Only User
Levels 1, 10 and 99 will see the Password
prompt.
ACH Payment Tasks
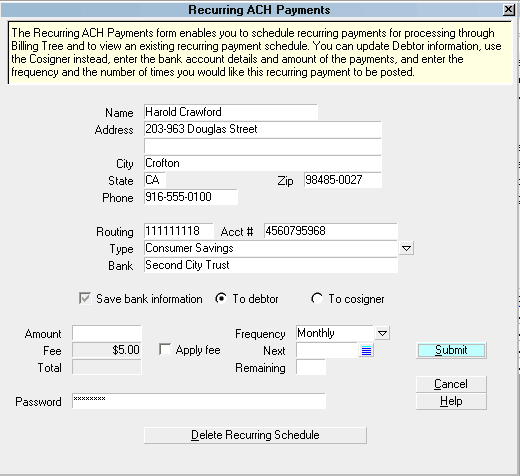
Recurring ACH Payments
Some of the fields will be auto-filled for you on the screen.
Banking information is stored in the Debtor Detail tab.
If you already have banking information for this debtor
correctly entered into the right fields in the Detail tab,
you should see the banking fields also auto-fill with data.
If you wish to charge a convenience fee, you must
have enabled ACH convenience fees in your ACH Setup
screen and also for the individual Clients in the
Advanced Settings screen.
Client Settings
It is the above preliminary setup steps that enable and control
ability and amount to be charged per transaction. Until you check
the Apply Fee box, the Fee amount remains greyed out.
If the fee is not allowed at all or disallowed for certain clients,
the Fee and Apply Fee fields will be read-only/greyed out.
You can fill in other details as needed, save the banking
and address information to the Debtor or Cosigner and
submit the payment.
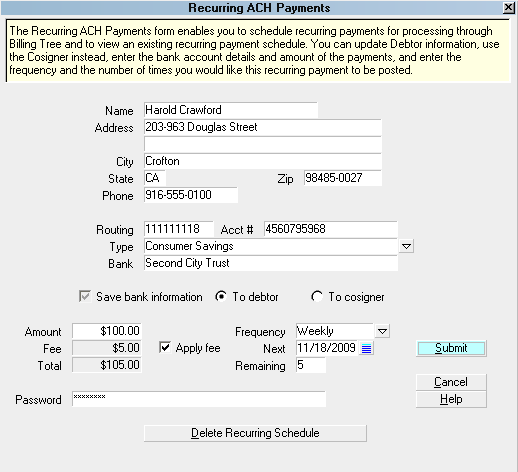
Ready to Submit a Recurring ACH Schedule
Collect! posts the payment transactions with Payment Dates
entered according to the schedule you set up. The Posting
Dates are filled with the date you initiated the
recurring ACH arrangement UNLESS you check the ACH Setup Field
called "Posted date blank on recurring". This feature will
leave the posted date with no entry until the date the
transaction is reconciled.
The whole post-dated arrangement is then posted in the Transaction
tab on the Debtor account. This is strictly an ACH recurring
arrangement aspect. By comparison, Recurring Credit Card arrangements
are not stored in Collect! and do NOT appear in the Transaction tab
until the payment comes due and has been processed by Billing Tree.
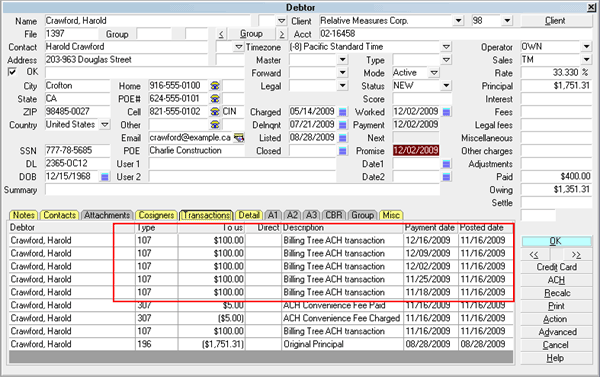
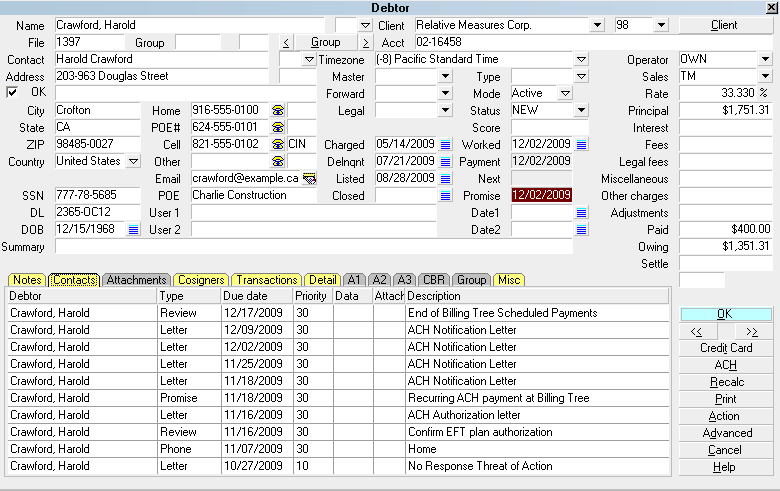
ACH Transaction Schedule Posted
Recurring ACH payments are not finalized in Collect!
until you run Reconcile ACH History.
Collect! posts a Promise contact to keep track of the payment
schedule.

Promise Contact for Recurring ACH Payments
Collect! automatically sets up a Review Contact to remind you of the
end of the payment schedule.

Review Contact for Recurring ACH Payments
You can also schedule EFT notices to go out reminding the
Debtor of the next payment due and a fixed schedule of 'X' days
prior to each payment coming due.

EFT Notices and Reviews
EFT Notices
In compliance with EFT requirements, the Billing Tree Module
enables you to automatically schedule authorization letters
and EFT notices for recurring credit card and recurring
ACH payments. You can access this setup screen from the
Billing Tree Setup menu.
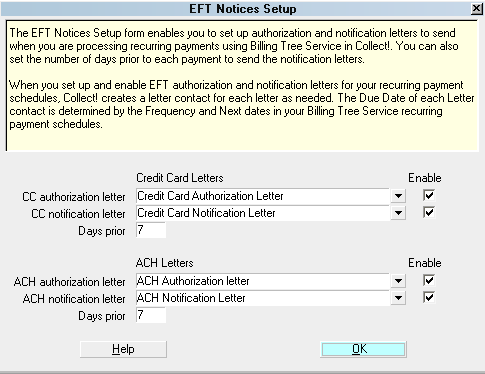
EFT Notices Setup
It is your responsibility to ensure that
any letters you send to debtors are
compliant in format and content with
legislation and regulations in your
region.
When you submit a recurring ACH payment schedule, Collect!
will automatically schedule letters and Review Contact events
according to your setup and arrangement parameters.
EFT Notices and Reviews
View EFT Notices
Reconcile ACH History
The Reconcile ACH History function uploads payments which have
now become currently due to the ACH Gateway. It is a batch
process that will also download any new NSFs/chargebacks, as well
as any payments a debtor may have made on their own directly at the
Billing Tree portal that your office is as yet unaware of.
You can Reconcile ACH History once per day or multiple times as
you wish. The system keeps track of reported payments and will not
duplicate a transactions which has already been posted.
If you have set the check-box in ACH Setup for 'Posted date blank on
recurring', this download process is what will write the Posted Date
into your processed item in the Transaction Tab.
Reconcile ACH History
Collect! displays a summary screen to let you know what actions
were taken, how many of each kind of transaction was uploaded and/or
downloaded. It also writes an exception file if any transactions
cannot be matched.
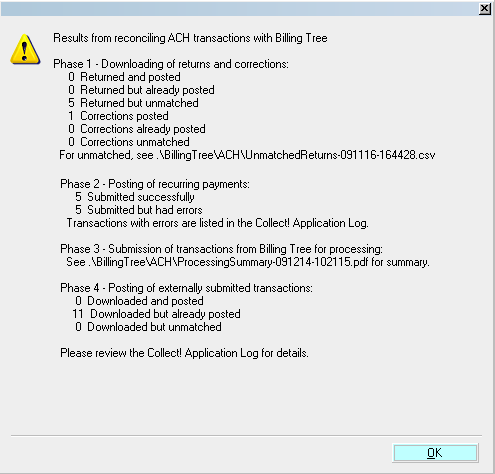
Reconcile ACH Summary of Results
It also writes a detailed log into the path
"CV11\bin\BillingTree\ACH\achnow.txt".
If unmatched returns are downloaded, you will find the exception
reports located in the folder located via the path CV11\bin\BillingTree\ACH.
See Also
- Billing Tree Topics
| 

Was this page helpful? Do you have any comments on this document? Can we make it better? If so how may we improve this page.
Please click this link to send us your comments: helpinfo@collect.org