Changing Commission Rate By Contact Plan
Changes to an Agency's Contingency Rate for one or more Clients
are commonplace in the industry. The objective, at the operational
level, is to accommodate the Client without a massive manual
labor project that has everyone updating volumes of shelf inventory
account by account. This is a process that can be automated
with a Contact Plan to mass change all the Debtors under the
affected Client in one pass through the inventory.
Background
When you enter new accounts from within the Debtors Tab
in the Client Screen, the Rate field on each Debtor
entered here will be auto-populated from the rate
which currently exists on the Client. If there is
no default rate entered into the Client Advanced Settings
screen, this blank rate field will be passed along to
Debtors as they are entered.
It is possible to override and overwrite a blank or default
rate field on the Debtor screen as a new account is being
entered if there is an exception reason why it would be
necessary to be faced with this chore. For the majority of the
business you will enter for any one Client, it shouldn't be
necessary to be doing extra entry when the system is designed
to save you steps.
There are a few commonplace Industry scenarios where you
may find that you need to update significant portions
of your inventory with a new commission rate or rate plan.
- A Client who normally assigns Retail only at a rate
of 35% will now be sending you listings for Commercial as
well and you are to charge 45% on this stream of business.
This creates a condition where the Type of assignment is
becoming the determining factor in what will decision the
correct rate to charge on each account.
- Your Agency has made a business decision to change
its contingency rate for all Clients who assign business
of a specific Type, effective as of a designated date.
- You have an individual Client with one or more Client
numbers that has changed their rate as of a specified
date and wants this change to be applied to shelf
inventory retroactively in addition to what is being
reflected as the current rate for new listings.

Commission Rate - Changing By Contact Plan
 WARNING: We recommend taking a Snapshot of your database
before embarking on any large-scale invasive auto-process.
See File Maintenance topics.
WARNING: We recommend taking a Snapshot of your database
before embarking on any large-scale invasive auto-process.
See File Maintenance topics.
The scenarios above which want a different rate
entirely from the Client default for different reasons
and based on Debtor account Type can be best handled
by adding an Event to the NEW Contact (Action) Plan
which tests for account Type and changes the commission
rate on that basis from the default Client value for to
the new prescribed rate for the account Type.
Using shipping defaults for example purposes, your Debtor
Account Type pick list should look something like the
following:
"0" You Can Add Your Own Types
"1" Retail
"2" Commercial
"3" Medical
"4" NSF_Account
Here are examples of the settings you would use on the inside
of a Contact (Action) Plan to make the change on the basis
of the account Type code.
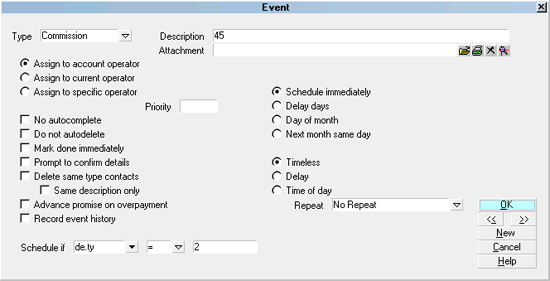
Plan Event to set Commission Rate to 45%
This event runs if the Pick List 'Type' is 2. In this logic,
the numeric representation of the expressed "Commercial"
type is being tested for and if found to be true, ONLY then does
the system update the commission rate on an account to 45%. Note as
well that the fill value 45 is entered in the Description field with
no percent sign or decimal points.
The following is another example of the same decisioning using a different
'Type' Pick List numeric to make the conditional logic test with.
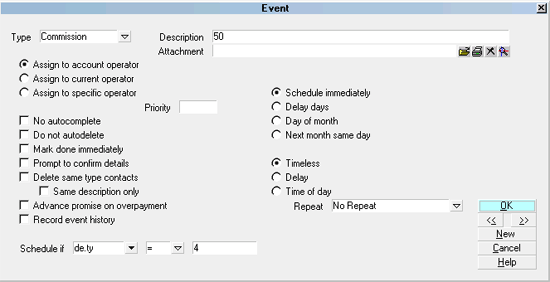
Plan Event to set Commission Rate to 50%
This event runs if the 'Type' is 4, that is, for NSF_Account accounts,
as shown in the Pick List choices above.
To determine what your numeric value is for your 'Type' pick list
selection, Right click on the Type field and open the pick list
by clicking into the field, then right-clicking. This will
popup an Access Rights window. Next to the "Pick list file"
field is a yellow folder. Click the folder to open the pick
list and determine what numeric value in your site's pick
list match the criteria you will be isolating by.
Adding an Event to your NEW account automation addresses part of
the issue on a go forward basis. To run against the whole
database to identify and isolate accounts for this treatment,
you need to gather up the shelf inventory and if applicable,
update all of their Commission Rates. If you are able to segregate
on the basis of Client, like in #1 above, then this Tag List
creation can be done from within a Client's Debtors tab. If you
need to sweep all Clients for a specific 'Type', the best shelf
inventory prospective will come from a Browse Active Debtors list.
The methodology is the same coming from a Client screen Debtors Tab or
Browse Active Debtors list,
- From the list, click Find. When the Search Criteria
window pops up, select 'Type' and pick from the
dropdown menu to populate your From / To columns
with the target criterion.
- Click Search in the lower right corner to Tag
a list of qualifying accounts.
- To properly gather your Tagged List, click Edit
at the top of the screen, then View Tags (or View All)
- whichever message your running version shows you for this purpose.
- Create a new Contact Plan from the menu path
"System\Contact\Management Settings\View Contact Plans"
and input your Rate Change Event. This standalone
Contact Plan will be run as a batch process against
your shelf inventory meeting the target criteria for
update.
- To run the created Contact Plan against all the
accounts in the tagged list, click "Tools\Batch
Processing\ Run Contact Plans". Follow the prompts
and select the Contact Plan designed for this
purpose and run it.
- When asked to Untag your list after the
process completes, initially say NO so that you can spot-check
a few to make sure the desired result was obtained.
- After confirming that your rates on the target subset
of accounts have updated correctly and successfully, click
Edit to Untag your list and Clear
your search criteria.
See Also
- Client Topics
- Contact Plan Basics
- How To Modify Or Create A Pick List
|
Was this page helpful? Do you have any comments on this document? Can we make it better? If so how may we improve this page.
Please click this link to send us your comments: helpinfo@collect.org