How To Setup Operators
This topic discusses setting up your Operators to access and
use Collect!. This requires that you have access rights to the
various menus and forms in Collect!.
 Examine settings for different Operators by using
the Record Navigation keys [<<] BACK and [>>] FORWARD
from the Operator form. As you scroll through the records, you
can examine the settings for each Operator.
Examine settings for different Operators by using
the Record Navigation keys [<<] BACK and [>>] FORWARD
from the Operator form. As you scroll through the records, you
can examine the settings for each Operator.
Please press F1 for an explanation of the fields in the
Operator form.
To create new operators, we recommend that you
cut and paste from our original Operators. Please refer
to How To Copy Operators To Master Database for details.
When you are finished pasting your record, open the new
Operator and enter a UNIQUE Operator ID following
guidelines below.
Operator ID Guidelines
Each Operator must be set up with a UNIQUE ID.
Each Operator must also have a Password. It is advised to
make the Password unique for each Operator, although it is
permissible to give the same Password to multiple users.
The password is used to sign on, but the ID is used to set
every parameter that relates to the operator.
For your convenience, Collect!'s Demonstration database
contains a predefined set of Operator IDs and Passwords.
For Example:
- OWN for owner
- SYS for system administrator
- MGR for office manager
- SC for senior collector
and so on. For each of the IDs, the Password is the same
as the ID. For example, for ID OWN the Password is own,
and for ID SYS the Password is sys.
- Use up to 7 characters for the Operator ID.
- Make sure each of your Operators has his/her
own UNIQUE ID. (Passwords can be shared.)
- Use a different means of identifying your Sales Teams,
such as, ST1, ST2, ST3. Sales Team IDs are not Signon
IDs, but are used to classify Sales Team information
where it is needed.
Using 1JC, 2JC, 3JC is acceptable, but we advise
assigning distinct, different IDs, derived perhaps from the
user's name. For example, JM for John Miller, SD for
Sally Douglas, and JMC for Jayne McCaul.
 You cannot use "System" or "Admin" for
your ID. These are reserved words.
You cannot use "System" or "Admin" for
your ID. These are reserved words.

Using The Operator ID
When your Operators have been set up, you can use the
Operator ID in many places in Collect! to customize routines
and direct them to a particular Operator's attention. This
pertains to the WIP ( Work In Progress) To Do List, assigning
accounts, building Sales Teams, running Contact Plans,
assigning commission rates, and other procedures.
Personal Information
Fill in the personal information fields as needed. If the Operator
has an Email address, put that in the Email field and Email can
be sent to the Operator.
Refer to the F1 Help for details about these fields.
Type
There are various types of user that can be chosen. Each of
these results in a different series of events when the Operator
signs into Collect!.
SYSTEM takes the user to the Main Menu upon signing on.
COLLECTOR takes the user directly to the WIP list when
signing on. Other settings can be chosen in the WIP Options
to affect how the Operator works the WIP list.
DIAL OPERATOR begins to dial contacts for this Operator as
soon as they sign in, provided Auto Dialer is installed and
set up.
CLIENT takes the user directly to a Client record that is
specified in the Operator form field labeled Client #.
This field appears when you select Client for the Operator Type.
If the Client does not exist, the user is not admitted to Collect! no
matter what User Level you select. The Client Type Operator
can only see accounts belonging to the Client # you select.
The Browse Find By functionality for Client Operators
is tied to a hierarchical client ownership system that also allows
you to use the "Owned by Client" in the Client form. Clients who
own other clients will be able to see all records in their
hierarchical tree, but no others. Please refer to Help topic,
Enabling Your Clients to Browse for Records.
WEB HOST opens Collect! in Web Host mode when this
Operator signs on. Additional settings may be chosen in
the Operator Detail and Operator Security sections.
SCHEDULER opens Collect! in Scheduler mode when this
Operator signs on. This setting displays the Scheduler as
soon as the operator signs in, allowing you to set tasks
to be performed automatically, such as database snapshot,
import routine, recalculate totals, and print report. Please
refer to Help topic, Scheduler, for details.
SALES TEAM is not used to sign on an Operator. The ID
is used to calculate commissions shown on the Debtor
form. It is not a valid Signon ID. When you select
Sales Team, other fields become visible on the Operator
form where you can set up the team members.
The Sales Team Operator Type can be used
for account access security. Please refer to Help topic,
Account Access Control for details.
Sales Team
Create an Operator form for each of your Operators, assigning
each of them a unique ID. Then you can create a Sales Team
form with its own Sales Team ID and add the Operators to
the team.
Before a Sales Team is constructed, each
Operator must have their own Operator form filled out with
a unique ID.
Sales Teams provide a convenient way to keep track of
commissions owed to a group of your operators. A Sales
Team has its own ID. We recommend that you use a code
such as ST1, ST2, or TM1, TM2, to designate a Sales Team.
You should try to make the ID distinctly different from your
individual Operator IDs so that you can clearly identify
Sales Teams.
When the Sales Team choice is selected, fields appear on
the Operator form to hold Sales Team information. Operators
are listed in the Sales Team fields by their unique
individual ID. This can be chosen from a drop-down box.
Enter the Sales Team ID in the Debtor's form. Any
commissions will be calculated and divided up among the
Sales Team members using the commission percentages
recorded in the Sales Team information on the Operator form.
Sales Teams also provide a way to group Operator IDs for
account security purposes. This can be used with
Account Access Control to restrict access to accounts
based on Team ID or nested Teams.
Before a Sales Team is constructed, each Operator
must have their own Operator form filled out with a unique ID.
Operator Details
In the Operator Detail tab:
Messaging
Although you may have users that are very experienced, it is
advised to choose NORMAL level, at least at first, to give more
prompts and messages for error checking. Records can be
deleted without confirmation if you choose the Expert level,
but this is not without risk!
NORMAL
You should choose the Normal setting for your Operators so
that they are alerted before records are deleted. It is very
easy to make mistakes. You want to give your users a
chance to catch them.
Use Softphone For Dialer
You can use a softphone for your Collect! auto dialed calls.
Switch ON "Use softphone for dialer" and put the softphone
protocol prefix in the Note 2 field. Collect! will use this
softphone for all the Operator's auto dialed calls.
This requires that your operating system is set up to handle
the softphone protocol of your choice.
Please refer to Help topic, Softphone for more information.
Disable Popup Help
You can disable popup help at the Operator level. It can
still be enabled if needed by pulling down the Help menu
and choosing Enable popup help.
Allow Browser Signon
This switch is used to activate the Operator's access to
Collect! over the Internet using Web Host. When the
Operator attempts to connect to Collect! to enter new
information or view existing accounts, Collect! verifies that
this switch is ON for the Operator before allowing them to
access the database.
Please refer to Help topic, Web Host for more information.
Automatic Recalc
Switch this ON for any operator. This will force Collect! to
recalculate an account whenever the operator opens a
Debtor form. This will ensure that, when you are viewing
the account form, all dollar amounts are current and up to
date.
Perhaps an operator does not need to see updated
financial information when viewing an account. Then you
may choose to leave this switched OFF. If you have many
users, you may prefer to switch it OFF to optimize your
network resources for increased performance.
If you do not use Automatic Recalc, there are several
other options for recalculating dollar amounts to bring
account balances up to date.
You may use the Tools menu, Recalculate option at
any time to bring all account balances up to date.
You may use the RECALC button on the Debtor form
to recalculate the dollar amounts for the account you
are viewing.
Printing
Various printing options are available, as explained in F1 help.
The settings here override the global switches set in the
Report and Printer Setup. This is useful, for instance, if you
want to assign certain reports or certain types of printing to
one Operator's queue and not affect the general printer setup.
Operator Email
In the Operator Email tab:
Enable SMTP
Select this to switch ON Simple Mail Transfer Protocol, a
standard mail transfer protocol that Collect! can use with
the Email feature. This setting is switched ON when sending
HTML emails. Please refer to How To Send Email As HTML
for details.
Operator Security
In the Operator Security tab:
Enable Verification
This feature gives you the ability to force verification of
field data. Switch this ON when you want the operator to
confirm important information in a certain field before they
can exit a form. This is very useful for confirming data or
simply to make sure the operator has important information
that you need. There are a few steps necessary to set up
this procedure. Please see Help topic,
Prompt To Verify Field On Exiting A Form for details.
User Levels And Security
There are many possibilities for using the Security section.
User Level is the primary way to limit or grant access to areas
of your system. There are also several other settings that can
be used to control access to accounts in many different ways
to suit your needs. Please refer to Help topic,
Account Access Control, for details.
You should only use User Level 99 for administrative
purposes. Assigning a User Level 99 may result in losing
functionality that relies on Collect!'s access rights system.
If you attempt to set an Operator's user level to 99,
Collect! will display a cautionary message.
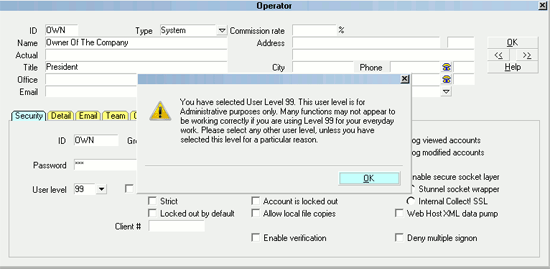
Setting User Level 99
Operators who sign into Collect! at user level 99 will
see a similar message.
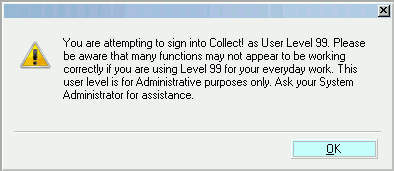
Signing on with User Level 99
The Operator 99 shipped with Collect! does not display
this message. That is, Operator ID 99, User Level 99.
You can change the Password for ID 99 and Collect!
will not display the message, as long as you are using ID 99
with User Level 99. Any other use of user level 99 displays
the cautionary message.
When creating a new operator, Collect! prompts about
entering a password if you attempt to leave the form
without creating a password.
You cannot use the reserved ID "system"
or "admin". Also, you cannot use a password
of ******** ( 8 asterisks).
If an error occurs when you create a Password, you
will be sent back to the Operator form to correct the
error. You can still leave the Operator without correcting
the error by pressing ESC on your keyboard.
Adjusting User Rights
When you set up each operator, it is best to choose a
User Level that most closely fits the access rights you
want this operator to have. However, you may discover that
they cannot access certain areas that they need or maybe
they can view forms they need not see, or they can
change data in fields you want left alone. You can fine tune
the user's permissions to suit your needs.
Every Operator must have a User Level assigned.
Please refer to How To Set Field Or Form Properties for
guidelines on customizing user rights.
Planning User Levels
Setup of Operators uses the Collect! feature User Levels.
By means of these levels, your users can be monitored to
access only the areas of Collect! they need to, to change
only the information that they must, to view only the data
and forms that pertain to their work. You can guide users
to the areas that they should address, displaying records
tailored to their work load.
Users that need to access more of your system's forms
and data can easily be set up to do so.
It is recommended that you plan before assigning
User Levels. What tasks do your different workers do? What
do you want them to be able to do in Collect!? Do you have
a good idea of the Access Rights each User Level allows?
It is recommended that you try out the User Levels that
are supplied before you create your own.
Please refer to User Level Samples for more details.
You must sign out of Collect! completely, returning
to the Desktop, whenever you change to a different User Level,
or some of the rights from the previous level that you were
signed in as may still be in effect.
WIP Settings
Operator level settings can be saved as a configuration (CFG)
file when you are setting up your operators. You can also
set the configuration for all operators of the same User Level
once you have saved the CFG file for one of the operators of
that user level. Please see Help topic Copy Operator Configuration
for details.
See Also
- How To Start Using Collect!
- User Level Samples
- Account Access Control
- Enabling Your Clients to Browse for Records
|
Was this page helpful? Do you have any comments on this document? Can we make it better? If so how may we improve this page.
Please click this link to send us your comments: helpinfo@collect.org