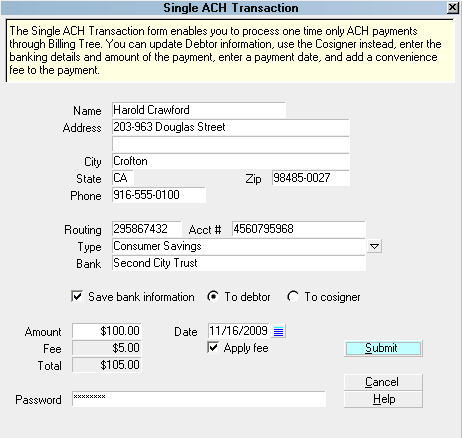
Single ACH Transaction
The Single ACH Transaction screen allows you to submit
a one-time ACH payment for an individual debtor. From
this screen you can:
- update Debtor information
- create a Cosigner Payer
- enter the details
- enter the amount of the payment
- enter a payment date
- add a convenience fee to the payment
Single ACH Transaction
To access this screen, click the ACH button in the lower
right corner of the main debtor screen. You will see
two choices in the menu ACH PAYMENT TASKS popup.
Choose RUN A TRANSACTION to enter the SINGLE ACH
TRANSACTION window.
Or
Choose RECURRING PAYMENTS to enter a post-dated
ACH arrangement.
When you post a single ACH payment, the transaction is
written in Collect! immediately and uploaded to Billing
Tree, and processing confirmation is returned to Collect!.
If the transaction is later charged back for any reason,
the Reconciliation process will write a reversal. A
separate transaction for the convenience fee, if applicable,
is also posted in Collect! and processed same day.
When you run Reconcile ACH History from the menu path
" Daily Administration\ Payments and Charges\Reconcile ACH",
transactions which are due for processing in the date
range since your last reconciliation are uploaded while any
chargebacks or new payments made directly on the ACH portal
are downloaded. Any unmatched transactions are written to
an exception report located in the path CV11\bin\BillingTree\ACH.
 We recommend that sites run their Reconcile ACH History
daily. Multiple times per day is permissible; no
duplication of payments or reversals can occur.
We recommend that sites run their Reconcile ACH History
daily. Multiple times per day is permissible; no
duplication of payments or reversals can occur.
 Users of CV11.6.2.7 and higher who are also licensed
for the Scheduler Module now have an enhanced automation
with the addition of the Reconcile process being added
to the Scheduler Task list of options. You may run this
process offline and unattended. Contact us at
sales@collect.org for module pricing.
Users of CV11.6.2.7 and higher who are also licensed
for the Scheduler Module now have an enhanced automation
with the addition of the Reconcile process being added
to the Scheduler Task list of options. You may run this
process offline and unattended. Contact us at
sales@collect.org for module pricing.

Name
Enter the payer's name if it is different
from the debtor name already displayed.
By default, this field is filled with the
Name from the Debtor screen. You can edit this
name as needed for the transaction. If you
choose to save this information, the system
will update the Debtor screen for you. If
it is a third party payer with a different
name than any responsible party on the debt,
select "To Cosigner". The system will save
this information by creating a new Cosigner
window with the Class ACH Payer. This Class
must exist in your Cosigner pick list. Older
versions of Collect! use "Other" as the Class.
Address
Enter the payer's Street Address. By default,
this field is filled from the Debtor screen.
By default, this field is filled with the
Address from the Debtor screen. You can
edit this as needed for the transaction.
If you choose to save this information,
the system will update the Debtor screen
for you. If you are entering the info for a
third party payer, the system will include
this address.
Address 2
This is an optional second Address line.
By default, this field is filled from the
Debtor screen.
By default, this field is filled with the
Address 2 from the Debtor screen. You can
edit this as needed for the transaction. If
you choose to save this information, the
system will update the Debtor screen for
you. If you are entering the info for a
third party payer, the system will include this
Address 2.
City
Enter the payer's City. By default, this
field is filled from the Debtor screen.
By default, this field is filled with the
City from the Debtor screen. You can edit
this as needed for the transaction. If you
choose to save this information, the system will
update the Debtor screen for you. If you are
entering the info for a third party payer,
the system will include this City.
State
Enter the payer's two character State code.
By default, this field is filled from the
Debtor screen. This is a required field by
the correct 2-digit code.
By default, this field is filled with the
State from the Debtor screen. You can edit
this as needed for the transaction. If you
choose to save this information, the system
will update the Debtor screen for you. If
you are entering the info for a third party
payer, the system will include this State.
ZIP
Enter the payer's ZIP code. By default,
this field is filled from the Debtor
screen. Make sure your zip is valid.
Billing Tree REJECTS records with invalid zip
codes.
By default, this field is filled with the
Zip from the Debtor screen. You can edit
this as needed for the transaction. If you
choose to save this information, the system
will update the Debtor screen for you. If you
are entering the info for a third party payer,
the system will include this Zip.
Phone
Enter the payer's Phone number. By default,
this field is filled from the Home phone
number on the Debtor screen.
By default, this field is filled with the
Phone from the Debtor screen. You can edit
this as needed for the transaction. If you
choose to save this information, the system
will update the Debtor screen for you. If
you are entering the info for a third party
payer, the system will include this Phone.
Routing
Enter the Routing number for the Bank
that this ACH payment will be drawn from.
This is a 9-digit number and must match
the routing number of the payer's bank.
When this transaction is processed, it is
stored in the Debtor Detail Tab, in the
ABA field, or stored to the Cosigner, if
you choose to "Save bank information".
Acct #
Enter the payer's Bank Account Number.
This must be the account that the ACH
payment will be drawn from.
When this transaction is processed, it
is stored in the Debtor Detail Tab,
Account field, or to the Cosigner, if
you choose to "Save bank information".
Type
Select the Type of bank account from the
pick list provided.
When this transaction is processed, it
is stored in the Debtor Detail Tab,
field label Detail 1, or to the Cosigner,
if you choose to "Save bank information".
Bank
Enter the name of the Bank this ACH payment
will be drawn from.
When this transaction is processed, it is
stored in the Debtor Detail Tab, Bank field,
or to the Cosigner, if you choose to
"Save bank information".
Save Bank Information
Activate this option with a check mark
if you want to save the entered bank
information to the debtor's Detail Tab,
or to the Cosigner window.
To Debtor
This option will update the information
on the Debtor account and in the Debtor
Detail Bank, Account, ABA and Detail 1
fields, if you choose to "Save bank
information".
This does overwrite any information that
is presently entered into any of the target
fields.
To Cosigner
Clicking the radio button for Cosigner
will only be permitted if you have entered
a name that is different from the auto-filled
primary debtor name. This will create a Cosigner
window if you choose to "Save bank information".
Amount
Enter the Amount of the ACH payment you are
about to process.
Date
Select the payment Date of the ACH payment
you are about to process.
Fee
This field displays the amount of the
Convenience Fee.
This field is Read Only. You must check
the "Apply fee" box for the amount of the
convenience fee to auto-fill. Unless
you have enabled each client to allow
ACH convenience fees, the Fee amount
will remain blank and the "Apply fee"
check box will also be Read Only and
not accessible. See Advanced Client
Settings for more information.
Apply Fee
Check this ON to activate the convenience
fee for this transaction and invoke display
of the fee amount to be applied when the
payment is processed.
If you have not enabled convenience fees
for this Client, then the Apply Fee
field will be greyed out. Please refer to
Advanced Client Settings for details.
Total
This is the total amount that will be drawn
from the bank account used for this transaction.
This includes the amount for the convenience fee,
if applicable.
The fee transaction is posted separately from
the payment amount. The Total displayed is
the sum of both the payment and the
convenience fee amounts being withdrawn
from the debtor's bank account for this
transaction.
Password
This is your Billing Tree ACH Password. This
is prefilled for you automatically after you
have entered it for the first time for the
current session.
Help
Select the HELP button for Help on Single ACH
Transaction and related topics.
Cancel
Select the CANCEL button to close this
screen without submitting the payment to
Billing Tree.
Submit
Select the SUBMIT button when you are sure
that you have entered all the required
information correctly for the payment you
are about to process.
When you select SUBMIT, the payment will be
posted in Collect! and processed by Billing
Tree when your company next runs "Reconcile
ACH History".
You must run daily reconciles to keep your
transaction uploads to Billing Tree current
and your records up-to-date with NSFs received
by Billing Tree along with external payments
which debtors may be making directly on the
ACH Gateway.
Transaction Details
After you have successfully processed a
single ACH payment, you can view the resulting
posting immediately in the Transaction Tab of
the debtor account. You will receive a unique
Reference Number in the User 2 field of the
Transaction Detail Tab when ACH has cleared
a payment. The Transaction Tab will also
have a posting of the convenience fee,
if applicable.
NSF Payments
When you reconcile ACH history, the module
will download any reversals for payments not
yet received in Collect!. Reversals would be
any transaction which failed to clear, such as an
NSF, Stop Payment or Hold. The convenience
fee is also reversed provided your ACH Setup
window contains reversal transaction type
codes to be used.
See Also
- Billing Tree Topics
|
Was this page helpful? Do you have any comments on this document? Can we make it better? If so how may we improve this page.
Please click this link to send us your comments: helpinfo@collect.org