Single Credit Card Transaction
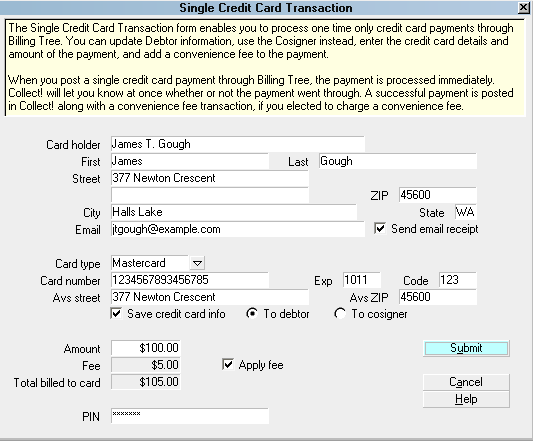
The Single Credit Card Transaction screen enables you to
process one time only credit card payments. It can update
demographics on the account as well as store limited, PCI
compliant amounts of data about the card and pertinents
about the transaction itself.
To access this window, click the Credit Card button in
the lower right corner of the main Debtor screen and choose
"Run a Transaction".
The payment is uploaded immediately to the Billing Tree
Gateway. If it is a current dated payment, it will be
confirmed right away. If it is a future dated payment, it will
be stored as a payment pending on the Billing Tree portal.
Payments having reached their due dates are submitted at Billing
Tree's end of day for processing/approval through their
USA ePay account.
Single Credit Card Transaction
Click Submit to send the credit card payment to the Gateway.
Card Holder
Enter the card holder's name if it is different
from the name already auto-filled for you.
By default, this field is filled with the
Name from the Debtor screen. You can edit
this as needed for the transaction. If you
choose to save this information, the system
will update the Debtor screen for you. If
you are entering the info for a third party
payer, the system will include this Name.
Choose "To Cosigner" and the system will
save this information by creating a new
Cosigner window with the Class of "CC Payer".
Older versions of Collect! use "Other"
as the Class. This will allow you to
distinguish the difference between a
responsible party and a potential unresponsible
payer on the account.

First
Enter the payer's First Name as it appears
on the credit card that is being used for
this payment.
Last
Enter the payer's Last Name as it appears on the
credit card that is being used for this payment.
Street
Enter the payer's credit card Billing Street
Address. By default, this field is filled
from the Debtor account information.
You can edit this as needed for the
transaction. If you choose to save
this information, the system will update
the Debtor screen for you. If you are
entering the info for a third party payer,
the system will include this Address.
Choose "To Cosigner" and the system will
save this information by creating a new
Cosigner window with the Class of "CC Payer".
Older versions of Collect! use "Other" as
the Class.
City
Enter the payer's credit card Billing
address City. By default, this field is
filled from the Debtor account information.
You can edit this as needed for the
transaction. If you choose to save this
information, the system will update the
Debtor screen for you. If you are entering
the info for a third party payer, the system
will include this City. Choose "To
Cosigner" and the system will save this
information by creating a new Cosigner
window with the Class of "CC Payer". Older
versions of Collect! use "Other" as the Class.
State
Enter the payer's two character credit card
Billing address State code. By default,
this field is filled from the Debtor
account information. This is a required
field and must be a valid 2-digit code.
You can edit this as needed for the
transaction. If you choose to save
this information, the system will update
the Debtor screen for you. If you are
entering the info for a third party payer,
the system will include this State. Choose
"To Cosigner" and the system will save this
information by creating a new Cosigner
window with the Class of "CC Payer". Older
versions of Collect! use "Other" as the Class.
ZIP
Enter the payer's credit card Billing
address ZIP code. By default, this field
is filled from the Debtor account
information. This is a required
field and must be a valid zip. Billing
Tree REJECTS submission if the zip is not
valid.
You can edit this as needed for the
transaction. If you choose to save this
information, the system will update the
Debtor screen for you. If you are entering
the info for a third party payer, the
system will include this Zip. Choose
"To Cosigner" and the system will save
this information by creating a new Cosigner
window with the Class of "CC Payer". Older
versions of Collect! use "Other" as the Class.
Email
Enter the payer's EMAIL address. By
default, this field is filled with
the Email address from the Debtor account
information.
You can edit this as needed for the
transaction. If you choose to save this
information, the system will update the
Debtor screen for you. If you are entering
the info for a third party payer, the system
will include this email. Choose "To
Cosigner" and the system will save this
information by creating a new Cosigner
window with the Class of "CC Payer". Older
versions of Collect! use "Other" as the Class.
Send Email Receipt
Switch this ON with a check mark to send
an email receipt to the card holder when
the credit card payment is processed.
Card Type
Select the Card Type from the pick list
attached to this field.
Card Number
Enter the 16-digit Credit Card Number for
the card that is being used for this payment.
Exp
Enter the credit card Expiry Month and Year
with no spaces, i.e. 1216 for December 2016.
Code
Enter the 3 or 4-digit CVV number found on
the back of the payer's credit card, beside
their signature.
AVS Street
The Address Verification Service Street
is included so that Billing Tree can
verify that the street address of the payer
matches the zip code of the payer.
Enter the correct street address for the
payer if it isn't already pre-filled to
match the Billing street address of the
payer.
AVS ZIP
The Address Verification Service Zip
is included so that Billing Tree can
verify that the street address of the payer
matches the zip code of the payer.
Enter the correct zip code of the payer if
it isn't already pre-filled to match the
Billing address zip code of the payer.
Save Credit Card Info
Choose this option with a check mark if you
want to update your records with the
information you have filled in for this
transaction. You can save the information
to the Debtor or create a new Cosigner
with the Class designation of "CC Payer". Older
versions of Collect! use "Other" as the Class.
This switch is optional for Single Credit
Card Transactions and is pre-filled checked
for Recurring arrangements as the information
must be sent and stored on the Billing Tree
Gateway to allow future payments to process.
To Debtor
Check this radio button to save the updated
information from this transaction to the
debtor. This radio button will auto-check itself
if the debtor name is recognized as being
in the Name field. Additional information will
update from the transaction will also update
to the Debtor Detail Tab if you choose to
"Save credit card info."
Please be aware that this does overwrite any
information that is currently stored in the
Debtor Detail 2 and Debtor Detail 3 fields.
To Cosigner
Choose this option by clicking the radio
button to save the updated Payer
information from this transaction to
Cosigner. This option will create a new
Cosigner with Class "CC Payer", if you
choose to "Save credit card info". Older
versions of Collect! use "Other" as the
Class. Personal information and redacted
card information will be stored in the
Cosigner fields.
Amount
Enter the Amount of the credit card
payment you are about to process.
Fee
This field displays the amount of the
Convenience Fee.
This field is Read Only. The amount is set
in the Transaction Type that you set up to
use for your credit card convenience fees.
Please reference the Credit Card Setup
topic for details.
You must enable convenience fees for
each client. Refer to Advanced Client
Settings for details.
If you have set up a Transaction Type
to charge the fee, it will auto-populate
when you check the Apply Fee switch. It
will show the amount but not include it in
the Total if you have not checked the Apply
Fee box.
Apply Fee
Switch this ON with a check mark to charge
a credit card convenience fee when this
payment is processed.
If you have not enabled convenience fees
for this Debtor's Client, then the Apply
Fee field will be greyed out. Please
reference to Advanced Client Settings
for details.
If the client is enabled for convenience
fees but you elect not to charge them on
this transaction, then simply do not check
the Apply Fee box. It will show the amount
of fee that could be charged but it will
not include the amount in the final Total.
Total Billed To Card
This is the sum total amount billed to the
credit card for this transaction, inclusive
of convenience fee, if applicable.
The fee transaction is posted separately
from the payment amount in Collect!. The
Total is the single line item that will
appear on the Debtor's credit card statement
from their provider.
PIN
This is your Billing Tree PIN. The module
auto-fills this in for you after you have
entered it for the first time for the current
session.
Help
Select the HELP button for Help on Single
Credit Card Transaction and related topics.
Cancel
Select the CANCEL button to close this
window without submitting the payment to
Billing Tree.
Submit
Select the SUBMIT button when you have
completed entering the requisite fields.
If you have missed a mandatory field or
entered invalid data (i.e. zip code), you
will receive a popup advising of why the
transaction(s) cannot be submitted. Simply
follow the directions and resubmit.
Transaction Details
After you have successfully Submitted a transaction
for a single credit card payment, you can view
the results in the debtor's Transactions Tab.
The convenience fee, if applicable, will also
appear as a transaction item in the Tab. The
Transaction Detail tab for each separate
transaction contains the approval confirmation
details of each transaction processed
successfully by Billing Tree.
See Also
- Billing Tree Topics
|
Was this page helpful? Do you have any comments on this document? Can we make it better? If so how may we improve this page.
Please click this link to send us your comments: helpinfo@collect.org