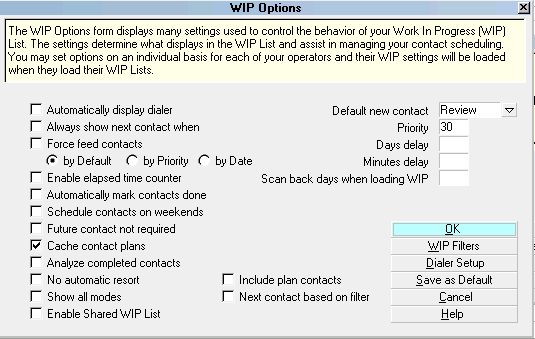
WIP Options
The WIP Options form displays many settings used to
control the behavior of your Work In Progress (WIP) List.
The settings determine what displays in the WIP List
and assist in managing your contact scheduling. You may
set options on an individual basis for each of your operators
and their WIP settings will be loaded when they load
their WIP Lists.
The WIP Options settings are enabled only when accounts
are worked through the WIP List.
WIP Options
To access this screen:
- From the Work In Progress window, click the Reload button,
then WIP Options.
- From the Main Menu, click the Work in Progress button in
the left side bank of buttons, which will navigate you to the
Work In Progress window. The proceed as above to click the
buttons for Reload, followed by WIP Options.
- To access the system default settings, the menu path is
"System\ Preferences\ Plans and Reference Tables\WIP Options".
Automatically Display Dialer
Switch ON 'Automatically display dialer' to start the phone
dialing process automatically whenever you move onto a
Phone contact in your WIP List. This switch only works
with Phone contacts in the WIP List.
When this switch is OFF, you will have to go to the account
and press F2 on the phone number you wish to phone, or
select the phone icon beside the field.
To start dialing as soon as you move onto an account,
switch this ON. In the Auto Dialer Preferences form,
switch OFF 'Prompt before dialing and switch ON 'Dial
in background'.
 To use this feature, your system phone dialer
must be properly configured and functioning
outside of Collect!. If you can dial a number
using the Windows Phone Dialer, then you
can also dial using Collect!.
To use this feature, your system phone dialer
must be properly configured and functioning
outside of Collect!. If you can dial a number
using the Windows Phone Dialer, then you
can also dial using Collect!.

Always Show Next Contact When
Switch ON 'Always show next contact when' to
display the Schedule Next Contact - Pending form
whenever you exit from the Debtor form. This is
enabled only when you are working accounts from
your WIP List.
When finished working one debtor, you may move to the
next contact in the WIP list. Collect! will display details
of the next pending contact in the Schedule Next
Contact - Pending form before you are allowed to move
off the account. This provides an opportunity to modify
the next contact before the debtor is dropped from
your current WIP list.
If you turn this switch OFF, Collect! will not display
the details of the next pending contact before exiting
from the account.
 You can switch ON 'Next contact based on
filter' and use the WIP Reload Filters form
to set up the types of contacts to display
as pending contacts.
You can switch ON 'Next contact based on
filter' and use the WIP Reload Filters form
to set up the types of contacts to display
as pending contacts.
Force Feed Contacts
Switch ON 'Force feed contacts' to control the order
in which operators work the contacts in their WIP List.
The operator must work down the list sequentially. No
matter which contact is selected in the WIP List, Collect!
will always display whatever account is next in line
sequentially.
You can also select the order that Collect! will use when
displaying contacts in the collectors' To Do List.
When this switch is OFF, an operator has the ability to
pick and choose which contacts to work next.
When this switch is ON, Collect! will prompt
the user that an account must be worked.
By Default
A dot in this radio button will cause Collect! to load the
WIP List sorted according to Collect!'s default behavior.
Contacts with today's date will be first, then dates from
oldest to newest.
Contacts with the same Date will be sorted by Priority,
from oldest to newest. Contacts with the same Priority
will be sorted by Name and then by Type.
Timed contacts always go below normal
contacts and are sorted by Time.
By Priority
A dot in this radio button will cause Collect! to load the
WIP List sorted by Priority from highest to lowest.
Contacts with the same Priority will be sorted by Date,
from oldest to newest. Contacts with the same Date will
be sorted by Type and then by Name.
Timed contacts always go below normal
contacts and are sorted by Time.
By Date
A dot in this radio button will cause Collect! to load the
WIP List sorted by Date from oldest to newest.
Contacts with the same Date will be sorted by Priority
from highest to lowest. Contacts with the same Priority will
be sorted by Type and then by Name.
Timed contacts always go below normal
contacts and are sorted by Time.
Enable Elapsed Time Counter
Switch ON 'Enable elapsed time counter' to record
the length of time an operator spends on each
contact in the WIP List. If the operator stays on an
account longer than 15 seconds, or changes something
on the Debtor form, the elapsed time will be recorded
in the current contact when the operator exits from
the account.
This information can be used in reports for performance
tracking and troubleshooting. For example, you can
easily determine areas where your operators are
spending the most time, which types of contacts require
more time, or accounts that consistently take additional
time.
This feature is enabled only when you work contacts
from the WIP List. If you are browsing a debtor, and
you view, or work, a contact found in this way, the
elapsed time will not be recorded.
Automatically Mark Contacts Done
Switch ON 'Automatically mark contact done' to
automatically mark each contact as completed when you
are finished working it. When you exit from working a
debtor in your WIP list, Collect! will remove the contact
from your To Do List and record the date and time the
contact was marked done.
When this switch is OFF, Collect! will prompt when you have
finished working a contact. You may choose to complete it
or leave it in your WIP List.
Collect! thinks you worked a debtor when
anything changes in the account. You might
change the address, write notes or schedule
a Contact plan. If you do any of these things,
Collect! thinks you have worked the account.
If you just look at a debtor, Collect! knows
you didn't change anything and doesn't
mark the contact as done.
Schedule Contacts On Weekends
Switch ON ' Schedule contacts on weekends' if you
want Collect! to schedule contacts on Saturdays and
Sundays when you run a contact plan.
Typically, when you run a contact plan, all dates are
calculated from the current date. If this switch is OFF,
a planned contact that would have fallen on a Saturday
or Sunday will be rescheduled for the following Monday.
For example, if this switch is ON and you have a plan
that sends a letter today and schedules a review in 10
days, the review may land on a Sunday when you're at
home relaxing. If you do not work on weekends, even
on Saturday mornings, turn this switch OFF.
Future Contact Not Required
Switch ON 'Future contact not required' to disable
Collect!'s contact checking functions. When this
switch in ON, Collect! lets you exit from a debtor,
even when no future contacts are scheduled for the
account.
Normally, every active debtor should have at least
one pending contact to ensure that the debtor is not
lost in the system. Leave this switch OFF to ensure
that Collect! checks for a future contact when you are
working your WIP List. If there is no future contact,
Collect! uses the WIP default settings to automatically
schedule a contact. The Schedule Next Contact - Pending
form appears so that you can confirm the contact date
and time.
CAUTION: When you switch this ON, you may
end up with debtors that become disenfranchised
from a WIP list if there is no manually set up
In Progress Contact Event by an Operator in the
types of Review, Promise, Phone or Other. To survey
the system for disconnected debtors, called
"Orphan" accounts in Collect!, click
"Tools\ Utilities\ Orphaned Account Search" and
follow the prompts.
Include Plan Contacts
Switch this ON with a check mark to consider Plan
contacts as valid future contacts. When this switch
is ON, Collect! will not display the Schedule Next
Contact - Pending form if there is an in progress
Plan contact on the account.
When this switch is OFF, Collect! will display the
Schedule Next Contact - Pending form, even if the
only pending contact on the account is an in progress
Plan contact.
This setting is only visible if you are not
using the 'Next contact based on filter'
switch.
Next Contact Based On Filter
Switch this ON with a check mark to define the
contacts Collect! considers as valid future contacts.
With the switch set, Collect! will use the settings
in the WIP Reload Filters to determine which types
of pending contacts it will search for when you are
finished working an account. Only the contact types
you have selected will be shown when the
Schedule Next Contact - Pending form is displayed.
Cache Contact Plans
Switch ON 'Cache contact plans' to cache contact plan events
locally. This increases performance and is especially
noticeable in multi user operations. The cache is not enabled
by default.
*** VERY IMPORTANT: If you intend to set security
levels on contact plans using the
Contact Plans Access Rights form, this
switch must be turned ON.
If you turn this switch ON, please remember to
turn it off when you edit your contact plans. The
cache is cleared when you close a database
and return to the Welcome To Collect! screen.
Analyze Completed Contacts
Switch ON 'Analyze completed contacts' to display
historical summary information about contacts that
have already been worked.
When this switch is ON, Collect! will analyze completed
contacts and display the results in the WIP graph in the
Work In Progress form. To limit the analysis to a specific
time period, enter a value into the 'Scan back days when
loading WIP' field at the bottom of the WIP Options form.
Switch this OFF to have Collect! work normally, scanning only
contacts that still need to be worked and loading them into
the WIP List.
Do not leave this switch ON by mistake or
the operator will see no contacts when they
load their WIP List. Switch it OFF and reload
to view the operator's contacts.
No Automatic Resort
Switch ON 'No automatic resort' to turn off the default
auto resort function in Collect!.
By default, whenever you update a contact in the WIP
List, Collect! tries to resort the list. When you go from your
sorted WIP List to an account and change something, that
would force a resort in the WIP List. So one minute you are
halfway down the list and the next minute you are at the
bottom of the list. This is due to the auto resort. With this
switch turned ON, you will return to your WIP List just as it
was.
Show All Modes
Switch ON 'Show all modes' to load contacts in your WIP
list for accounts with CLOSED and PRECOLLECT modes, as
well as contacts for ACTIVE accounts.
By default, whenever you load the WIP List, only contacts
for ACTIVE accounts are displayed. Show All Modes is
intended for managers who may need to examine contacts for
CLOSED and PRECOLLECT accounts. Normally,
operators should be looking at only contacts for ACTIVE
accounts in their WIP Lists.
Enable Shared WIP List
Switch this ON to enable the Shared WIP Processor.
This is used when you want more than one operator
to work the same WIP List. Operators will quickly
and automatically move to the next available contact
in the WIP List whenever the current WIP is completed
or is being worked by another worker.
Please refer to Help topic, Shared WIP Processor for
more information.
Default Values For New Contacts
When you work your WIP List, Collect! notices if there is no
pending contact for the debtor. Collect! prompts you with the
Schedule Next Contact - New form to create a new contact
with the default values you select in the following settings.
Several settings can be set. Collect! uses these as defaults
whenever a new contact is created, either manually or
through the Schedule Next Contact - New form. Contacts
scheduled when you run a contact plan DO NOT use these
default values.
The settings are:
Default New Contact
Priority
Days Delay
Minutes Delay
These are described below.
Default New Contact
The 'Default new contact' field shows the contact Type
Collect! will create for you by default, whenever you
create a new contact. When Collect! prompts you
with the Schedule Next Contact - New form to create
a new contact, this will be the contact Type displayed
for you.
The contact Type may be modified if needed, when you
create the contact.
Select the down arrow or press F2 to pick from the list
of contact types.
Priority
The 'Priority' field shows the Priority Collect! will assign,
by default, whenever you create a new contact. When
Collect! prompts you with the Schedule Next Contact - New
form to create a new contact, this will be the contact
Priority displayed for you.
The contact Priority may be modified if needed, when
you create the contact.
Priority levels are as follows:
66 to 99 - High
34 to 65 - Medium
1 to 33 - Low
Days Delay
The 'Days delay' field shows the number of days from
today that the next contact will be scheduled. This value
will be added to the current date, by default, whenever you
create a new contact. For example, if you enter 3 here,
the 'Due date' of the next contact will be the current date
plus 3 days. When Collect! prompts you with the Schedule
Next Contact - New form to create a new contact, the
Due Date will be based on the value entered here.
The contact Due Date may be modified if needed, when
you create the contact.
Minutes Delay
The 'Minutes delay' field shows the number of minutes in
the future that the next contact will be scheduled. This value
will be added to the present time, by default, whenever you
create a new contact. For example, if you enter 30 here,
the 'Time' of the next contact will be 30 minutes from now.
When Collect! prompts you with the Schedule Next
Contact - New form to create a new contact, the Time will
be based on the value entered here.
The contact Time may be modified if needed, when
you create the contact. Leaving this blank schedules a
timeless contact.
Contacts that have a Time value set will pop up
when you move from contact to contact in your
WIP List. You'll be given a choice to go to the
timed contact or skip it.
Scan Back Days When Loading WIP
Enter a number of days to scan back when building your
WIP List. This limits the number of days the program
will scan back when loading contacts into your WIP List.
This shortens the load time, but limits historical analysis.
Leave this field blank to load all historical contacts.
If you enter 30, Collect! will load contacts from one
month ago up to today. Contacts older than 30 days
will be ignored. If you enter 60, the WIP loader will
only load contacts from 60 days ago up to today.
Any contacts outside that date range will be ignored.
OK
Select this button to save changes you have made
and return to the previous form. Collect! saves any
changes you have made into the collect.cfg file in
the Collect! program folder. Collect! will use the new
settings when loading the WIP List, unless a particular
operator has specific settings saved as default into
their own *.cfg file.
WIP Filters
Select the WIP FILTERS button to open the
WIP Reload Filters form where you can control
exactly the types of contacts and the number of
contacts to load into the To Do List. These settings
help to prioritize and organize your work.
Dialer Setup
Select the ' DIALER SETUP button to open the
Auto Dialer Preferences form where you can set or
modify parameters for your auto dialer.
Save As Default
The SAVE AS DEFAULT button is used when you are setting
WIP options for a specific user. Select this to save these
WIP settings for the current operator. These settings will
be used whenever the operator loads their WIP List.
When prompted, select YES. This creates a configuration
file for the operator in Collect!'s program folder. For
example, own.cfg would be created if you were using
operator OWN. Collect! looks for a .cfg file for the particular
operator when it loads the WIP List. If it doesn't find one, it
loads the collect.cfg instead with the global settings.
Saving these settings as your default also saves
your Auto Dialer and Printer settings, the WIP Options
and your current WIP Reload settings.
Once you have saved the Operator Configuration
for an operator, you can use the
Copy Operator Configuration feature, to set the
same settings for all operators in your system
with the same User Level.
Cancel
Select this button to ignore any changes you have
made and return to the previous form.
Help
Select this button for help on the WIP Options
form and links to related topics.
See Also
- WIP Options Basics - Introduction/Accessing
- How To Start Using Collect!
- Copy Operator Configuration
| 
Was this page helpful? Do you have any comments on this document? Can we make it better? If so how may we improve this page.
Please click this link to send us your comments: helpinfo@collect.org