Add An ODBC Data Source
When using ODBC clients, you can use your operating
system's ODBC Data Source Administrator to add data
sources and servers to access Collect! By default, the
instodbc utility provides you with access to RDS
and the RDM Server.
You may want to be able to access an additional Data
Source and an additional Server from the same client
station. To do this, it is necessary to add a Data Source
for the additional Server.
The steps involved are:
- Creating a Data Source
- Configuring the connect.ini to locate the Server
- Accessing the source using your ODBC client application
Create A Data Source
The easiest way to create a Data Source is to use
the instodbc utility as detailed
in Installing ODBC Drivers For CV11. This creates a
data source for RDS.
If you need to create an additional data source, you may
run the instodbc utility an additional time
to create a different data source, e.g. RDS2.
Example:
instodbc -a C:\CV11Client\bin RDS2
Or, use the operating system's ODBC Data Source Administrator
to create a User DSN and System DSN for your new
source, as outlined below.
1. Open the ODBC Data Source
Administrator through the Control Panel. Select the
Add button to create a new User DSN.
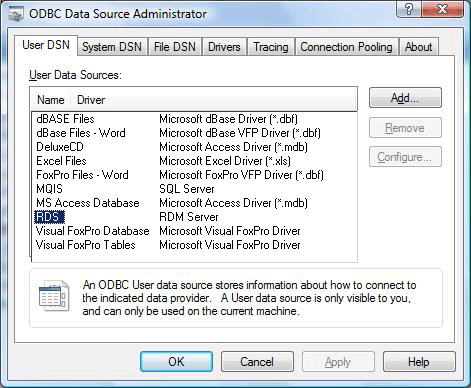
ODBC Data Source Administrator
Following the example of the existing RDS configuration,
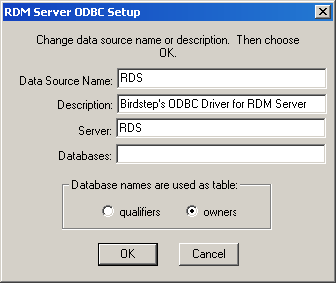
RDM Server ODBC Setup
2. Enter a new Data Source Name: RDS2
3. Enter the same Description: Birdstep's ODBC Driver for RDM Server
4. Enter a new Server name: RDS2
5. Database names are used as table: owners
6. Repeat these steps for the System DSN.
Next, it is necessary to configure the connect.ini to
locate the new data source.

Configure The Connect.Ini To Locate The Data Source
In your Windows or WINNT directory, on the client station,
you should have a connect.ini as outlined
in Installing ODBC Drivers For CV11. If not, copy one there, from
the CV11Client\bin folder of your workstation's CV11 application.
Open the connect.ini in a text editor. The first
block of text,
[RDS]
Protocol=tcp ;Comma separated list of protocols to try
Host=192.168.2.118 ;IP address of machine with server
Port=1530 ;Port the server is using (optional w/ host name)
defines the default location and settings for the RDM Server.
You need to add an entry for the RDS2 data source. It
is especially important that you enter the correct name
and the IP address for this second data source.
For example,
[RDS2]
Protocol=tcp ;Comma separated list of protocols to try
Host=192.168.2.122 ;IP address of machine with server
Port=1530 ;Port the server is using (optional w/ host name)
The top blocks of the connect.ini should resemble the
image below.
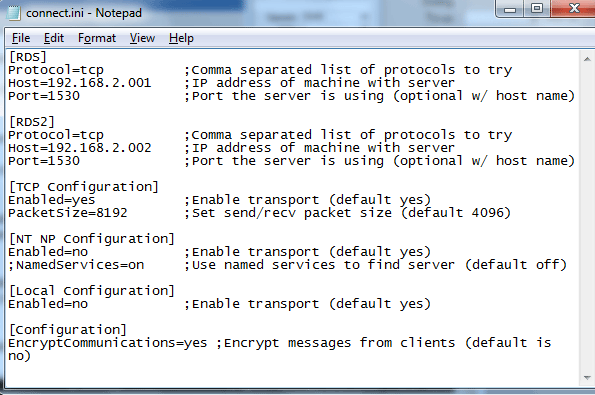
Two Servers In The Client Connect.ini
Access The Data Source With Your ODBC Client
You may now access either the server RDS at the IP address
Host=192.168.2.118 or the server RDS2 at the IP address
Host=192.168.2.122. If, for instance, you open MS Access
and attempt to link to tables in an ODBC Source, you will have
two choices, now - RDS and RDS2.
It is not necessary to rename the second server in
the rdmserver.ini or the Admin tool. It can
still retain its Server Name of RDS. What is important is that
an entry that matches the Data Source Administrator is entered
in the client station's connect.ini. The "Server"
entry in the RDM Server ODBC Setup must match the block
name in the connect.ini, i.e. Server: RDS2 in the Data Source
Administrator's RDM Server ODBC Setup and [RDS2] in
the connect.ini.
TECHNICAL:
You can also run the instodbc.exe from
a DOS prompt to create a new entry in the Data Source
Administrator. This process is described in the help
topic Installing ODBC Drivers For CV11.
SYNTAX: instodbc <options> <dll path> <Server Name>
We use [-a] for the options. The dll path is your CV11Client\bin
folder. We will use RDS2 for the server name. This results in a
command that looks like the following. Please substitute
a complete and correct path for "serverpath".
instodbc -a C:\CV11Client\bin RDS2
You should see a message "Support added" when you
execute this command. If you look in the Data Source
Administrator, there will be an entry for RDM Server RDS2.
Now there are two entries in the Data Source Administrator,
one for RDS and one for RDS2.
After this, you would proceed as above to configure
the connect.ini for this new data source.
RDM Server Options
You can select different RDM Server options from the Collect!
Signon form. You will see your new "RDS2" entry reflected
in the RDM Server pick list. This list reads the entries in the
connect.ini and displays them in a list. It does not affect your
ODBC connectivity.

Two RDS Servers in the Server Pick List
Please refer to Help topic, CV11 Server Options for details.
Troubleshooting
If you cannot connect after adding an ODBC data source,
the issue may be a "stale" setting in the registry. This
may happen if RDM Server drivers were previously
installed on the same machine. You may need to actually
open the registry and view the settings for the RDM Server
entry in the Software section. Please refer to the Help
topic, Remove an ODBC Data Source, in the "Remove
Via Regedit" section.
See Also
- ODBC Topics
|
Was this page helpful? Do you have any comments on this document? Can we make it better? If so how may we improve this page.
Please click this link to send us your comments: helpinfo@collect.org