How To Import Records
The Import Module lets you quickly and accurately load or update large numbers of accounts into
Collect! from other systems or your branch offices. Collect! includes a basic version of this module
that lets you lay out your data files to match any of the import maps shipped with the system to
bring new data into Collect! The unrestricted Import Module enables you to create and save your own
custom import maps that support your existing file layouts. The Import Module also allows a number
of automated processes performed on files being imported as part of the import process. Supported
formats: CSV, Fixed Length ASCII, or any other text-based format.
 Before running an import, you must already have an Import Map ( File Format Specification)
in your system. Please refer to the Help topic How to Create an Import Map for more
information.
Before running an import, you must already have an Import Map ( File Format Specification)
in your system. Please refer to the Help topic How to Create an Import Map for more
information.
Initiate The Import
 If you are running complex imports, you may want to backup your database before running the
import.
If you are running complex imports, you may want to backup your database before running the
import.
- Navigate to the Main Menu screen.
- Click the File menu, then Import/Export, then click Import File to display the Import Menu
screen.
- Select the Down arrow next to the field labeled File Format. The File Format Specification
list is displayed.
- Select Import Map that you would like to use.
- Review any fields that were auto-populated. If there are any errors, click the CLOSE button
to go back to the map and correct the issues. Possible errors:
- Wrong data in the fields
- Fields were populated that should have been blank (ignore the Starting File Number field)
- Fields were empty that should have been populated
- File Name: If a file name was specified in the Import Map, this will be populated; otherwise,
click the Browse button.
- On the Open Import File dialog box, navigate to the location of the file that you are
importing, then select the file, and click the Open button. Now the file and its location
will be displayed in the field labeled File Name.
- Client/Number: If a Client was specified in the Import Map, this will be populated; otherwise,
open either Client pick list and select the Client that you want to import the accounts to.
Not all Imports Maps require you select a Client. For example, if you are importing payment
files, skip trace results, or dialer results, the Import Map should already be setup to
key on a unique identifier like File Number. If your key is on Client Account Number, then
you would select a Client to create a combined key for the lookup.
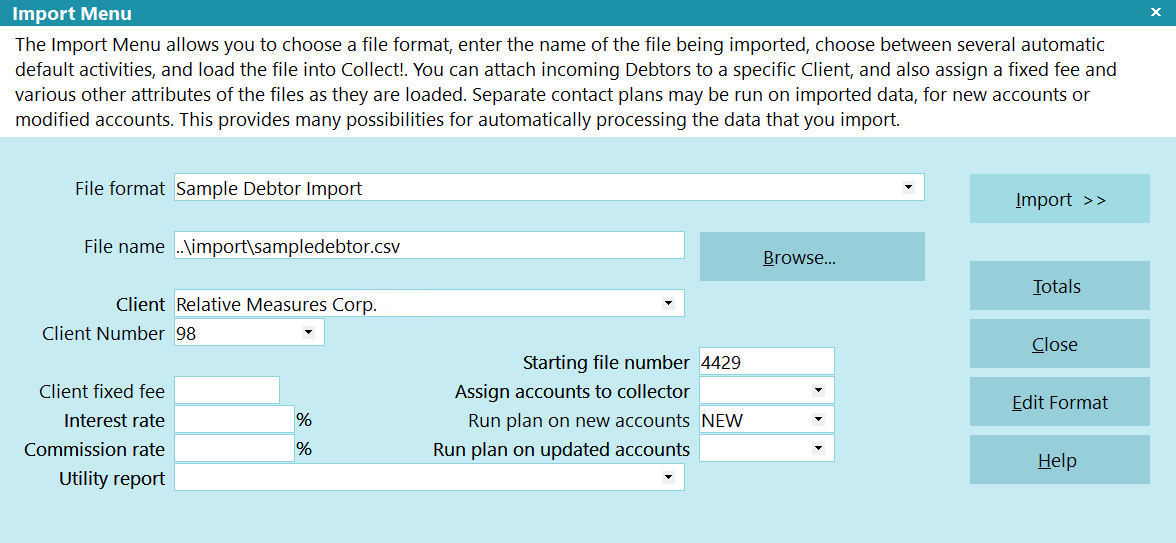
Import Menu Settings
- Select the Import button. You will see the first record that is being imported.
When you run an import, you will get the following prompt asking if you want to disable
record tagging. Select NO if you plan to run batch processing or recalc after the accounts
are imported.

Disable Record Tagging

Examining Records AS They Are Imported
When you import records, it is very important to examine the results that you are getting. For this
reason, the import routine pauses as each record is imported. This gives you an opportunity to refuse
the record, cancel the import, or proceed.
Notice at the bottom of the Collect! screen, in the status bar, that you are being prompted for a
response. In white letters, you will see Update Debtor? (Yes/No/All/Cancel) Do not
choose anything yet!

Debtor Record Being Imported
You may have to auto hide your Windows taskbar if it is hiding the status bar in Collect!.
You have four choices:
- Yes [y] accepts the record, imports it and displays the next record ready to import.
- No [n] refuses the record, skips it and displays the next record ready to import.
- All [a] runs the whole import with no more prompts.
- Cancel [c] aborts the importing routine. Whatever you accepted up to this point is imported.
Once an import begins, these are your only choices. We will always choose one of these
letters. Clicking on the screen with your mouse may cause import issues. This is not an
active form, but rather a snapshot for you to verify.
- If everything looks correct, press the y key on your keyboard to accept the
record. If there are errors, press the c key on your keyboard to cancel the
import and go back to correct the errors with the Import Map.
- The next record will now appear. Check for errors and proceed accordingly.
- Repeat this process until you have reviewed a large enough sample that is error free.
Typically an existing Import Map won't have errors. Error would appear if the data file
had unexpected data, or if a Client inserted or remove columns in the file.
- When you are comfortable that the import is working, press the y key on your
keyboard to import all remaining data.
- After the data has been imported, a summary window will appear. Review it and click OK.

Import Summary
- If you selected the Recalculate Accounts box on the Import Options, you will be prompted to
recalculate the debtors. If you imported dollar amounts, select the Yes button.
If you do not recalculate, you can always do it after the import. Select Tools from the top
menu bar and select Recalculate from the drop-down choices.
- After the import, close the window and check out the new debtors to make sure the data is
correct.
After an import, newly imported records remain tagged. Select Browse from the top menu and
select All Debtors from the drop-down choices. Then Select Edit from the top menu bar and
select View Tags from the drop-down choices. You will be viewing a list of all your newly
imported records.
Once you have reviewed the accounts and validated the data (data in correct fields, financials are
accurate, etc.), then you are done. Run any post-import Batch Processing such as Contact Plans,
Credit Bureau Setup, Grouping, Dialing Campaigns, or Collector Assignment.
Troubleshooting
If you find that the import overwrites data, check your import map. Overwriting will occur if you
have the 'Use as key to find existing' and/or 'Exact match only' turned ON for a field. This switch
will cause overwriting if a match is found. Consider turning OFF all 'Use as key' fields.
| 
Was this page helpful? Do you have any comments on this document? Can we make it better? If so how may we improve this page.
Please click this link to send us your comments: helpinfo@collect.org