How To Print A Sample Report Or Letter
This topic discusses printing a sample report two ways:
- From the Report Definition form
- From the form the report is meant to Start On.
Requirements
- Access rights to print reports
- Review Report Definition and Report Body Help topics

Overview
When you are examining the reports that ship with
Collect! in the Demonstration database, it is a good
idea to print a few of them, at least. You will want to
know what results you can expect before you begin
to assign letters and print statements live.
A Word Of Caution
Most of the reports in Collect! are designed to print
a batch of documents, one for each Client or each
Debtor, depending on the Start On field in the
Report Definition.
* If you have a database of several thousand records,
you might not want a sample that is several thousand
sheets.
* If you choose a report that prints a list of records for
each account in another list, you may accidentally choose
to print the entire list once for every entry in each account's
list.
These mistakes are easily made. Collect! allows you an
escape from a printing session gone wild. Just hit the
ESC key to stop the printing process.
Print From Report Definition List
1. Pull down the Print menu and select Customize Printing,
Edit Report Templates. The Report Definition form will display.
2. Choose a report that you would like to try out.
3. The Report Definition form will open displaying all
the information regarding this report. Press F1 to
access information about the Report Definition form
in general.
 We will not be modifying this report, only printing
a sample. Some reports are samples of codes used in report
design. These reports can be printed to be used as guides
for your own reports when you begin to design and modify them.
We will not be modifying this report, only printing
a sample. Some reports are samples of codes used in report
design. These reports can be printed to be used as guides
for your own reports when you begin to design and modify them.
4. Click on the Report Body to open the Report Body editor.
 You can Quick Print any report when this editor is
open and you will have a record of the report's design complete
with all printable information and printer control codes.
You can Quick Print any report when this editor is
open and you will have a record of the report's design complete
with all printable information and printer control codes.
Comments In The Report Body
Be aware that comments can be added to the Report Body.
This is helpful to explain what the code does and you will find
these comments in reports included in Collect!
You can recognize comments because they begin with a
double-slash.
Example:
//This is a comment.
Putting the double-slash at the start of a line prevents the line
from printing. It is for information purposes only.
The double-slash must be at the BEGINNING of the
line. Only a comment can follow the double-slash on that line.
No codes can be placed on the same line.
5. Hit F8 to return to the Report Definition form.
6. Notice what form the Start On field displays. When you
attempt to print, you may be prompted to choose records
from this form.
7. Press the Print button on the lower right side of the
Report Definition form.
You will see a prompt like the one below:
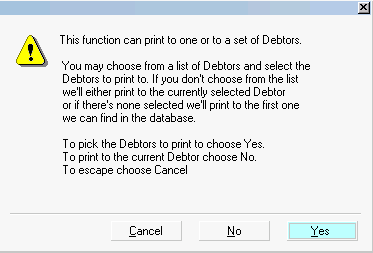
8. Please read this carefully and choose NO. This
will result in one sample report being printed rather than
an indeterminate batch.
9. The Print Report form will pop up. It will
have the title of the report that you are about to print
in its title bar.
If you are unfamiliar with the settings on this
form, please refer to Print Report in the Help topics.
10. Choose 'Screen' to print your sample report to
the screen to be viewed. You can also print it to a
printer if you prefer.
What's Next
This exercise is a good introduction to the process of
printing a report or letter in Collect! To print an actual
single report or letter, or a batch, you would first
open the form that the report is meant to Start On.
Print From Start On Form
1. Pull down the Browse menu and choose all Debtors.
Select a Debtor to open the Debtor form.
2. Now the Report Definition list is displayed with all
Debtor reports and letters as well as reports that
can be started anywhere.
The choice of reports depends on the
form that is open when you access the Report
Definition form.
3. Choose a report or letter that you would like to view.
4. Now when you choose a report, you will see the prompt below.
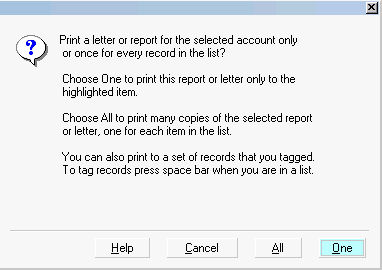
rather than an open Report Definition form. Choose ONE
to print only one record as a sample.
5. Respond to the Print Report form as you desire.
Print Multiple Records
1. Pull down the Browse menu and choose all Debtors.
2. Use the arrow keys and spacebar to select a few
records as described below.
To select records, highlight the item using the
arrow keys and select it by pressing the spacebar.
When you do this, the selected line will turn yellow.
As you select more records, the ones you already selected
will turn blue. To deselect an item, use the arrow keys again
and when you are on the record, press the spacebar. The
yellow highlight will disappear and the item will turn
black then appear with a normal white background when
you move off of it.
3. When you are finished selecting records, pull down
the Print menu and choose Reports and Letters. Choose
a report or letter that you would like to view.
4. You will see the prompt below:
5. This time choose ALL to print reports for the records you
selected.
6. Respond to the Print Report form as you desire.
See Also
- Report Sample to view sample reports and letters
- Report Topics Index for a list of all report and letter topics
- How To Use Quick Printing Features
- How To Get Started Creating Reports And Letters
|
Was this page helpful? Do you have any comments on this document? Can we make it better? If so how may we improve this page.
Please click this link to send us your comments: helpinfo@collect.org