How To Set Up Printing Letters Via Web Host
Letters and reports may be printed directly from the
Web Host with a few simple setup steps. These apply
if you have upgraded from a Collect! version 8 or 10,
or if you are using a version prior to CV11.1.4.3.
 If you are using CV11.1.4.3 or newer, you
should already have this feature fully
enabled. Please refer to the Help topic,
How To Print Letters Directly from Web Host
for more information.
If you are using CV11.1.4.3 or newer, you
should already have this feature fully
enabled. Please refer to the Help topic,
How To Print Letters Directly from Web Host
for more information.
To Print Letters Directly from Web Host:
- Import letters into Web Host Report Definition list.
Letters should be taken from the current list of
reports in your working database so that you are sure
of the output you want.
- Edit letters for displaying as HTML.
- Print debtor letter listing to create
the options list for letters to be printed.
- Edit Web Host internal reports to display a pick
list of choices.
These steps are outlined below.
 Please make sure you do not use a letter that prompts
the end user to enter data, such as a date range
or a dollar amount. Test print any letter
that you add to the list.
Please make sure you do not use a letter that prompts
the end user to enter data, such as a date range
or a dollar amount. Test print any letter
that you add to the list.
Import Letters Into Web Host
1. Sign into Collect! as you would normally, NOT the
Web Host. From the Collect! Report Definition list,
export the letters that you want to print via the Web Host
and then sign into Collect! in Web Host mode and
import them into the Web Host Report Definition list.
Please refer to Export A Group Of Reports and
Import A Group Of Reports for detailed steps.

Edit Letters
Each of the letters imported must be edited for
printing in the Web Host.
Place the following lines at the top of
the report body for each letter. Please make sure they
are EXACTLY as shown below.
@SETde.dbaddress = @vardbaddr
@no html
<html><body><pre>
<script>
@tvarTxt = "window.print();" if (@varprint = 2)
@tvarTxt<
</script>
Place the following line at the bottom of
the report body for each letter.
</pre></body></html>
Further formatting may be necessary to get
the spacing and font size right. Use standard
HTML tags just as you would in other HTML
pages. This would require some prior knowledge
of the HTML language and formatting principles.
Create reports.txt for letters to be printed.
Edit Web Host internal reports to display a pick
list of choices.
Print Debtor Letter Listing
In the Web Host, we need a report called "debtor letter listing".
When this report is printed, it will create a reports.txt
in the {database}\html\user folder. The reports.txt
is an ASCII text file. It contains a list of reports for the
Letters pick list that displays to the Web Operator.
If you do not have this report in your list, you may request it
from Technical Services, or you may create the report
yourself, if you are familiar with creating reports and letters
in Collect!.
To create it, do the following:
1. In Web Host mode, select Print from the top menu bar
and then select Customize Printing, Edit Report Templates.
Create a new report and name it 'MASTER debtor
letter listing'. Set the Start On to Anywhere or [*].
2. Go into the Options. Set Destination to 'File'
and set the Filename to
..\masterdb\html\user\reports.txt
If you are doing this in your DEMODB,
please use this instead ..\demodb\html\user\reports.txt
and name your report 'DEMO debtor letter listing'.
3. Put the following into the body,
@rd no total where (@rd.so = Debtor)
<option value="@rd.na<" >@rd.na< </option>
@rd
4. When you are finished, print the MASTER debtor letter
listing report. This creates the reports.txt
file in the \masterdb\html\user folder so that it includes the
all letters that were imported and edited to be printed from the
Web Host.
Edit Web Host Internal Reports
Finally, we need to modify the pages that are displayed to the
Web Operator so that the Letters and the Print options are
visible.
Web Host Letter Selection, Preview and Print Options
To do this, the following code needs to be added into
the OperatorDebtorDrillDownWorksheet
and OperatorDebtorDrillDownDetails
reports. The code gets added on line 14, right
under the @include buttonsdebtordrilldown.txt
line.
<div class="buttons">
<table align="right" cellpadding="0" cellspacing="0" width="100%">
<tr>
<form method="post" name="rptselection" action="report" target="_blank">
<input type="hidden" name="reportname" value=" ">
<input type="hidden" name="filename" value=" ">
<input type="hidden" name="vardbaddr" value="@de.dbaddress">
<input type="hidden" name="varprint" value="">
<td align="right">
<select name="rpttype">
@include reports.txt
</select>
</td>
<td align="left" width="30%%">
<input type="button" value="Preview"
onClick="
rptselection.reportname.value = rpttype.value;
rptselection.filename.value = rpttype.value+'.html';
rptselection.varprint.value = '1';
rptselection.submit();
">
<input type="button" value="Print"
onClick="
rptselection.reportname.value = rpttype.value;
rptselection.filename.value = rpttype.value+'.html'
rptselection.varprint.value = '2';
rptselection.submit();
">
</td>
</form>
</tr>
</table>
</div>
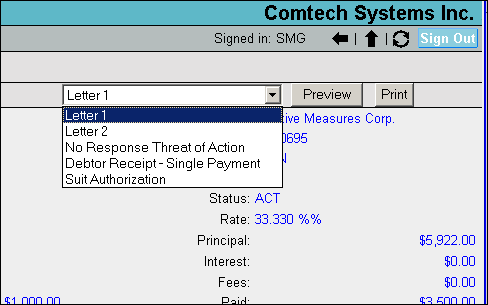
Summary
That is all. Now when you view an account in the Web Host,
you will have a Letter Selection, and a Preview and Print button.
These are available on every Worksheet or Details page.
Your Web Operator can go to any Account page when
logged into the Web Host, and they will be able to select
a Letter from the pick list and PREVIEW or PRINT it.
We are just dumping the text to an HTML browser.
It is possible that the formatting you designed
in Collect! may not be the same in the browser.
If this is the case, you will need to implement
HTML coding into the report to display it correctly.
See Also
- Web Host Topics
|
Was this page helpful? Do you have any comments on this document? Can we make it better? If so how may we improve this page.
Please click this link to send us your comments: helpinfo@collect.org