Contact Plan For New Accounts
This document steps through creating a contact plan to
be run when new accounts are entered into your
system. It is a good idea to try each step manually
so that you are very sure of the steps the contact plan
is automating.
The steps are:
1. Set Debtor Status to NEW
2. Assign Account to HSE Operator
3. Assign Sales Operator SAL to Account
4. Schedule a Review
5. Run the NEW contact plan on a new account
Accessing The Contact Plan And Event Forms
1. To create a contact plan, please select System from
the top menu bar and then select Contact Management Settings
from the drop-down choices. This will display a submenu.
2. Select Contact Plans, View from the submenu choices and
the list of contact plans will be displayed.
3. Select the NEW button to display a blank Contact Plan
form.
4. Give your plan a Code and a Description:
Code: NEW
Description: New Business
5. Click into the Event subform and say YES to open a
blank Event form.

Setting Status To New
To create an event to set the Debtor Status on the new account:
1. Select the down arrow next to the field
labeled Type and use your down
arrow to scroll down to the STATUS choice. Press
ENTER to select it.
2. Select the down arrow next to the field
labeled Description and use your
down arrow to scroll down to the NEW choice. Press
ENTER to select it.
These are the only settings we need to make
to set the Debtor Status to NEW. The resulting event
should look like the screen shot below.
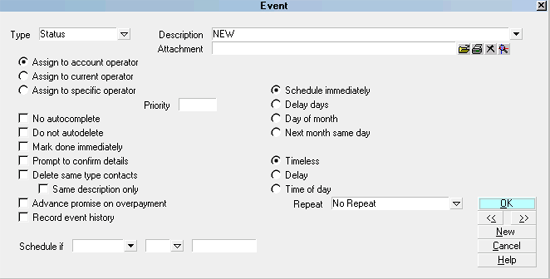
Event to set Status to NEW

Assigning Account To Hse Operator
To create an event to assign the account to operator HSE:
1. Press F3 to open another blank Event form.
2. Select the down arrow next to the field
labeled Type and use your down
arrow to scroll down to the OPERATOR choice. Press
ENTER to select it.
3. Select the choice
labeled Assign to specific operator
so that a dot appears in the radio button. This will
display an additional field labeled Operator,
4. Select the down arrow next to the field
labeled Operator and use your
down arrow to scroll down to the HSE choice. Press
ENTER to select it.
5. In the Description field type in "Assign Account
To Operator."
These are the only settings we need to make
to assign the account to the HSE operator. The
resulting event should look like the screen shot below.
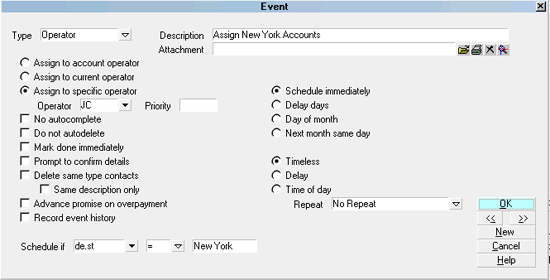
Event to Assign Account to HSE Operator
 This strategy assumes that all new accounts
in your system will be assigned to a House account before
being distributed among your collectors to work. You
can assign the accounts to any operator that you want.

Assigning Sales Operator To Account
To create an event to assign a Sales Operator:
1. Press F3 to open another blank Event form.
2. Select the down arrow next to the field
labeled Type and use your down
arrow to scroll down to the SALES choice. Press
ENTER to select it.
3. Select the choice
labeled Assign to specific operator
so that a dot appears in the radio button. This will
display an additional field labeled Operator.
4. Select the down arrow next to the field
labeled Operator and use your
down arrow to scroll down to the SAL choice. Press
ENTER to select it.
5. In the Description field type in "Assign Sales
Operator To Account."
These are the only settings we need to make
to assign the SAL operator to the account. The
resulting event should look like the screen shot below.
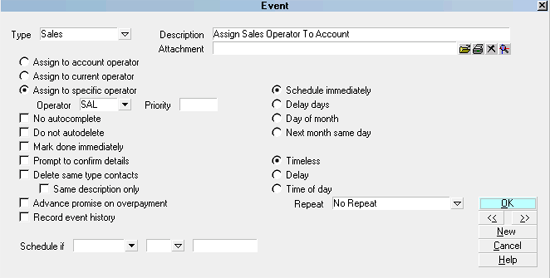
Event to Assign Sales Operator to Account

Scheduling A Review
To create an event to schedule a review:
1. Press F3 to open another blank Event form.
2. Select the down arrow next to the field
labeled Type and use your down
arrow to scroll down to the REVIEW choice. Press
ENTER to select it.
3. Select the choice
labeled Assign to specific operator
so that a dot appears in the radio button. This will
display an additional field labeled Operator.
4. Select the down arrow next to the field
labeled Operator and use your
down arrow to scroll down to the CMG choice. Press
ENTER to select it.
5. In the field labeled Priority
type in 30.
6. In the Description field, type in the text "Review
New Account."
These are the only settings we need to make
to schedule a review for the CMG operator. The
resulting event should look like the screen shot below.
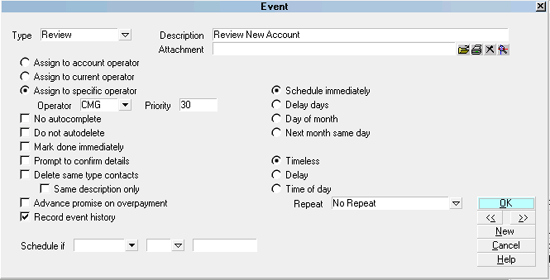
Event to Schedule a Review
 This strategy assumes that the Collection
Manager is going to review all new accounts before
assigning them to individual collectors to work. You
can schedule this review for any operator you want.
Select OK to close the Event form. The Contact Plan
form now has all your events in it.
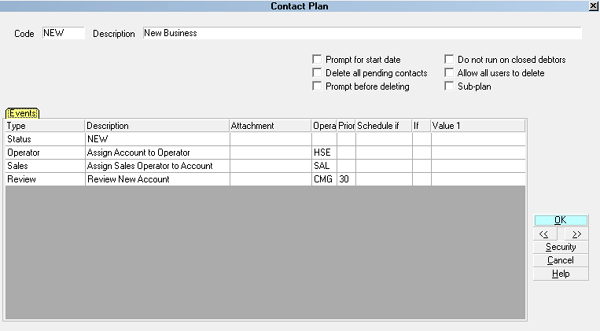
NEW Contact Plan and Events
Select OK to close the Contact Plan form and select OK
again to close the list of contact plans.

Run The New Plan On A New Account
Enter a new account in Collect! and type NEW in the
Action field to the right of the Summary field to run the plan.
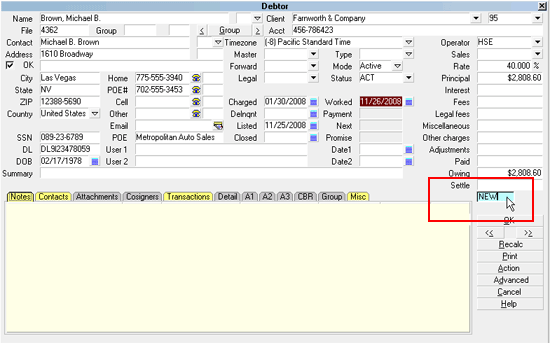
Action field with NEW Contact Plan
You should notice some activity and then the
Operator, Sales and Status fields should show
the correct operator IDs and Status code.
View the list of contacts and you should see a Review.
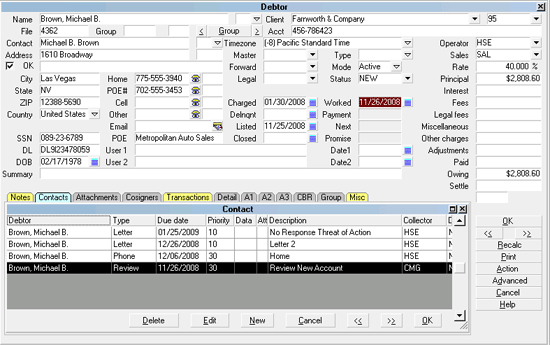
Review scheduled by Contact Plan
 If you wish to run this plan automatically whenever
you enter a new account, this may be set in the Client Settings.
Please refer to help on Client Settings in the section
entitled "Contact Plan For New Accounts" for more information.

See Also
- Contact Plan Topics

| 
Was this page helpful? Do you have any comments on this document? Can we make it better? If so how may we improve this page.
Please click this link to send us your comments: helpinfo@collect.org