Softphone
You can use a softphone for your Collect! auto dialed calls.
This feature allows you to click on a phone number directly
or the phone icon beside a phone number and the system will
automatically dial the number for you. It can be configured
to present the user with a prompt to dial popup or to dial
in the background without prompting by setting the switches
with your preference in \System\ Preferences\Auto Dial Setup.
This requires that your operating system is set up to handle
the softphone protocol of your choice. This feature also
enables UDP protocol dialing.
 The Device and Modem Control Strings are not used
in the Windows dialer functions. For Windows
2000/2003/XP Pro and newer, we use the TAPI32
interface. To configure your TAPI interface use
Control Panel.
 Collect! can communicate with the Softphone of
your choice, provided your O/S is configured
already to handle the softphone communication
protocol you specify. Non-TAPI systems can also
use Auto Dialer.
Softphone In Collect!
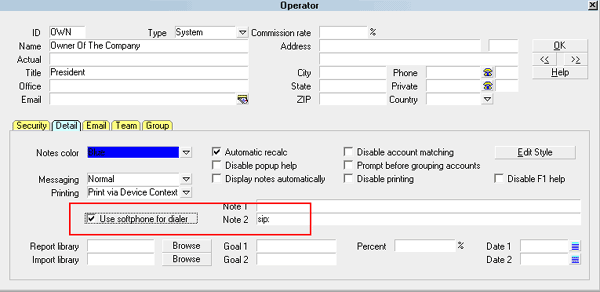
This option is set at the \System\ Rights\ Operator screen.
1. Open the Operator window for the user you want to set
up for softphone, and click into Detail Tab.
2. Click the check box beside "Use softphone for dialer" to
enable this setting.
3. Enter the prefix for the protocol you want the system to
use for your automated dialing in the "Note 2" field. For
example, "sip:"

Softphone Settings in Operator Detail
Once you have enabled these settings, all use of the dialing
features will be sent to the program registered with your O/S
as the default protocol handler for softphone calls.

Non-TAPI Dialer Systems
Collect! integrates through a TAPI interface, or through a
SIP Soft Phone. It can also redirect through UDP protocol
to a non-tapi dialing system.
 If you wish to use a third party dialing system
that is non-TAPI, it will be necessary to
contact Tech Services to arrange for us to
create you a custom dialer plug-in to
integrate with other dialing systems.

Udp Protocol Dialing
With of a few configuration settings, Collect! can be made
to integrate with UDP Protocol dialing systems.
 This is an ADVANCED feature requiring the technical
expertise of your dialer vendor for implementation
and testing.

Udp Redirect Syntax
The UDP dial string is constructed in the following way:
UDP/:[ipaddress]:[port];[extension]#authcode (optional)
UDP/: This static string starts the setup.
[ipaddress]: This is the IP Address of the dialer.
*** MUST be followed by a colon.
[port]: This is the Port the dialer's IP Address is
listening on. *** MUST be followed by a colon.
[extension] This is the Operator's Phone Extension.
#authcode This static string is an optional
command to add ClientNumber[4]DebtorNumber[8] to the UDP
dial string.

Udp Redirect Setup
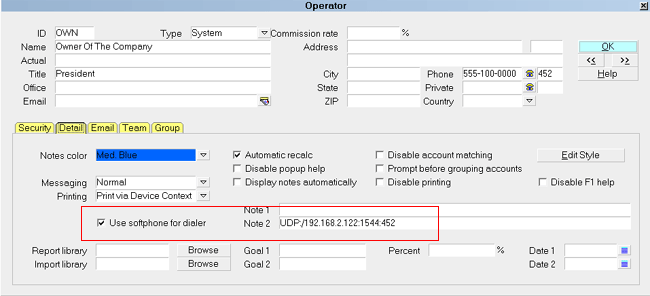
1. From the menu path \System\Rights\Operator screen, enter
the Detail Tab and switch ON "Use softphone for dialer" for
every user that you wish to be using the automatic dial feature.
2. In the "Note 2" field, enter the command string in the
following format:
UDP:/ipaddress:port:extension
Example:
UDP:/192.168.2.122:1544:452
When the user clicks a phone number, Collect! will
send "extension,number" to the IP Address and Port via
UDP protocol.

UDP Redirect Setup
Example of Resulting String Sent:
452,5551237777
 This requires that your dialing system is able to
read the dialing string that Collect! submits.
This may require custom programming for
implementation. Contact Tech Services if you
have questions or requests for integration
with third party dialing systems.

Authorization Code For Udp String
There is an optional parameter in the UDP string configuration
that enables you to send an "Auth Code" with your UDP
string by using the command #authcode. This
is required for security with some systems.
By default, the #authcode command will send
4 digits of the Client Number followed immediately by 8
digits of the Debtor File Number. The resulting Authorization
Code is ALWAYS 12 digits.
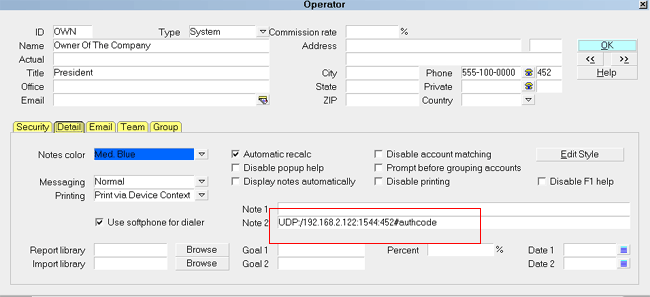
In the \System\Rights\Operator screen, enter the Detail Tab
and enter the command string in the "Note 2" field in the
following format:
UDP:/ipaddress:port:extension#authcode
Example:
UDP:/192.168.2.122:1544:452#authcode
When the user clicks a phone number, the system will
send "extension,number,ClientNumber[4]DebtorNumber[8]"
to the IP Address and Port via UDP protocol.

UDP Redirect Setup with Authorization Code
Example of Resulting String Sent:
452,5551237777,123412345678

Example - Auth Code Format
When Collect! detects the parameter #authcode,
it pulls 4 digits of the Client Number, immediately followed
by 8 digits of the Debtor Number, to create a unique 12 digit
Auth Code to add to the UDP string.
1. Client Number: LAST FOUR digits.
2. Debtor Number: LAST EIGHT digits.
3. Insert LEADING ZEROES if needed.
Example:
Client # 24
Debtor File # 4585
Collector Extension 109
Dialing phone number 818-555-1111
Resulting UDP string:
109,8185551111,002400004585
 If the user dials clicks to dial from any area
in Collect! where the Client Number and/or
Debtor Number are not applicable, the
#authcode command is ignored.
Resulting UDP string:
109,8185551111

Summary
The Softphone feature enables you to use SIP or UDP protocol
for integrating with many external auto dialing solutions.
Additionally, an Authorization Code may be added to the
UDP dial string, enhancing security, if needed.

See Also
- Auto Dialer

| 
Was this page helpful? Do you have any comments on this document? Can we make it better? If so how may we improve this page.
Please click this link to send us your comments: helpinfo@collect.org