How To Setup Transaction Types
This document explains the concept of Transaction Type
in Collect!. It will help you use existing transaction types
in the right way and create your own.
Transaction types are an integral part of Collect!, and are
used for recording and organizing financial information.
The Financial Type field in the Transaction form determines
how Collect! will process a transaction. Payments, Fees,
Interest, Adjustments, Legal are examples of these
Financial Types.
For convenience and reporting, Collect! organizes
Transaction Types into groups of 100, with
the 100, 200, 300, 400, 500 and 600 codes actually reserved
as titles for the group they represent. Each series roughly
represents one of the Financial Types. For instance, the 100
series is reserved for Payment types. However, it is the
Financial Type setting that actually determines how a
transaction is processed.
Financial Type Setting Determines Transaction Type
Transaction types are used when printing client and debtor
trust account reports. The reports provide a dated summary
of financial transactions, and then show a breakdown of the
financial activities, usually organized by Transaction series,
such as 100's, 200's and so forth. Using these groups will
help you with the organization of your own reports.
For example, Group 100 defines all basic transactions such
as payment from a Debtor to the agency by cheque or cash,
payments from the Client to the agency and other details.
Several groups are predefined, including Original Principal and
Interest, Legal Expenses, Interest and Other Expenses.
 The Demonstration database in Collect! ships with
many predefined transaction types. You can copy any of
these to the Masterdb database.
The Demonstration database in Collect! ships with
many predefined transaction types. You can copy any of
these to the Masterdb database.
Viewing The List Of Transaction Types
The following list contains all the transaction types provided for
you by Collect! You can modify these if you need to or add
your own, depending on your business needs.

Codes And Descriptions
100 PRINCIPAL AND INTEREST
101 Payment By Check
102 Payment By Cash
103 Closing Fee received
104 Money Order
105 Returned NSF Check
106 Payment of Agency NSF Fee
107 Check Payment Taken By Phone
108 Debtor Over Payment
109 Credit Card Payment
110 Monthly Payment
121 Legal Advance Fee Received
122 Legal Fee Advance Recovered
150 Down Payment
151 Payment Plan Payment
160 Monthly Billing Amount
193 Payment Plan Initial Discount
194 Judgement Principal - don't modify
195 Judgement Interest - don't modify
196 Original Principal - don't modify
197 Original Interest - don't modify
200 LEGAL EXPENSES
201 Legal Fees
202 Taxable Cost
205 Legal Fee Advance Request
300 OTHER EXPENSES
301 NSF Charge Due Agency
302 Closing Fee
303 Locate Fee
310 Service Charge
320 Payment Plan Late Fee
321 Down Payment
350 Payment Plan Service Charge
351 Late Fee - don't modify
397 Client Fee
398 Debtor Fee
399 Collection Fee - don't modify
400 INTEREST
401 Interest Adjustment
499 Total Accrued Interest
500 ADJUSTMENTS
501 Adjustment by Client
502 Adjustment by Court Order
599 Adjustment through Upgrade
600 INTERNAL EXPENSES
601 Agency Internal Expenditure
Each one of these transaction types has its own settings,
set in the Transaction Type form for that type.
To view the settings for these transaction types, pull
down the System menu and choose Financial Settings,
Transaction Types. The complete list of transaction types
available to you will be displayed. Click on your choice to
open the Transaction Type form and view the settings.
 You should leave code 100, 200, 300 and 400 etc.
as titles for the group they represent. Then use
codes 101, 201, 301, 401, 501, 601 as the starting points for
the transaction types you want to list in the group. You can
also create your own groups and codes and then build reports
that reference transactions with these codes.
You should leave code 100, 200, 300 and 400 etc.
as titles for the group they represent. Then use
codes 101, 201, 301, 401, 501, 601 as the starting points for
the transaction types you want to list in the group. You can
also create your own groups and codes and then build reports
that reference transactions with these codes.
Please note that Collect! internally creates and uses
the following transaction types when building its reports.
194 Judgement principal
195 Judgement interest
196 Original principal
197 Original interest
399 Fee for Agency Commission
499 Total Accrued Interest
If these codes do not appear in your Transaction Type list, then
they will appear as numbers in your trust reports, rather than
with text titles. You should create these codes in your
Transaction Type list if they are not there. These Transaction
Type codes are required, and should not be changed. Most
of the others can safely be modified.
Print A List Of All Settings
To view all of the transaction types available in Collect!, pull
down the System menu and choose Financial Settings,
Transaction Types. A list will display. You could pull down
the Print menu and choose Quick Print from the list of choices.
When prompted, say "Yes" to details. This will give you
a complete list of the transaction types and their settings.
Record Navigation Buttons
Another way to view different transaction types is to
open the first Transaction Type in the list and use
the FORWARD [>>] button to scroll through the forms
for the different types. It is a convenient way to examine
the settings. Use BACK [<<] to move back up the list.
Using The Predefined Transaction Types
Press F1 from the Transaction form and the Transaction Types
form to get Help on the fields in these form. Using this information
and the list above, pick the transaction types that you need.
Examine the settings of these transaction types to be sure they
will act as you expect them to. Most of the types can be
modified. However, you should be sure of what you are doing
when you make changes to existing Transaction Type settings.
These settings have been chosen to perform in a certain way.
Creating Your Own Transaction Types
The easiest way to create a new transaction type is to copy
an existing type, or heading, give it a new Code number, in the
same general group, and a new Description. Then modify the settings
to suit your needs.
Each group heading has default settings that generally
apply to the whole group. You can copy the heading as a
template for your new type and the basic settings will be
set already.
Copy A Transaction Type
1. Choose System, Financial Settings, Transaction Types to
display the list of types in your system.
2. Use the up and down arrows to locate and highlight the
type or heading that you wish to copy.
3. Make sure it is highlighted and press CTRL+C. You will be
informed that you have copied data.
4. Press OK and then press CTRL+V. The list will now contain
a duplicate copy of the transaction type or heading that
you copied.
5. Click on one of the copies to open the Transaction Type
form for you to modify.
6. Give your copy a new Code number and a new Description
to begin to create your own transaction type.
Create A Transaction Type Group
To add group 700, for example, to the Transaction Type list:
1. Open the Transaction Type List.
2. Press F3 to create a new Transaction Type.
3. Enter 700 as the Code to identify the group.
4. Type in a general Description that applies to each transaction type
in this new group.
The Description you use to label the group is used
in trust account reports as the title of the Transaction group.
5. Choose the default settings that will generally apply to
transaction types in this group. These settings can be modified
for each individual transaction type that you create in the group.
6. Press F8 to save your work.
Now, when you view the list of transaction types, this new
group will display.
Create A Transaction Type
As described above, you can copy an existing type or heading
and modify it.
Or, you can press F3 when you are viewing the transaction
type list or an individual transaction type. This will display a
new blank transaction type form for you to fill out. (Or press
the NEW button on the toolbar or the NEW button at the
bottom of the transaction type list.)
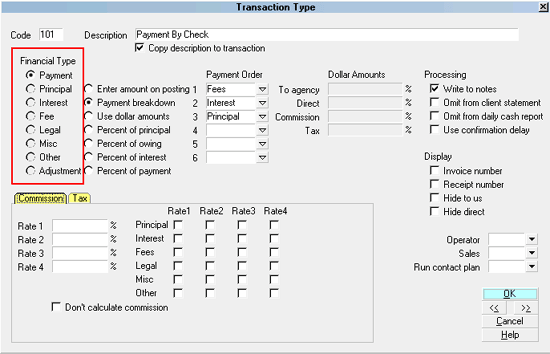
Transaction Type Settings
Each Transaction Type has its own unique settings. These
control report printing options, calculations, commission
rate, perhaps running a Contact Plan, assigning operators
and sales persons to transactions.
There are over twenty settings on the Transaction Type
form that you can choose from to setup a particular
Transaction Type. The ability to select a Contact Plan to
run offers many more choices as well. (This means that
once you know what your business needs are, you can
create uniquely customized transaction types to automate
your transaction posting operations.)
Each section heading in the Transaction Type list
has default settings that generally apply to any new transaction
type that you create in that category. You can use these
settings as a starting point when you create your
transaction types.
1. From the Transaction and the Transaction Types forms,
press F1 for Help about the fields on both of these forms.
You should be aware of how closely they are connected
with each other.
2. Use the information available from Help to fill in Code,
Description and Copy description to transaction. You can
also use the default settings in the header sections to
get you started.
Remember that this Transaction Type should be
meaningful to you and fit the way you do business. It enables
you to categorize your transactions but you must decide
what categories mean something to you.
3. Make choices in the Financial Type section as needed,
using the F1 Help results to guide you. The Financial Type
determines how the transaction is processed and totaled.
4. The second column of the Financial Type section pertains
to the Transaction and Debtor forms. The choices set the
way information is displayed and calculated. A payment can
be categorized and broken down into Interest, Fees, Adjustment
and Principal in any order you need.
If you want to see the payment breakdown for this
Transaction, switch ON "Payment breakdown" in the
Transaction Type form. Several fields on the Transaction
form are only visible when this switch is turned on. These fields
relate to Principal, Fees, and Interest. Review help on those
topics.
The Help available when you press F1 from the
Transaction form will give you a good explanation of these
payment breakdown aspects. Categorizing your transactions
using payment breakdown gives you very detailed information
for reporting and tracking purposes.
5. The Processing section allows you to change the defaults
for adding transaction information to statements and reports.
6. The Commission and Tax tabs give you choices for
Commission and Tax calculation.
7. The Display section can hide To Us or Direct fields on
the Transaction form. This makes it easier for the user to
know where to enter the dollar amount when a transaction
is posted. Also, Collect! can create an Invoice or Receipt
number automatically if you switch on these settings for a
particular Transaction Type. Please refer to the Help available
on Transaction for more information about numbering
receipts and invoices.
8. Choose an Operator and transactions of this type will
be posted to this Operator. This may be used for calculating
Operator commissions. Press the arrow in this field
to display a list of operators in the system.
9. Choose a Sales ID and transactions of this type will be
posted to this Sales person. This may be used for calculating
Sales commissions. Press the arrow in this field
to display a list of Sales IDs in the system.
10. Choose a Contact Plan to run when transactions of
this type are saved. Press the arrow in this field
to display a list of available contact plans.
POST PAYMENT EVENT SEQUENCE
The sequence of events when you post payments is:
1. A transaction record is created.
2. Debtor totals are recalculated.
3. The default payment posting Contact Plan is run.
4. The Transaction Type specific Contact Plan is run.
This plan is run AFTER any Contact Plan you
use in the "default payment posting" options setup form.
This means that you can use this plan to set up a custom
schedule for promised payments received or NSF checks.
See Also:
- How To Manage Contacts
11. You can set a Commission Rate to use with
this Transaction Type. This rate will be used instead
of the normal Commission Rate in the Debtor form.
Summary
Several basic transaction types are needed to handle
the transactions that you post every day. You may
find that Collect! has already provided the types and
settings you need to begin using transaction types.
If your needs are not met by the predefined transaction
types, you can modify existing types or create your
own. Please have an idea of the transaction types that
you need and the particular settings you would like to
apply before you begin to construct your own system
for organizing your accounts.
See Also
- Transaction Type Samples
- How To Post a Transaction
|
Was this page helpful? Do you have any comments on this document? Can we make it better? If so how may we improve this page.
Please click this link to send us your comments: helpinfo@collect.org