Introduction To Debtor Information
The purpose of this topic is to simplify how you think
about Debtor information. Generally, 4 important
areas of information relate to your Debtor:
- Demographics,
- Contact phone numbers and trace leads,
- Extra client detail, and
- Financials - how much does the debtor owe.
You will find that for anything you have, Collect! has a place
to store it. But, before you begin that data entry, you have
to make some decisions about what your entry standards are
going to be. The following are examples of the types of
decisions to be made:
Data entry standard examples:
1. Block capitals for the debtor name/address info or
sentence English? (only first letter of each word capitalized).
2. Dates MM/DD/YYYY or DD/MM/YYYY?
3. Certain piece(s) of extra client supplied data that is
going into a user defined field. Pick the same field for
that piece of data all the time. Rename the alias name
of the field to identify that piece of data if the client
is big enough and the use of the field is exclusive for
that item.
We recommend not allowing individual users to decide to put
something in User 1 one day and Summary the next, then
User 2 the time after that. You will additionally find
your needs to draw data from user defined fields into
reports a more reliable and expected end result if you are
consistent in where you store specific types of information.
Likewise the entry style of the data. Example, if a User 1
field contains the referring Doctor's name, then decide if
all entries will be "Dr. James Smith" or "Doctor J. Smith"
or "Dr James Smith". The use of abbreviations and
punctuation marks (in the example above, use of periods
or not) will affect your report appearance.
4. Phone numbers. Are you entering them as numerics
stripped of any hyphens or parentheses, i.e. 5552451212
OR, are you entering them as 555-245-1212. Because you
may want future automations and lookup features to make
decisions based on the presence of absence of said
non-numerics. We don't recommend using (555)245-1212 as
the leading parenthesis will prevent certain types of
logic from being able to detect if a phone number is
present in the field or not. Specifically, if you want
to eventually use the system to find 'skip' files (no
phones), then an area code encased in brackets will
interfere with a 'Schedule if' conditional that will
be looking for the first position being greater than
zero. A Bracket symbol will not give the expected
result and a file with a phone number could be sent
to a trace desk.
You can set a software switch to prevent staff from being
able to free-form update Phone fields if your preference is
no non-numerics. Click "System\ Preferences\Options, Sounds
and Colors" and then check the box On for "Only numerics in
phone fields".
5. SSN. Is your standard going to be to enter
the number all 9 digits with no spaces, SSN is 555555555 or
as the format of 555 55 5555. If your portfolios are of
the types that collectors will need to be doing lookups
by SSN, you may wish to adopt the no spaces/no non-numerics
format and set your preference switch accordingly.
You can set a software switch to prevent staff from being
able to free-form update SSN fields if your preference is
no non-numerics. Click "System\Preferences\Options, Sounds
and Colors" and then check the box On for "Only numerics in
SSN".
6. Do you collect internationally? If not, the use
of the Country code will get redundant on letters,
reports and client statements. You may choose to leave
this field blank and/or comment out the field in reports
or letters that call for it as part of a client, debtor
or agency address.
Putting two slashes in front of a printable field code
that is left-flush with the margin will comment out that
line and prevent that field from being expressed.
Example; the following is a standard debtor address block
that you may see in letters. The country code is the last
field, @de.co. As below, it will either express if something
redundant (like United States or Canada) is in there, or,
create a blank line in your letter if the field is blank.
@de.na<
@de.ad< @de.a1<
@de.ci<, @de.st< @de.zi<
@de.co<
This is the same address block with the country code
commented out. The integrity of the coding remains
intact for legacy and troubleshooting purposes, but the
unwanted field will not express.
@de.na<
@de.ad< @de.a1<
@de.ci<, @de.st< @de.zi<
//@de.co< 06/09/2015 Commented out country code.
7. We recommend using the standard 2 digit State (or
Province) codes of your region and not entering the
name of the state/province in full words. This will
allow your State field to be ascending/descending sortable
and maintain another data convention that will be reflected
in your letters and report outputs. As well, in some countries,
postal services will not accept envelopes that have non-standard
abbreviations for their provinces/states.
8. If you plan on reporting to any of the Credit
Bureaus, establish correct address format standards
right from the outset. Your local Post Office will
have a handbook which describes what is or is not
an acceptable addressing format. The reason for this
is to ensure not only is your mail not rejected
by the postal service but that both the Collect!
Credit Bureau Module and the Credit Bureaus themselves
will reject addresses not submitted in correct format.
Example of a correctly formatted address:
123 - 55 Somewhere St.
New York, NY 12345
Example of an incorrectly formatted address insofar
as the credit bureaus are concerned:
55 Somewhere Street
Apt #123
New York, New York, 12345
9. Collector Notes. Do you want them to write in
block caps all the time or regular sentence English.
If you employ live skip tracers, do you want their
notes to be block caps or sentence English? Some
agencies have collectors write in block caps and tracers
in lower case so that at a glance, who wrote the notes
is distinguishable. You also have the ability to color
code your users notes by selecting a specific color in the
Operator Setup for each user level's notes.
For sites using any feature build of CV11, colored notes
are characterized by the color defining the BACKGROUND of the
note field, as selected in "System\ Rights\ Operator", Detail
Tab. The text will be black.
For sites using CV12 and higher, the background of notes
remains a uniform beige while the TEXT is what is colored.
This is a new feature which Collect! is proud to be offering.
The preference is still defined in the same Operator Setup
screen, in the Detail Tab. Color options are as numerous
as there are Hex color codes to choose from. Use your favorite
Internet site that offers colors and the Hex codes needed to
represent them. A sample site to try is
"http://www.color-hex.com/color-names.html".
10. Have you created Action/Result codes for your
collectors to use that negate perfunctory note entry
such as Tel Res - No Answer (or Tel Res - NA) etc. and
standardize how you want certain actions to be
notated in your accounts note history? This improves
your collector efficiency if they can enter a 3 digit
Run Plan to input static notes instead of having to
redundantly type them all day.
11. Have you designated which windows you want collectors
to use for any other office specific requirement, AND
updated the pick lists so that said windows/entry screens
are ready for them? Example, if you will be utilizing the
Cosigners Tab for the Other Parties as well (as it is
designed for), have you updated the pick list for the Class
in that window to include all the different designators that
you may wish such as NOK, AKA, Reference, Relative etc.
Perhaps you wish to drill down farther and update the pick list
for Cosigner Type to include designations like Mom, Dad, Brother,
Sister, MIL, FIL, B/F, G/F, etc.
12. Have you reviewed the Financial preferences that will
govern the behavior of how Transactions will behave? See
the Help page called Transaction Type. Your preferences
for these must be set and uniform from the beginning if you
wish to have reliable results.
13. Are you a credit reporting agency? If so, you will need to
purchase a license for the add-on CBR Module (call Administration
if you have not yet done this) and implement some entry standards
to ensure your monthly (or more frequent) reporting takes place
with the least amount of rejects needing review.
This means there are some key client and debtor entry areas to be
aware of:
- Company Details. You need to ensure you have a complete
company name and address in your Company Details. This information
is written from this file to the Header Record of the Metro2
file you will send out to your bureaus of choice.
- Credit Bureau Setup. You need to complete the
"System\Preferences\Credit Bureau Setup" screen with the required
entry fields updated. See the Help page "How To Setup Credit
Reporting".
- Client Setup. You need to choose a Type in the upper right
corner of the Client setup screen. This is actually the bureau's
creditor classification field. The pick list shipping default
should not be changed as these are exactly what options are
acceptable in the Metro2 output file for Equifax, Trans Union and
Experian. No others will be accepted. The field left as "Unknown"
(the default when you set up a new client) will be rejected
by the Collect! CBR Module.
- Advanced Client Settings. Check ON "Report accounts to
bureaus" and "Send client detail to bureaus". This latter is
the K1 segment that includes the mandatory creditor name as
part of the submission.
- Make sure to enter EITHER a Delinquency or Charged Date
into your debtor accounts. The Collect! CBR Module requires
at least one of these fields to be present, because the
credit bureaus require that the correct age of the account be
reflected at time of reporting. Absence of dates in both
fields will cause the CBR Module to reject the account. It
can be updated and will be picked up by the next output
process.
- Make sure to turn ON your new debtors for credit reporting.
This can be done either manually by clicking into the CBR Tab
when an individual account is being data entered, or can be done
as a Batch Process from a tagged list of accounts you have
entered that day. See the Help topics " Credit Report Details",
" Prepare Accounts for Reporting to Credit Bureau" and " Select
Bureau Report Details".
14. If you have clients with different Remittance/Statement
cycles (i.e. Monthly, Biweekly etc.), it is important to
have these clients properly set for their cycles right from
the beginning.
15. The shipping default for clients is Net Remit types. If
you have clients for whom you remit as Gross or Combined, these
settings should be set for these clients from the beginning.
16. If you have client balance forwards from Receivables before
your cutover to Collect!'s software, these can be (manually) input
into created Invoice/ Statements. The timing of these entries and
methodology is a more advanced task. Contact Technical Services
at 250-391-0466 for info and pricing to accomplish this task.
17. Do you intend to use Collect!'s CHECK, GCHECK, and CCHECK
forms? These are the check outputs that would be created when
you generate Statement/Invoices. If so, there are input fields
that need to be completed for your banking name, address and
Routing/ABA/account # details. If you use custom check stock
but would still like them output by Collect!, contact Technical
Services at 250-391-0466 for pricing to have your check reports
modified to output to your preferred check stock format.
The following is the inside of the CHECK report indicating the
fields you need to complete before you generate your first
Statements/Invoices.
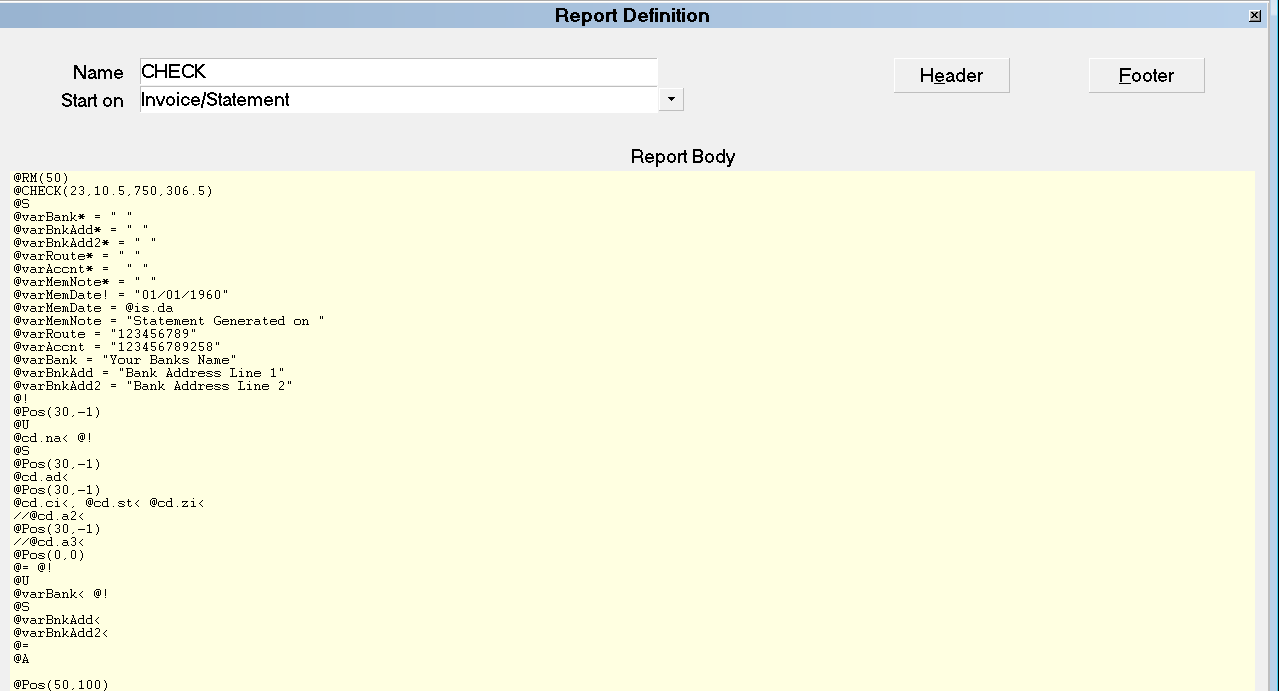
Bank Info Update for New Site Checks
The fields where you want to input the correct information
between the quotes to replace the "placeholder" information are:
@varRoute = "123456789"
@varAccnt = "123456789258"
@varBank = "Your Banks Name"
@varBnkAdd = "Bank Address Line 1"
@varBnkAdd2 = "Bank Address Line 2"
If you have Gross and/or Combined remittance type clients, you will
want to do the same things for the report names GCHECK and CCHECK.
Follow the menu path " Print\ Customize Printing\ Edit Report
Template" and this will bring up your print menu window called
Report Definition. Select the report called CHECK. This will
open up the report body on your screen. Click into the yellow
colored "Report Body" and it will turn white. You are now in
Edit mode. Scroll to where you see the insert lines above and
input your bank routing #, your bank account #, your bank name,
bank Address and bank City, State Zip into lines where indicated.
Then click OK to save or press F8. Repeat this process for
GCHECK and CCHECK if you have Gross or Combined remittance type
clients, as a generate statement run will output three
different types of checks to go with the different types of
statements.
 If you are a Canadian or Bahamian site, you will want
to request that Technical Services update your
CHECK / GCHECK / CCHECK as well as Statement /
GStatement / CStatement for the spelling of
"cheque" in place of "check" where applicable in
these documents. Canadian sites will also need to
update "US Funds" to "Canadian Funds" in two sports
on each of the three check reports.
If you are a Canadian or Bahamian site, you will want
to request that Technical Services update your
CHECK / GCHECK / CCHECK as well as Statement /
GStatement / CStatement for the spelling of
"cheque" in place of "check" where applicable in
these documents. Canadian sites will also need to
update "US Funds" to "Canadian Funds" in two sports
on each of the three check reports.
18. If you would like your logo to added to the Statement/Invoice
forms that Collect! outputs as its shipping default type, OR,
other customizations, contact Technical Services for 250-391-0466
for pricing.
19. Have you set up your Contact Plan for initial use? Example,
the system ships with a NEW contact plan as a sample. Use this as
a template to decide how you want your new business to be activated.
Items to consider:
- What do you want the initial status to be? NEW is a common
site favorite but this can be changed to be NBS if you have a
different preference.
- Do you have a letter series that you want to imbed right
away? A Letter1 that goes at day 0, Letter2 that goes at day
30, Letter3 that goes at day 45 (or any delay date timeline)?
- Would you like a Review or Phone Contact Event to be inserted
to get the account on a collection desk right away or with a delay
in the event of a letter hold period in your region?
- Any other date driven activities that can be set up at the
time the account is listed? i.e. 90 day Mgr or Auditor Reviews, etc.
20. Do you have your dunning letters set up? If you are a new to
Collect!, you may wish to have our Technical Services team set up
your first letters so that go forward, you have samples to follow.
Call or email Technical Services for pricing at 250-391-0466 or
support@collect.org.
21. Do you have specific reports that you are required to send to
your clients, like New Business Acknowledgements (called Client
Acknowledgements in Collect!) or Monthly Inventory reports (called
Client Status Reports in Collect!), or client performance metrics
(such as Client Analysis 12 Months, Monthly Batch Analysis, and
Monthly Spindown in Collect!)? Please review the shipping
default reports. If you require customized reporting to meet
your clients' requirements, please call or email Technical
Services at 250-391-0466 or support@collect.org.
With these actionable items preplanned for and attended to in advance,
you will find your migration and usage of the Collect! system to be
smooth and seamless.
If you'd like to purchase any training or orientation time to
augment your Collect! system launch, contact Technical Services
at 250-391-0466.
See Also
- Accounting Topics
- Debtor Financials Basics
- Transaction Type
- How to Enter a New Client
- Debtor
- How To Setup Credit Reporting
- Credit Report Details
- Prepare Accounts For Reporting To Credit Bureau
- Select Bureau Report Details
- How To Use the Help Menu

|
Was this page helpful? Do you have any comments on this document? Can we make it better? If so how may we improve this page.
Please click this link to send us your comments: helpinfo@collect.org