Web Host Setup And Testing
This document describes how Collect! can be set up in your
office to work as a simple web server - communicating over the
Internet with your operators or your clients anywhere in
the world - while you maintain control over what they see and
what they do. Web Host is an ideal solution for Internet
accessibility and for modern intranet works.
Streamline data entry and retrieval with Web Host's ultimate
flexibility. Create custom easy-to-understand data entry forms
for your staff to use from their Internet browsers. Create elegant
reports to display account information to your clients. Web Host
functionality is supported by sophisticated, powerful backend
processing through Collect!
Collect! Web Host works with browsers such as Internet Explorer
and Netscape. It has been tested with Internet Explorer 5.5 and
higher and with third party tools used for 256 bit encryption. Using
other browsers may produce unexpected results.
 By default, Collect! Web Host has SSL functionality
enabled to provide encryption services for secure
mode. All that is required is that you start the
Web Host with the /W1ss argument in the Web Host
startup icon. Collect! will use Port 443 for HTTPS
by default, or you can set a different port using
the /y argument.
By default, Collect! Web Host has SSL functionality
enabled to provide encryption services for secure
mode. All that is required is that you start the
Web Host with the /W1ss argument in the Web Host
startup icon. Collect! will use Port 443 for HTTPS
by default, or you can set a different port using
the /y argument.
Comtech is not responsible for the security of your data.
Internet security is complex and rapidly changing and requires
a dedicated security specialist.
Setup Background Requirements
- Basic concepts of HTML
- Basic concepts of Networks
- Firewall/Security for Internet
System Requirements
- Reliable TCP/IP network with appropriate name resolution
- Internet Explorer 5.5 or higher
- A third party SSL product (e.g. sonicwall)
Operation
Two distinct entities are involved with the operation of the system:
- The server side is a CV11.exe process.
- The client side is a web browser.
Server:
Collect!'s HTTP server listens on the port number specified
in the /Snn command line entry. The
default is port 80 for HTTP servers, so, typically, you want to start
with /S80. By using port 80, you make it possible to just type
the server's network name into the browser's navigation pane and
you end up on the server.
You also need the /W1ss /y443 command line
argument to kick it into web server secure mode. (Tech Note - It
operates in a packet routing mode if the /Snn is specified without
the /W1ss argument.) Collect! will use Port 443 for HTTPS by
default, or you can set a different port using the /y argument.
When operating as a web server, /S80 /W1ss /y443,
you can now use your Internet browser to submit encrypted
data to the Collect! server, using Collect!'s internal SSL handling.
If you are using a third party SSL utility, use the
arguments, /S80 /W1s for Web Host
secure mode.
Client:
The Collect! server receives a POST command from an HTTP
browser form submit. We parse the command and save it to
a *.csv file in the UserID folder. Then we call the importmap
specified in the posted data from the web page. This lets us
interpret the fields in the *.csv file linearly in a customized import
map. The hidden field named 'importmap' is skipped and then
the rest of the fields are saved to the *.csv file.
Please review our examples. You can use these, modify them,
or create your own.

Web Host Shortcut Command Line Arguments
The Web Host command line should be using a UNC path to
the CV11.exe file as well as the following three
arguments /S80 /W1ss /y443.
The /Snn argument causes Collect! to listen
on Port nn. So /S80
causes Collect! to listen on Port 80.
A /W1 argument makes Collect! start as
an HTTP server. The /W1ss argument
enables Web Host internal SSL functionality using SSL 2.3
with 256 bit encryption. To specify other option, please see the
section below, "Secure Mode."
The /W1s argument enables Web Host
secure mode when using a third party SSL utility.The default
is SSL 2.3. To specify other option, please see the
section below, "Secure Mode."
The /y443 argument specifies the secure
port to use for HTTPs requests.
By default, Collect! Web Host has SSL functionality
enabled to provide encryption services for secure
mode. The necessary Keys and Certs are created
automatically when you first open Web Host.
Additional arguments cause the web server to automatically
sign into Collect! Use the argument /i{ User ID}
for the User ID. You must use a valid ID that is already set up
in your Operators. For example, /iWEB.
Use /p{ Password} for the User Password.
This must be the valid password for the User ID that is set up
in your Operators. For example, /pWEB.
Examples:
1. Secure mode with the use of the /W1ss /y443 arguments:
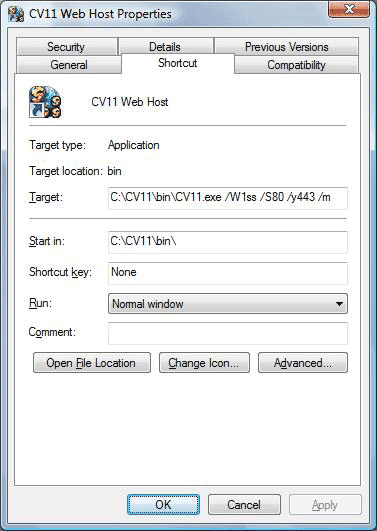
Collect! Web Host with Collect!'s internal SSL handling enabled
2. Secure mode with the use of the /W1s argument:
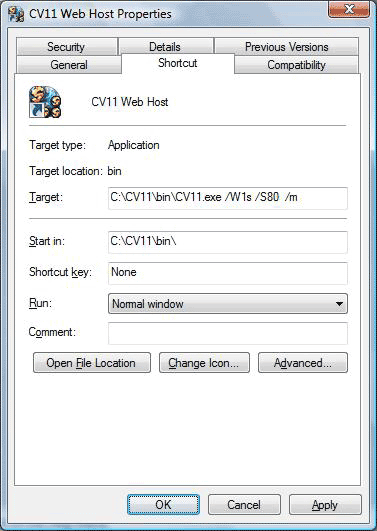
Collect! Web Host - Secure Mode - when using a third party SSL utility
3. Web host mode, not secure:
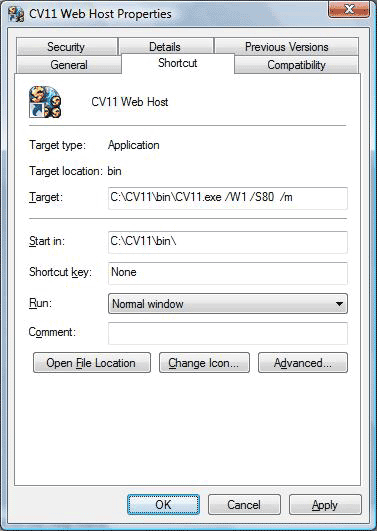
Collect! Web Host - Not Secure - Not recommended
SSL Encryption Levels
Collect! supports all common encryption methods. You can use
any one of the following.
To enable a specific encryption method, you can simply add one
of the following arguments to the Web Host shortcut.
| /w1s ARG | /w1ss ARG | ENCRYPTION METHOD |
| /w1s | /w1ss | SSL2.3 |
| /w1s0 | /w1ss0 | SSL3.0 |
| /w1s1 | /w1ss1 | SSL2.0 |
| /w1s2 | /w1ss2 | SSL2.3 |
| /w1s3 | /w1ss3 | TLS1.0 |
| /w1s4 | /w1ss4 | DTLS1.0 |
| /w1s5 | /w1ss5 | TLS1.1 |
| /w1s6 | /w1ss6 | TLS1.2 |
Example:
C:\CV11\bin\CV11.exe /W1ss2 /S80 /y443 /m
When you open the Web Host, the read-only "Security"
field displays the encryption method Web Host is
currently using.

Collect! Web Host using SSL2.3 Encryption
If no encryption method is used, this field will display the
word "none."
It is recommended that your internet browser
encryption method setting matches the
encryption level you are using for
Web Host.
Web Host Test Mode
When Collect! is started in Web Host mode, menus are disabled.
They can be re-enabled by signing in as User Level 99.
As a command line argument, the letter 't' is also available if
you want to start the Web Host in "test mode" based on the
current user level rights. For example, /wt1s or /wt1ss will start
up Web Host in test mode with all menus enabled.
W3 Mode
Real time updates to the system are possible through Web Host
using the /W3 startup option. This enables predictive dialer users
to return results of call campaigns to Collect! using XML. Normal
system password authentication is bypassed and data is imported
directly into the system. This may be used with Trusted Hosts available
through the System menu, Network and Environment option.
Example:
/S80 /W3 /y443
Web Host Packet Logging
This argument, /whl, is used for
troubleshooting transmission of Web Host data.
The /whl command will also
prevent the deletion of the temporary CSV files that
Collect! uses for XML Data Pump.
Example:
C:\CV11\CV11.exe /S80 /W3 /y443 /whl
Web Host Packet Logging Enabled
This will generate a text file in your CV11\bin folder,
i.e. "webhostpacketlog.txt." This is for advanced developer
troubleshooting. This file can be used to reproduce HTTP
headers and payload content, for instance in
XML Data Pump troubleshooting.
This will also allow you to log SSL encrypted
sessions too, since Collect! writes to these
files after the decryption phase.
Timed Shut Down
If you wish to log out of the Web Host automatically at a
given time, you can use the command line argument /T in
the CV11 shortcut you use to start the Web Host.
Example:
C:\CV11\CV11.exe /S80 /W1ss /y443 /T1:30
Shut down Collect! Web Host at 1:30 AM (Uses 24 hour clock)
The Web Host ignores any settings set in Database Preferences
for Auto Log Out After and will not shut down automatically
unless you use /T in your shortcut as shown above.
Setting Up Collect! Web Host Users
To set up an operator to have access to the Web Host via
the browser, each web operator must have 'Allow Browser
Signon' switched ON. Click "System\Rights\Operators" then
click on the Operator you wish to set up for Web Host OR click
the New button to create a fresh login. In the Security Tab of
the Operator screen, the "Allow browser signon" software switch
is located in the middle of window, to the left of Group ID.
If you are creating or testing anything that could
affect your live production environment, we
recommend experimenting in your demodb first,
before taking your new process or scenario live
to your masterdb.
Collect! currently demonstrates 7 user security levels set
up to access the Web Host. These are Client, Owner,
Data Entry, Accountant, and Collector (CL1, OWN,
DEN, ACT, SMG, SAL and JC.) Each of these levels has its
own distinct viewable pages. The CL1 operator is a
Guest level mainly in place for clients to view your Web
Host before they come on board. Other user levels may
be used as well, including a Client Group operator.
Please refer to How To Add A User To Web Host
for additional information.
Trusted Hosts
Web Host access may be limited only to IP addresses you
list in Trusted Hosts. When this feature is enabled, no other
IP addresses will be allowed to access Web Host screens.
Please see the Help topic, Trusted Hosts, for more information.
Web Host Preferences
Additional Web Host related settings may be set at the global
level in the Database Preferences window.
Maximum Web Host Users sets the number
of active users that Web Host will allow during any given session.
Web Host Session Mem KB sets the
maximum size of data packets Web Host will send and receive.
Please refer to Database Preferences for details about
these settings.
Windows Security Alert
The first time you start the Web Host, you may see a
security alert if you are running Windows XP or a third
party firewall. Please refer to Windows XP Firewall for
details for set your security to allow the Web Host to
accept connections from the internet.
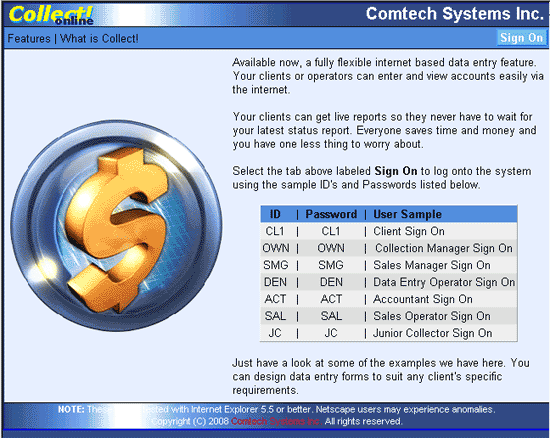
Logging In Via The Browser
With your Web Host running, open your browser. You would
type into the Address bar, the IP address or UNC path of the
computer that has the Collect! Web Host running.
If this is on the same machine that you are currently
using, you can use 'localhost' for the path. Login
with each UserID to view the different interfaces.
When a User logs in for the first time, Collect!
Web Host creates a folder for that UserID. For
example, CV11\data\html\users\98\CL1)
Technical Description
How the Browser Interacts with Collect! Web Host
Collect! Web Host is intended to be a simple means whereby you
can
- Give your clients access to live reports and data
- Allow data entry by personnel using a browser
All users who wish to access Collect!'s Web Host must
use a browser that supports HTTP 1.1 protocol. All samples have
been designed and tested for Internet Explorer 5.5 and higher
with 'Use HTTP 1.1' switched ON in Internet Options - Advanced Settings.
Collect! Web Host uses two processes: Import and Report
The imports and reports in the Collect! Web Host are totally
separate from Collect! They are stored in the html\db folder
of the database. Collect! Web Host responds to HTML FORM
submissions of the GET and POST requests. Collect! looks at the
Action property of the FORM and will either call an Import or call a
Report. The type of import or report that is called is determined by
a hidden input tag. This tag has a NAME property of
either 'importmap' or 'reportmap'. The VALUE property of this input
tag would be the exact name of the import map or report that you
want to call. When an 'importmap' is called, the hidden 'importmap'
is skipped and the rest of the fields are saved to a *.csv file in that
UserID's folder. Collect! Web Host then imports that file. All of these
requests are displayed on the HTTP Request Log form in the
Web Host.
Please review our examples in the Collect! Web Host. You can
use these, modify them, or create your own.
Background Requirements for Editing/Creating Imports:
- Knowledge of Database Imports with CSV files.
Please refer to How To Create A Single Record Import Map.
Background Requirements for Editing/ Creating Reports:
- Knowledge of HTML code.
- Knowledge of writing reports in Collect!
Please refer to Report Topics Index.
Changing Colors for the Collect! Web Host interfaces
- Knowledge of CSS (Cascading Style Sheets)
Testing Your Web Host Security
SSL encryption is built into Collect!. Use the command
line argument /W1ss /y443 to
start Collect! Web Host in secure mode.
To test the Web Host, start your browser on the Server and
type https://localhost into the Address field.
Your browser should display the default Collect! Web Host
sign on page.
Collect! Web Host Home Page
Collect! Web Host Sign On Screen
When using the Web Host in secure mode, there should
be a symbol of a lock in the Internet Explorer
status bar (in the LOWER RIGHT corner of your screen)
as shown below.
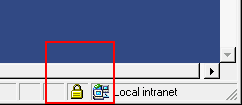
Security Lock Indicator In Status Bar of Your Browser
Ports Used For Web Host Secure Mode
By default, security software listens on port 443, manages the
security, and passes unencrypted data to the Web Host,
which listens, by default, on port 80. Similarly, data from Collect!
Web Host is encrypted and sent back to the requesting client.
You would configure your third party security software to set
the port values and a number of other details.
HTML Folder Hierarchy
Html folders are organized under the database folder in subfolders,
one per user level, {database}\html\users\level\userid. The user
level subfolder contains personal folders for each web user.
Requests for html pages by authorized users are processed as follows:
Collect! Web Host checks the user's personal folder.
If the file exists there, it is returned.
If the file is not found in the user's personal folder, Collect! Web
Host checks the user level's template folder and returns the file
if found there.
If the file is not in the user level template folder, then the master
template folder is checked and the file is returned from there.
While this may seem to be an unusual way of dealing with web
page requests, this scheme allows you to fully customize each
user's web experience, yet easily maintain a set of general web
pages that apply to groups of users.
User Authentication
When a valid user signs into Web Host, Web Host holds on to
their login information. When the user logs out of Web Host, the
information is cleared. If instead, the user simply closes the web
browser, when they log back in they will be prompted for
username and password twice, even though they were entered
correctly. This is because Web Host is verifying the stored login
information with the new login request.
Server/Client Arrangements
These diagrams provide suggested client/server arrangements
that you can employ with Web Host.
The first arrangement is a simple network setup. A separate
instance of Web Host provides access to promotional pages
for guest users.

Web Host Setup 1
The second model demonstrates running multiple instances of
Web Host and a separate instance for guest users.
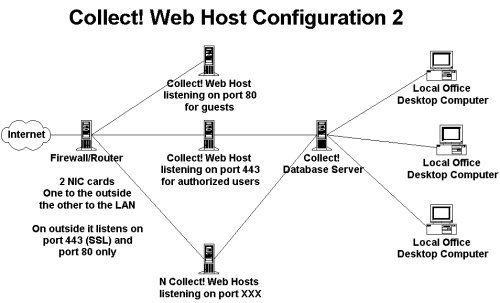
Web Host Setup 2
In the next model unauthorized users can only access an external
server. This provides general access to your promotional pages.
For authorization, users are referred to the secure port on the
Firewall/Router.
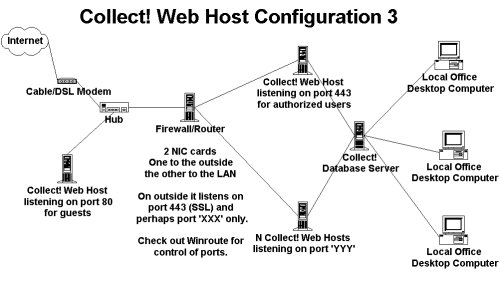
Web Host Setup 3
Firewalls/Routers
Notice the use of firewall/routers in the above diagrams.
Comtech can suggest solutions that we have tried but you will
need a competent technician to help you design your own
solution.
Scalability
The Collect! Web Host is an HTTP server that responds to the
GET and POST requests. The Web Host is a single application
that responds to individual requests as they come in. Response
time depends on the hardware the Web Host is running on.
Scalability for very large numbers of simultaneous Web Host
users is accomplished through a central database server, multiple
web hosts running on one or more web server machines
communicating with clients through a load balancing router.
Custom Reports And Imports
Custom routines can be designed by Comtech to satisfy your
unique business needs for data entry and retrieval. All operations
can be performed through Collect! using the flexibility of Web Host,
and the reporting and importing functionality inherent in Collect!
There is no need for third party utilities or programs.
Do not have Collect!'s text editor window open when
Collect! is acting as a web server. This will cause any reports
that need to run in the background due to remote user requests
to fail. If no one is accessing Web Host via browser while you are
editing the Web Host reports, there is no problem.
Mime Type Support
Mime types relate to the files we send to client browsers and
how we send those files. Each mime type can have several
different extensions, and may want to be transferred in ASCII
or binary modes.
The mimetypes.txt in the HTML folder
lists the mime types Web Host supports. This file is
read by the Web Host and used to resolve file types.
Click link to view: Mime Types Supported by Web Host
Bandwidth
When bandwidth is limited, the Collect! Web Host is a better
alternative to other means of Remote Data Entry. While the
Web Host does not provide the full functions and administrative
capabilities of the complete Collect! application to the client
machines, it can be readily tailored to offer remote collectors
and managers access to their accounts, the ability to record
notes, schedule future contacts and possibly post payments,
and to print reports. It can be tailored to offer web access not
only to your collectors in your remote offices, but also to your
clients, to access account information and reports directly
from the web, if you want them to.
If bandwidth is a concern and you want central control of your
database and accounts, perhaps web host functionality is
worth looking into. You have the added benefits of controlling
how your accounts are routed and processed. Remote offices
cannot run database maintenance or other System administration
tasks, so you have full administrative control.
Summary
A fully functional Web Host is installed when you install Collect!
With a few simple command line arguments, Collect! starts in
server mode and Web Host is ready to accept requests from the
Internet. If you need custom data entry and retrieval forms, this
requires modifications to web reports and import maps. Web reports
are easily modified by someone experienced in HTML. Web import
maps can be modified by anyone familiar with the import/export
module in Collect! From your most basic to your most complex
Internet data access needs, Web Host is the best and simplest
solution available on the market today.
See Also
- Web Host Quick Setup - getting Web Host up and running quickly.
- Web Host Topics
- Command Line Startup Options
- How To Setup Operators
- Database Preferences
|
Was this page helpful? Do you have any comments on this document? Can we make it better? If so how may we improve this page.
Please click this link to send us your comments: helpinfo@collect.org