Setup Client Login
Your Clients can access your system to review ONLY
their own portfolio and with ONLY the level of access
you wish them to have.
These to objectives are achieved with a combination
of Collect! security/ access rights settings and
customizing your Client portal if you are utilizing
Webhost. Example: It is possible to disable
Collector Notes from appearing to Clients. With direct
VPN access to your server, it is not possible to disable
Collector Notes from appearing at least in Read-Only
access mode.
Current security settings and a special Client/Guest
user level, you are able to keep your Client logins
secure and restricted to their own Debtor accounts
without any ability to go further or wider in your
system. The lock-down is based on the Client Number
you have ascribed to them and outside of which they
can see no data.
The 'Browse- Find By' functionality for Clients is tied to a
hierarchical Client consolidation system that also allows
you to use the "Owned by Client" field in the Client screen.
This field will allow you to consolidate a group of Client
numbers together under one main Consolidation Code. Also,
with careful construction and testing, you can create
a few levels of nested consolidation for more complex
User Access requirements.
Example: Your Client has ten Client Numbers.
The Head Office Rep needs to have access to all ten Clients
but there is a Division Manager who is only allowed access to
four of those ten Clients. It is possible to configure the
User Access levels so that each of these Reps can gain
access to your system without compromising the Client's
security requirements.
 WARNING: Account security is ultimately your
responsibility. When setting up your Client
Operators, you must ensure that Browse Find
By is working as you expect and that your
Clients can see only those records you want
them to see.
WARNING: Account security is ultimately your
responsibility. When setting up your Client
Operators, you must ensure that Browse Find
By is working as you expect and that your
Clients can see only those records you want
them to see.
Setup Client Login
The following screenshot is an example of a simple Client login
with only a single Client Number
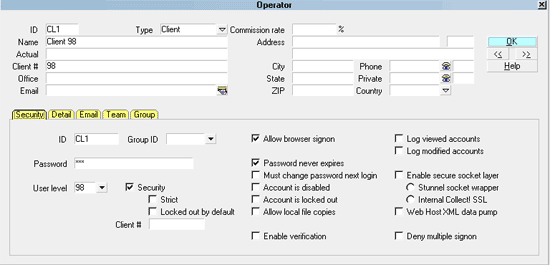
Client Operator with All Settings
To create a new Operator ID for a Client login, your menu path
is "System\ Rights\Operators". You must be signed in with an
ID that has sufficient access and permissions to enter new
Operator codes. A Level 10 such as the OWN login which ships
with Collect! is fine. Once you've entered the Operators
setup screen, follow the screenshot example above.
 By default, Clients with single Client
numbers are set up as User Level 98,
Guest. This level grants READ ONLY
access to all Fields, except Notes.
By default, Clients with single Client
numbers are set up as User Level 98,
Guest. This level grants READ ONLY
access to all Fields, except Notes.
Important aspects:
- In the Type field, select Client. A new field, Client #
becomes visible.
- Enter the Client # that this user will be approved for
access to. You MUST put a value in this
field for this to work right. If you leave this blank,
Collect! will not allow the Client to sign into Collect!.
- To enable Clients to see only their records, we have to
switch ON "Security" in the Operator Detail.
- Unless your Client indicates otherwise for security reasons
of their own, switch ON " Password never expires" for your
Client's ease of use on the system.
- Click OK or Press F8 to save your changes and exit the setup
screen.

See Also
- Operator Setup
- Client Topics
|
Was this page helpful? Do you have any comments on this document? Can we make it better? If so how may we improve this page.
Please click this link to send us your comments: helpinfo@collect.org