How To Use Contact Plans
This document will help you begin to use Contact Plans to control and manage your Contacts.
What Is A Contact Plan?
Manually scheduling contacts is great, but there are many times when you would have to enter the same contact over
and over again because it is a repeating schedule. Other times you may need to enter several contacts to work the
account properly. For instance, perhaps a letter, a phone call and a review are necessary. When you find that you are repeatedly
entering the same contact, or scheduling multiple contacts to perform the work you need done, let Collect! do your work
for you with a Contact Plan.
A Contact Plan is made up of single contacts or events. When many contacts are used together as a single entity, it is called a
Contact Plan. Each component in a Contact Plan is called an Event.
* An Event can be a letter, a review, a change in status, posting a transaction and many other types of events.
* An Event may be scheduled to run immediately or at a predetermined date and time in the future.
* An Event:
- may be assigned to an operator you specify
- may have a specific priority
- may be scheduled to run only if a certain condition is met
The Demonstration database in Collect! contains many samples of contact plans.
We will use some of these in the exercises in this document.
 It is assumed that you meet the following requirements.
They are necessary in order to benefit fully from the information in this topic.
It is assumed that you meet the following requirements.
They are necessary in order to benefit fully from the information in this topic.

Requirements
- Review help on Contacts, Events and Schedule Next Contact
- Review help on Reports and Letters
- Plan a Collection Strategy
- Setup Clients. Debtors and Operators
Viewing Contact Plans
Contact plans are found by pulling down the System menu and choosing Contact Management Settings. A sub-menu offers you
the selections -- View Contact Plans, Import Contact Plan and Export Contact Plan.
When you choose View Contact Plans, a list of all Contact Plans in Collect! will be displayed. Buttons on the Contact Plan
list allow you to create a New plan, Edit an existing one from the list, or Delete a plan from the list.
* You can also highlight a plan and press F5 to display its Contact Plan form.
* Or, you can press F3 to open a new, blank Contact Plan form.
Examine several of the existing plans to get a feel for how they work.
Import/Export Contact Plan
You can also import Contact Plans from other databases or from technical support documentation that Comtech Systems sends you.
You can export Contact Plans in a similar fashion. This is often the best way to send Comtech Systems details
of a problem you are having with the functioning of your Contact Plan.
Please refer to the Help topics - How To Import Contact Plans and How To Export Contact Plans.
Contact Plan Events
Contact Plans are composed of events, as described above. Select an existing plan and click on one of the events listed.
The Event form will open and you can examine the settings that are possible for each Event in a Contact Plan.
Press F1 from the Event form for an explanation of the settings on the Event form. You can also access information
on Contact Plans by pressing F1 from the Contact Plan form.
When you are viewing a Contact Plan form, you can press the record navigation buttons: [ << ] BACK , [ >> ] FORWARD
to view other plans in Collect!'s list of Contact Plans. Also, when you are viewing the Events form for a
particular plan, you can use the record navigation buttons to scroll through all the Events in the
Contact Plan you are viewing.
Design Or Modify A Contact Plan
You can print all the details of a particular Contact Plan and all of its Events by pulling down the Print menu. Choose
Reports and Letters, then choose Quick Print. Choose the destination for your output, for instance, screen or printer.
Choose Print. When prompted to include details, choose "Yes".
This will print a Contact Plan report for the plan you are viewing, including all of the settings for each of its Events.
This can be used to examine a plan in detail and figure out the settings you would like for your own plan. If you print this
to the printer, you can compare the settings for a few plans and jot down changes. All of the settings are labeled in the
report so you will know exactly what you are setting as you draft your own strategy into a Contact Plan.
You can create a new Contact Plan and apply your settings to it, adding events as needed to complete the plan.
Select A Contact Plan For A Debtor
 For these exercises, please sign into Collect! as operator OWN. When you choose a Debtor for one of the
instructions, check the upper right hand corner of the Debtor form. The Operator field should read OWN. This way, your results
should match the results that are described in the examples.
For these exercises, please sign into Collect! as operator OWN. When you choose a Debtor for one of the
instructions, check the upper right hand corner of the Debtor form. The Operator field should read OWN. This way, your results
should match the results that are described in the examples.
Pull down the Browse menu and choose Active Debtors. Then, open a Debtor form by pressing F5. Click the Action button or
press F2 when you are in the Action field. The list of Contact plans pops up. Choose one that sends a letter or schedules
a phone call and press the Enter key. Collect! runs the Contact Plan behind the scenes, scheduling Contacts and
performing other tasks set in the Contact Plan and its Events.
Select the Contacts tab. The list of this Debtor's contacts is displayed.
Notice that the new contacts have been added to this list.
Work In Progress
Go to the Main Menu and choose Work In Progress. The Contacts scheduled in the Contact Plan to occur immediately will now appear
in your To Do list or in the list of the appropriate operator. Events scheduled in the future, such as reviews, will appear in
Work In Progress on future dates as setup in the Contact Plan and displayed in the Debtor's contacts after the
Contact Plan is run.
Batch Processing
You can also run Contact plans on batches of accounts. You can batch accounts by any criteria you choose. Use the Tools Menu
Batch Processing command for more information.
How Collect! Executes Contact Plans Internally
When you choose an action for a Client or Debtor, Collect! goes through the following process.
Read the Contact Plan
Collect! reads the Contact plan from the local Contact plan cache or from disk.
All events are stored in workstation RAM for fast access. This assumes that you have set the Cache Contact Plans
switch in the WIP Options form. Access this form from the Main Menu as follows.
Choose System Administration
Choose System Setup and Configuration
Choose Plans and Reference Tables. You will be able to access the WIP Options from the form that opens now.
Check mark Cache contact plans to switch it ON.
If the Prompt Before Deleting Switch is Set
1) Make a list of pending Contacts
2) Display the list
3) Ask the User if they should be deleted.
4) If the User cancels, then cancel the whole plan.
Otherwise, continue.
Don't turn the "Prompt Before Deleting" switch on if you plan to run a Contact plan in a batch.
If the Delete All Pending Contacts Switch is Set
Metro Credit Report Contacts are not deleted.
If the Delete Same Type Contact Switch is Set on the Event
Now, Collect! scans through all pending Contacts for the Debtor (when "Delete All Pending Contacts" was not set.).
If one of the events in the Contact plan has the "Delete Same Type Contact" switch set, then delete any Contacts of that type.
The Event form opens when you select one of the events listed on the Contact Plan. Details of the particular event
are set in this Event form, such as "Delete Same Type Contact."
When a contact plan with "Delete all pending contacts" attempts to delete a pending contact, it will leave the contact alone if
the plan is being executed via the " Process automatic contacts previously scheduled" batch process.
If the Prompt For Start Date Switch is Set
If the "Prompt For Start Date" switch is set in the Contact plan, then Collect! gets the reference date for the Contact plan;
otherwise, today's date it used.
If you run a batch process with this switch ON, Collect! will prompt you only once at the start of the batch. The
Start Date you select will be applied to the whole batch.
Scanning Through Each Event
Now, Collect! scans though each event in the Contact plan and prepares the Contact details in RAM.
Determing the Contact Date
Now Collect! performs the following tasks:
1) If the "Delay Days" switch in the Event form is set, take the reference date and add the number of delay days.
2) If the "Day of Month" switch is set in the Event form, then check today's date.
If today's Day of Month is less than the specified Day, then schedule the Contact for this month on that day.
If we are already past that day of the month, schedule it for next month on that day.
If you did not enter a value for Day, Collect! will default to the 1st of the month.
3) If the "Next Month Same Day" is set in the Event form, then schedule the Contact for next month, the current day of month.
For example, if today is the 20th of October, the Contact will be scheduled for the 20th of November.
This switch is useful for creating repeating Contact plans.
4) After the date has been set, check the WIP Options to determine whether the "Schedule Contacts On Weekends" switch is turned
on. If Contacts are not to be scheduled for weekends, increment the date if it falls on a holiday.
Determine the Contact Time
1) If no time is specified in the Contact form, make the scheduled Contact time 0.
2) If the "Delay Minutes" switch is set in the Event form, add the delay time to the current time of day. This is useful for
setting a phone call for a few minutes from now.
3) If the "Timeless" switch is set in the Event form, then set the scheduled time to that time of day. For example, if the
Time entered is 18:00, the Contact will be scheduled for 6 PM.
Fill in the Other Contact Details
Now, Collect! fills in other Contact details, such as the priority, Operator, description and so on.
If the Prompt To Confirm Details is Set
If "Prompt To Confirm Details" is set in the Event form, then display the Contact as scheduled, and allow the User to change
the details.
Processing the Contacts:
Next, Collect! will group the contacts into the follow groups and run them in the order that they appear
in the Contact Plan Event list.
1. Plans, Letters, and Certain Transactions
Any Contact plan events scheduled in the plan for zero delay are run immediately, in the order listed in the first
Contact plan. Events within the called plan are also processed in the same order, as outlined here. Notice
that any changes made in the sub-plan will take effect before other events are processed in the main plan.
Letters that are marked as "Print Now" will print.
Transactions that have "Prompt To Confirm Details" will prompt the user to confirm the transactions details, then it
will post to the database immediately.
2. Activate and Close
Collect! executes Activate and Close events to update the Debtor's mode.
3. Notes
Notes scheduled for today are written to the Debtor notes. They will contain the previous account status before the plan was
run (unless it was changed in called plan), but the new Operator if one was assigned, and any changes made by the Contact plan.
4. Status, Sales, Edits, Commission, and Rate Plans
Status changes, sales assignments, edits, commissions, and rate plans that are scheduled for today will execute next.
5. Promises
Promises are created next.
6. Operator Assignments
Operator assignments that are scheduled for today are made.
7. Transactions
Transactions that don't have "Prompt To Confirm Details" checked and are scheduled for today are posted.
8. Metro
This is an honorable mention as Metro contacts should never be created in a contact plan. Please refer to the
Help topic How To Read The Metro Contact Description for more information.
9. Other, Phone, Review, Email, Client, ODBC, and Delayed Contacts
All remaining Contacts are scheduled. Those include the above Contact types if they are scheduled for a future date.
The Contact events that are scheduled for a future date can be run using the Tools menu Batch Processing command.
Contact Plan Samples
Quite a number of sample contact plans can be found in the Demodb database that ships with Collect! As described above,
it's easy to change existing plans and add new ones to suit your requirements. The list below introduces some basic
predefined Contact Plans.
The pre-designed Contact Plans are only found in the Demodb database.
Copying Contact Plans
If you would like to copy some of these Contact Plans into your Masterdb database:
1. At the Main Menu, pull down the System menu and choose Contact Management Settings.
2. Then select View Contact Plans.
3. From the list that is displayed, use the arrow keys to locate and highlight the Contact Plan you would like to copy.
4. Select Edit from the top menu bar and then select Copy from the drop-down choices. You will be notified that your
Contact Plan has been copied to the Clipboard.
To copy additional Contact Plans, use the arrow keys to highlight them. Repeat step 4. You will
be notified that other items are on the Clipboard. Choose "No" to add this item to the Clipboard contents.
5. Click OK to close the Contact Plans list. Choose Quit at the Main Menu to exit from your Demodb database.
5. At the Welcome to Collect! screen, switch to your Masterdb database. The Database to Open field will now display "MASTERDB."
6. Repeat steps 1 and 2.
7. With the list of Contact Plans displayed, pull down the Edit menu and choose Paste.
8. Check the Contact Plan(s) you copied to make sure it has all the information of the original and all the Events listed.
Contact Plan and Event Settings
Only settings that are switched ON are listed below. You can view these Contact Plans as described above under the
heading "View Contact Plans.".
You will find it most helpful if you open each Contact Plan as it is being discussed and examine the settings that are
mentioned. Pull down the System Menu, choose Contact Management Settings, Contact Plans and then choose View.
Look for each plan by its Code.
Press F1 on the Contact Plan form and the Event form for field level help and details.
*** PLANS IN THE DEMONSTRATION DATABASE MAY NOT HAVE EXACTLY THE SAME SETTINGS AS THESE PLANS ***
New Business
This Contact Plan manages new accounts. It is made up of a Contact Plan with five events.
After an initial letter, a phone call is made. This is followed by two more letters at intervals set in "Delay Days"
in the Event form. The events are scheduled and will appear in the Work In Progress list of the account operator on
the days predetermined by the Contact Plan.
On the days that letters are to be sent, they will be included automatically in batch process letters for that day.
On the Contact Plan form, the following information is setup:
Code: NEW
Description: New Business
Delete all pending contacts
The five Events for NEW are as follows:
1. This Event sets the Debtor status to NEW.
Type: Status
Description: NEW
Assign to account operator
Schedule immediately
Timeless
2. This Event sends the first Letter.
Type: Letter
Description: Letter 1
Assign to account operator
Schedule immediately
Priority: 10
Timeless
3. This Event schedules a phone call after 10 days.
Type: Phone
Description: Home
Assign to account operator
Delay days: Yes ......... Days: 10
Priority: 30
Timeless
4. This Event sends a second letter when 30 days have lapsed.
Type: Letter
Description: Letter 2
Assign to account operator
Delay days: Yes ........ Days: 30
Priority: 20
Timeless
5. This Event sends a third letter when 60 days have lapsed.
Type: Letter
Description: Letter 3
Assign to account operator
Delay days: Yes ........ Days: 60
Priority: 30
Timeless
The Days in "Delay days" are counted from the day the Contact Plan is run. So this Contact Plan
has two events that happen immediately, a status change and a letter. Counting from this date,
another Event is 3 days later, one 30 days later and one 60 days later - all counted from the
same beginning date - the first day the Contact Plan is run.
Close File
This Contact Plan will close an account and note that it has been closed. It can be used with another plan that sets the
conditions for closing files. For instance, if an account is paid in full, the account could be closed automatically.
See the topic How To Design New Contact Plans where a Paid In Full Contact Plan is designed using this idea.
On the Contact Plan form, the following information is setup:
Code: CLO
Description: Close File
Delete all pending contacts
The two Events for CLO are as follows:
1. This Event closes the file.
Type: Close
Assign to account operator
Schedule immediately
Timeless
2. This Event writes a note the Debtor's record.
Type: Note
Description: File closed
Assign to account operator
Schedule immediately
Timeless
Call in Fifteen Minutes
This Contact Plan schedules two events - one, a phone call in fifteen minutes and the other, a note, in case of a busy signal.
On the Contact Plan form, the following information is setup:
Code: C0
Description: Call In 15 Minutes
The two Events in C0 are as follows:
1. This Event schedules a phone call in 15 minutes.
Type: Phone
Description: Home
Assign to account operator
Schedule immediately
Priority: 90
Delay: Yes ...... Minutes: 15
Timeless
2. This Event writes a Note to the Debtor record.
Type: Note
Description: Busy, call again in 15 minutes
Assign to account operator
Schedule immediately
Timeless
Send a Letter
This Contact Plan schedules a letter to be sent. Then
it schedules a review to check whether a response
was received.
On the Contact Plan form, the following information is setup:
Code: L1
Description: Letter 1 - Today
The two Events in L1 are as follows:
1. This Events queues a letter in the print batch.
Type: Letter
Description: Series 3 - Letter 1
Assign to account operator
Schedule immediately
Prompt to confirm details
Delete same type contacts
Timeless
2. This Event schedules a review in 14 days.
Type: Review
Description: Letter sent recently. Any response?
Assign to account operator
Delay Days: Yes ...... Days: 14
Priority: 25
Prompt to confirm details
Delete same type contacts
Same description only
Timeless
Review a File
This Contact Plan schedules a file review.
On the Contact Plan form, the following information is setup:
Code: REV
Description: Review
The single Event in REV is as follows:
This Event schedules a review.
Type: Review
Description: Review file...
Assign to account operator
Schedule immediately
Priority: 30
Prompt to confirm details
Delete same type contacts
Timeless
Examples Using Contact Plans
Now, let's try a few if these sample Contact plans.
*** IMPORTANT *** For these exercises, please sign into Collect! as operator OWN. When you choose a Debtor for
one of the instructions, check the upper right hand corner of the Debtor form. The Operator field
should read OWN. This way, your results should match the results that are described in the examples.
The following examples assume you are on a Debtor record. If you are not on a Debtor record, pull
down the Browse menu, choose Active Debtors and press F5, or click on the line item, to open a Debtor.
Please press F1 for help regarding the Schedule Next Contact form which is mentioned in a few of these examples.
It is advised that you do not type details into this form or press the buttons on it until you know what they are for.
Scheduling Letters to New Business
1. Either press F2 on the Action field, click your mouse, or press the Action button.
2. Type NEW in the Action field. Collect! quickly performs some actions "behind the scenes."
3. Select the Contacts tab on the Debtor form. Notice that several new letters and a phone call are entered in this
Debtor's Contact list. Notice the dates. You will see that they correspond to the Delay Days that were set in the
NEW BUSINESS Contact Plan described above. These contacts will appear in the account operator's To Do list
on the days that they are scheduled.
Collect! has automatically scheduled all the appropriate contacts for this Contact Plan. You can see how this speeds
up data entry and minimizes errors. Contact Plans provide a consistent, timely contact strategy.
Scheduling a Call
1. Either press F2 on the Action field, click your mouse, or press Enter on the Action button.
2. Type the letter C and press Enter. The Schedule Next Contact form opens. This is because the "Prompt to confirm details"
switch is ON in the Event form for the Contact Plan whose Code is C.
You can easily verify this by opening the Contact Plan list. (Pull down System menu, choose
Contact Management Settings, Contact Plans, View.) Look for Code 'C' - Prompt to plan call.
Open this Contact Plan and click on the Event. You will now see that "Prompt to confirm details"
is checked. Whenever this is checked in an Event for a particular Contact Plan, the Schedule Next Contact
form will open when you type that Contact Plan's code into the Action field on the Debtor form.
Find help on the Schedule Next Contact form by pressing F1. There you will find details about the options and
choices you have when this form is displayed.
3. Fill in the details of the call you want to schedule. Select the Contacts tab and you will see that the call has
been added to the contacts list.
Scheduling a Letter
1. Either press F2 on the Action field, click your mouse, or press Enter on the Action button.
2. Type L1 and press Enter.
If you refer back to the details of the SEND A LETTER Contact Plan described above, you will notice that this
Contact Plan also has an Event with "Prompt to confirm details" switched ON.
Therefore, the Schedule Next Contact form will open.
3. The letter will be printed in the daily letter batch.
Find help on the Schedule Next Contact form by pressing F1.
There you will find details about the options and choices you have when this form is displayed.
Scheduling a Review
1. Either press F2 on the Action field, click your mouse, or press Enter on the Action button.
2. Type REV and press Enter.
3. When the Schedule Next Contact form displays, fill in the description of the review you want to schedule and it
will be added to the Debtor's contacts list.
You will find more help by pressing F1 in the Contact Plan form and also in the Event form.
Changing Debtor Commission Rate
When you enter new accounts from within the Debtors Tab in the Client Screen, the Rate field on each Debtor entered here will
be auto-populated from the rate which currently exists on the Client. If there is no default rate entered into the Client
Advanced Settings screen, this blank rate field will be passed along to Debtors as they are entered.
It is possible to override and overwrite a blank or default rate field on the Debtor screen as a new account is being entered
if there is an exception reason why it would be necessary to be faced with this chore. For the majority of the business you
will enter for any one Client, it shouldn't be necessary to be doing extra entry when the system is designed to save you steps.
There are a few commonplace Industry scenarios where you may find that you need to update significant portions of your
inventory with a new commission rate or rate plan.
- A Client who normally assigns Retail only at a rate of 35% will now be sending you listings for Commercial as well and you
are to charge 45% on this stream of business. This creates a condition where the Type of assignment is becoming the
determining factor in what will decision the correct rate to charge on each account.
- Your Agency has made a business decision to change its contingency rate for all Clients who assign business of a specific
Type, effective as of a designated date.
- You have an individual Client with one or more Client numbers that has changed their rate as of a specified date and wants
this change to be applied to shelf inventory retroactively in addition to what is being reflected as the current rate for
new listings.
 WARNING: We recommend taking a Snapshot of your database before embarking on any large-scale invasive auto-process.
The scenarios above which want a different rate entirely from the Client default for different reasons and based on Debtor
account Type can be best handled by adding an Event to the NEW Contact (Action) Plan which tests for account Type and changes
the commission rate on that basis from the default Client value for to the new prescribed rate for the account Type.
Here are examples of the settings you would use on the inside of a Contact (Action) Plan to make the change on the basis of the
account Type code.
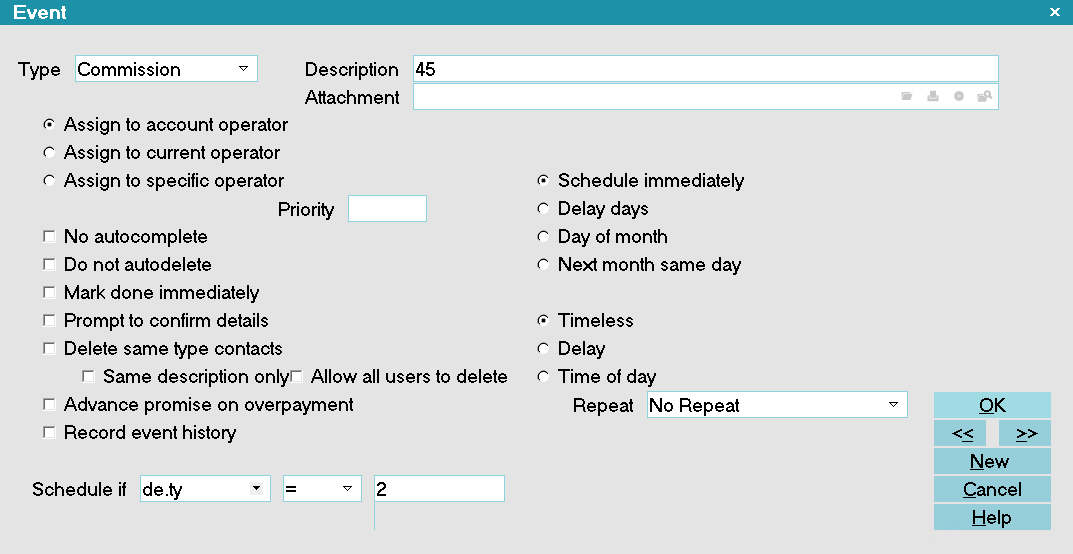
Plan Event to set Commission Rate to 45%
This event runs if the Pick List 'Type' is 2. In this logic, the numeric representation of the expressed "Commercial" type is
being tested for and if found to be true, ONLY then does the system update the commission rate on an account to 45%. Note as
well that the fill value 45 is entered in the Description field with no percent sign or decimal points.
The following is another example of the same decisioning using a different 'Type' Pick List numeric to make the conditional
logic test with.

Plan Event to set Commission Rate to 50%
This event runs if the 'Type' is 4.
To determine what your numeric value is for your 'Type' pick list selection, Right click on the Type field and open the pick
list by clicking into the field, then right-clicking. This will pop up an Access Rights window. Next to the "Pick list file"
field is a gray folder. Click the folder to open the pick list and determine what numeric value in your site's pick list
match the criteria you will be isolating by.
Adding an Event to your NEW account automation addresses part of the issue on a go forward basis. To run against the whole
database to identify and isolate accounts for this treatment, you need to gather up the shelf inventory and if applicable,
update all of their Commission Rates. If you are able to segregate on the basis of Client, like in #1 above, then this Tag List
creation can be done from within a Client's Debtors tab. If you need to sweep all Clients for a specific 'Type', the best
shelf inventory prospective will come from a Browse Active Debtors list.
The methodology is the same coming from a Client screen Debtors Tab or Browse Active Debtors list,
- From the list, click Find. When the Search Criteria window pops up, select 'Type' and pick from the
drop-down menu to populate your From / To columns with the target criterion.
- Click Search in the lower right corner to Tag a list of qualifying accounts.
- To properly gather your Tagged List, click Edit at the top of the screen, then View Tags (or View
All) - whichever message your running version shows you for this purpose.
- Create a new Contact Plan from the menu path "System\Contact\Management Settings\View Contact Plans" and input your Rate
Change Event. This standalone Contact Plan will be run as a batch process against your shelf inventory meeting the target
criteria for update.
- To run the created Contact Plan against all the accounts in the tagged list, click "Tools\ Batch Processing\Run Contact
Plans". Follow the prompts and select the Contact Plan designed for this purpose and run it.
- When asked to Untag your list after the process completes, initially say NO so that you can spot-check
a few to make sure the desired result was obtained.
- After confirming that your rates on the target subset of accounts have updated correctly and successfully, click
Edit to Untag your list and Clear your search criteria.
Reassigning an Account to a New Operator
This section steps you through creating a contact plan to reassign accounts to a different operator based on debtor criteria.
It requires familiarity with creating contact plans.
This example will assign accounts to JC based on the criterion New York.
Make sure that you have already set up an Operator form for the new operator you want to assign to your accounts.
Please be aware that changing the Operator ID on an account also assigns any In Progress contacts to the new Operator ID if
they were assigned to the account's previous Operator. Contacts that are Completed or assigned to a different Operator ID will
not be affected.
The simplest way to reassign accounts is to simply open each account that you want to reassign and select the new Operator ID
from the pick list for the Operator field on the Debtor form. Another method is using a contact plan. Please refer to
How To Use Contact Plans if you are not familiar with creating contact plans.
1. From the top menu bar, select Options and then select Contact Plans from the drop-down choices. This will display a sub-menu.
2. Select View to display the list of contact plans. Select the New button at the bottom of the list or press F3 to create a
new contact plan. This will open a blank Contact Plan form.
3. Type a unique 3 character name or number into the field labeled Code. Enter a brief explanation in the
field labeled Description.
4. Press F5 to activate the Events sub-form and select YES to create a new Event.
5. Select Operator from the pick list on the field labeled Type.
6. Select the radio button labeled Assign to specific operator so that a dot appears in it. This makes the
Operator field visible. Select the new Operator ID from the pick list attached to the Operator field.
For this example, select JC from the list.
7. In the first field next to the label Schedule if, select the down arrow to view the list of fields. Select
the criterion you are going to use, or begin typing in the field code, if you already know what it is.
8. In the second field enter the "If" condition that must be satisfied to use this criterion.
9. In the third field(s) enter the Value, or range of Values, to use when comparing fields to see if they satisfy the condition.
For this example, type in de.st in the first field, = in the second field, and then
NY or New York in third field (depending how your states are entered.)
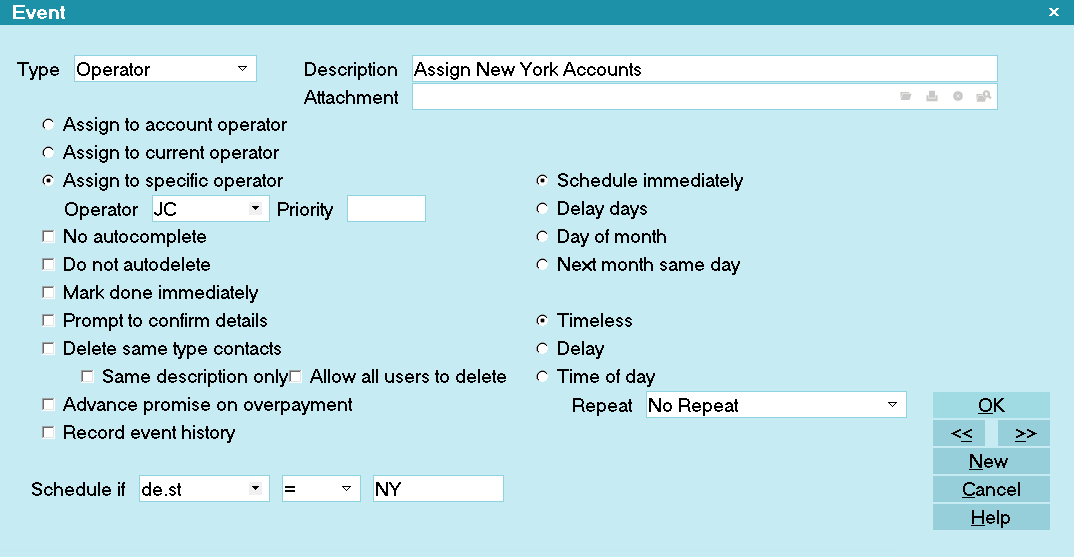
Operator Assignment Event based on State
10. Select OK or press F8 to close the Operator Event and return to the Contact Plan form. It should resemble the following
screen shot.
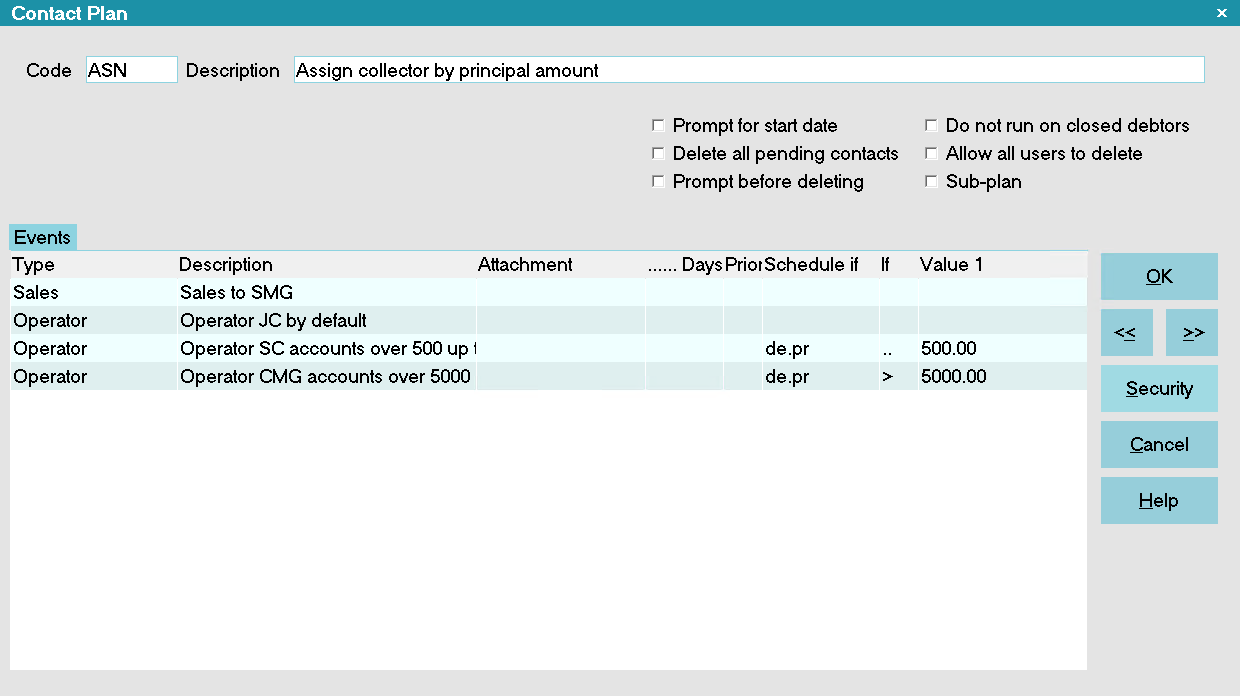
Operator Assignment Contact Plan
11. Select OK or press F8 to close the Contact Plan form and again to close the list of contact plans.
There are several ways to run this contact plan.
1. This plan can be run on an account directly when you are viewing the account. Select the button labeled
Action and select the contact plan to run it.
2 Or, type the contact plan's Code into the small Action box to the right of the field labeled Summary.
3. This plan can also be run through a batch process on specific accounts. Collect! will provide a summary of how many accounts
the plan ran on. Please see How to Batch Process Using Contact Plans for details.
Any In Progress contacts on these accounts for the previous operator will now show in the new operator's WIP list.
Summary
This article barely skims the surface of the possibilities available to you when you use Contact Plans. To use them
effectively requires a well thought-out collection strategy. As you know, there are many possible outcomes of
interactions with your Debtors and Clients. Many of them can be anticipated and handled automatically with Contact Plans.
| 
Was this page helpful? Do you have any comments on this document? Can we make it better? If so how may we improve this page.
Please click this link to send us your comments: helpinfo@collect.org