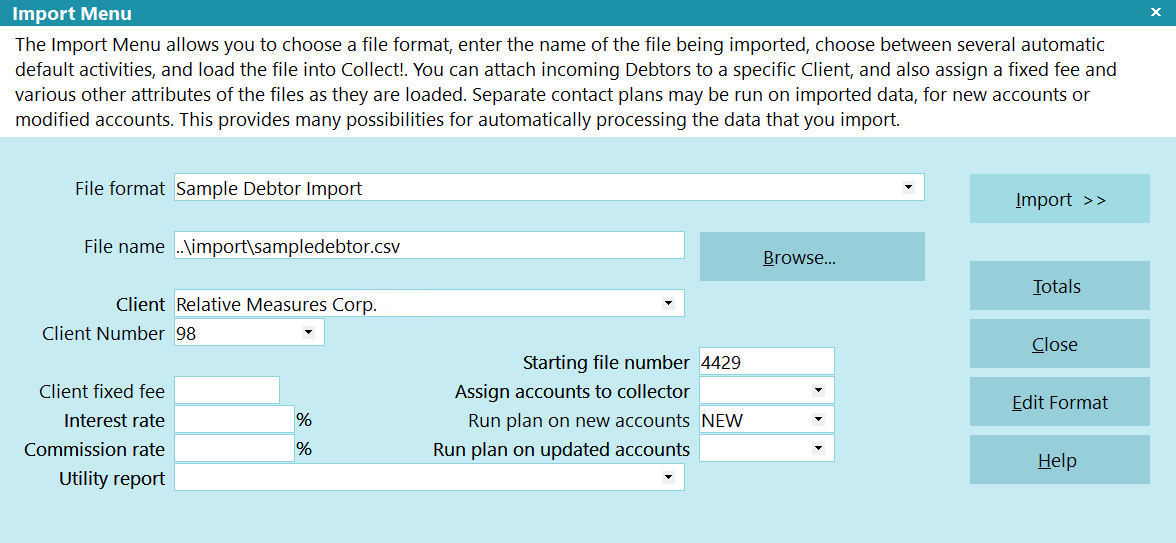
Import Menu
The Import Menu allows you to choose a file format, enter the
name of the file being imported, choose between several automatic
default activities, and load the file into Collect!. You can attach
incoming Debtors to a specific Client, and also assign a fixed fee
and various other attributes of the files as they are loaded.
Separate contact plans may be run on imported data, for new
accounts or modified accounts. This provides many possibilities
for automatically processing the data that you import.
Select File from the top menu bar to access the Import/Export
menu and then select Import File from the sub-menu to open the
Import Menu form.
Import Menu
File Format
This is the type of file you are importing. Press F2 to select
from the list. You can define a new file format from the Main Menu.

File Name
This is the name of the file. By default, Import loads the file
name from the File Format specification.
 The top two lines of *.cio files are reserved.
The .cio extension on a file causes Collect! to write system
information into the top two lines of an exported file. Collect!
does not read the top two lines of imported .cio files as user data.
Client
This is used when importing a file from one particular client.
Otherwise, leave this field blank. If you have more than one
client with identical names, enter a Client Number as well
so that Collect! can find the correct client.
Press F2 to pick from your Client list. This selection should
not be used with CIO files.
Client Number
Enter a Client Number to use when importing. Import will use
this value as a key to find the client. If this field is blank, Collect!
will use the name in the Client field. This field is updated when a
client is selected in the Client field.
Client Fixed Fee
The fixed charge is loaded into every Account record as it is
being loaded into the database. This field is the 'Precollect Charge'
shown in the Debtor Detail form in Collect!. It is not currently used
for accounting purposes.
Interest Rate
This is the interest rate that will be used to calculate the interest
the Debtor owes. Interest will be automatically calculated from
the interest date, read from each account in the import file. Leave
this field blank if you do not charge interest.
This field will not override any existing data
in accounts being imported. If, for example, some
accounts have an interest rate and others do not, the
interest rate will only be applied to those accounts
that have no existing interest rate at the time of
importing.
Commission Rate
This is the commission rate you are charging your Client. Leaving
this field blank results in 0 commissions being charged, something
which may be useful when importing Pre-Collect accounts.
Starting File Number
When importing new accounts, the internal Collect! Debtor
File Number is of vital importance.
After you have selected an import map, this field will populate
with the next available file number.
The value in this field will only be considered if the
Import Map has the "Import Specific File Numbers" box
checked on the Import Options form.
If you change this value to restart the numbering process
from a new number, Collect! will check the value you entered
against the highest file number in the database. If the value
in this field is lower than the highest file number, then it
is ignored and the next highest number is used. If the value
in this field is higher than the highest file number, then it
will be used and reset the numbering process for the next account.
Starting File Number will only affect the first account imported.
All subsequent accounts will use the auto-number process.
Assign Accounts To Collector
This ID will be assigned to each account as it is imported.
Press F2 to pick from your list of Operators.
Run Plan On New Accounts
This Contact Plan will be run after Collect! imports all data
creating new accounts.
 You can set additional options by choosing
a Contact Plan. These include scheduling review
contacts and letters to be sent, in addition to a
number of other details to help automate your
account processing.
You can set additional options by choosing
a Contact Plan. These include scheduling review
contacts and letters to be sent, in addition to a
number of other details to help automate your
account processing.
For example, you can have the system automatically schedule
a letter to be printed into the next batch, in addition to
automatically posting fixed charges to the Client, and
scheduling other letters or Operator contacts.
Run Plan On Updated Accounts
This Contact Plan will be run after Collect! imports all data
to existing accounts.
Since contact plans can contain conditional
processing (based on field values in the database)
you can embed quite a bit of intelligence into the
processing of incoming accounts. This eliminates
human error and increases efficiency.
Utility Report
When an import finishes, you can specify a report to run for
post-import processes. The report must be start on anywhere
and not rely on a tagged list.
You can use this option to run a complex account
distribution routine on your accounts.
Edit Format
Select this option if you need to modify an import map or
you want to create a new one in the currently loaded import
library. The list of all File Format Specifications will be
displayed. Select the import you wish to view. This will
show you the File Format Specifications for the import
map you selected. If you wish to create a new import map,
select the NEW button when you are viewing the list of
all File Specifications.
Browse
Choose this to open a dialog where you can pick a file to import.
Help
Press this button for help on the Import Menu
screen and links to related topics.
Totals
Select this button to display the Accumulator form.
The Accumulator form will be blank if you
have not used this advanced feature of
Import/Export. It is possible for Collect! to
keep running totals when records are imported.
Press F1 when the Accumulator form is
displayed to see more help.
Close
Select this to close this form and return
to the previous form without running an import.
Import
This button starts the import process. You will be prompted before
any new information is written to your database, and you will have
every opportunity to cancel importing.
AS Import Runs
As records are being imported, each record is displayed and the
program presents you with a few options:
- Would you like to import this report
- Skip this record
- Load all remaining records without prompting you
- Cancel importing
You should confirm at least the first few records to ensure that all
information is being loaded properly. If any of the fields you expect
to be there are not displayed, or are in the wrong places, then your
import specification has some kind of error.
The following options are presented as each record is loaded, just
before it is written to the database.
Yes
If you choose Yes, Import will store the record in the database and
prompt you again when the next record is ready for importing. This
can continue until you are sure that the records are importing properly.
Then you can choose to load all the remaining records without
further prompting.
No
If you choose No, the record will not be stored in the database and
Import will move to the next line in the import data file.
All
If you choose All, Import will continue loading the records remaining
in the file without prompting you further.
Cancel
If you choose to cancel, the import process will terminate and you
will be returned to the main Import Menu.
For more information on the predefined CIO file formats, use the Help
menu Index option and choose the topic Inter-Office Data Transfers.
Other information is available in the Help Index under
File Format Specification. Press the Edit Format button in the
Import menu to access this form and its details. Press F1 when you
are on the form to bring up help.
Importing And Exporting
Please review the Help on File Format Specifications, and then
create a file specification matching your requirements. Refer to
qualified technical support for assistance.
Comtech Systems Inc. can provide fee based
File Transfer Format development services.
Please create a list outlining your needs, then fax it
to (250) 474-2622 or phone (250) 391-0466 for
an estimate.
| 
Was this page helpful? Do you have any comments on this document? Can we make it better? If so how may we improve this page.
Please click this link to send us your comments: helpinfo@collect.org