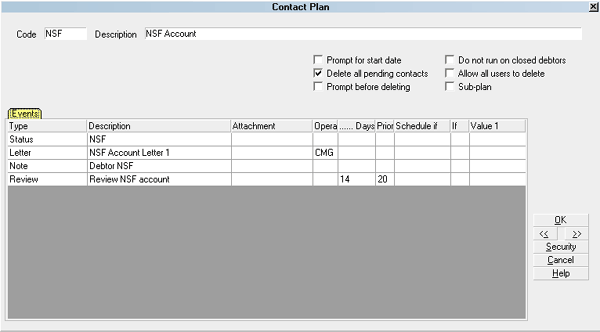
Contact Plan Basics
The Contact Plan form is used for automating functions
performed in Collect! Contact Plans are an extremely
powerful feature. Almost anything that you can do
manually while on the Debtor form, can be automated
with contact plans.
When you enter a new account, you might flag the debtor
status to NEW or ACT by pulling down the pick list on the
field and manually selecting NEW or ACT from the
Debtor Status codes list. If you decide to send this account
to Legal, you might manually select a debtor status code
of LEG and then select the Rate field to change the
commission rate to 45% from the 30% currently set in
the field. These steps can also be done automatically in
a Contact Plan.
Also, you might schedule a contact for the account
manually, by selecting the Contacts tab on the
Debtor form and creating a letter contact for Settlement
Letter to be printed in the batch tomorrow.
Although, manually scheduling contacts works well,
many times, you would have to enter the same contact
over and over again, because it is on a repeating schedule.
Other times, you might need to enter several contacts to
work the account properly. For instance, perhaps a letter,
a phone call and a review are necessary. When you find
that you are repeatedly entering the same contact, or
scheduling multiple contacts to perform the work you
need done, let Collect! do your work for you with a
Contact Plan.
A contact plan is made up of many contacts used
together as a single entity. Each single contact
in a Contact Plan is called an Event.
* An Event can be a letter, a review, a change in
status, posting a transaction and many other types
of events.
* An Event may be scheduled to run immediately or
at a predetermined date and time in the future.
* An Event may be assigned to an Operator you
specify, may have a specific priority, may be
scheduled to run only if a certain condition is met
The bottom line is, can you do it manually? Great! Design
a Contact Plan to do it for you automatically. But don't try
to create a Contact Plan to do things that you have not
tried to do yourself manually.
The Demonstration Database in Collect! contains many
samples of Contact Plans. Run them, review what they
do, modify and retest. This is a great way to speed up
the learning curve.

Contact Plan form
Accessing Contact Plan
There are several places in Collect! where you
may access the list of contact plans.
Debtor - Action button or F2 in the Action field
Client - Detail tab - Contact Plan For New Accounts pick list
System - Contact Management Settings - Contact Plans - View
Tools - Batch Processing - select Run Contact Plans when
you get to the Select Contact Plan screen. Select
the Edit Contact Plans button
Contact Plan - Plan Event - Description pick list
Plans, Tables and Defaults - Contact Plans button
Plans, Tables and Defaults - Transaction Type - Run contact
plan pick list
Plans, Tables and Defaults - Payment Plan Setup - Contact
plan on posting pick list
Plans, Tables and Defaults - Payment Posting Options -
Several fields have contact plan pick lists
Import Menu - Run contact plan pick list
Import Options - Schedule contact plan pick list
When the list of contact plans is displayed, select a
plan to modify it. Select the New button or press F3 to
create a new plan.

See Also
- Contact Plan

| 
Was this page helpful? Do you have any comments on this document? Can we make it better? If so how may we improve this page.
Please click this link to send us your comments: helpinfo@collect.org