Credit Card Step By Step - Part 3 - Recurring Payments
This "Step-by-Step" series is intended to provide you with
an orderly progression of procedures and procedural
considerations.
The actual details and expansive explanations are contained
elsewhere in the Help pages and will be referred to by link
to follow at the end of each page, where applicable.
This Step-by-Step page is dedicated to all aspects concerning
Recurring Credit Card Payments.
When you have completed a full review of all the steps,
you should be:
- Able to post Recurring Credit Card Payments
- Able to save credit card information
- Able to read the payment details from the transaction
- Familiar with running the reconcile
Posting A Recurring Credit Card Payments Schedule
You can set up a credit card payment schedule for a series
of credit card debits to be made at regular intervals. The
module will upload the details to Billing Tree, where the terms
and details of the arrangement are stored, and the system will
automatically debit the payer's card when each payment comes due.
A payment due on today's date will always have a lag time between
that due date and when you see the transaction is posted in
Collect!. This is because the Reconcile Credit Card History
batch process submits the transaction on the due date and it
will not be until the day after that you will receive the
download approval or decline, as Billing Tree doesn't submit
its own daily transactions to the banking institutions until
its end of day.
 Recurring Credit Card Schedules are dependent on
the Reconcile Credit Card History process being
run daily as it is this batch process which downloads
processed credit card payments which have become due
and are now approved for posting.
Recurring Credit Card Schedules are dependent on
the Reconcile Credit Card History process being
run daily as it is this batch process which downloads
processed credit card payments which have become due
and are now approved for posting.
Select the CREDIT CARD button on the Debtor screen in the lower
right corner to access the Credit Card Payment Tasks menu.
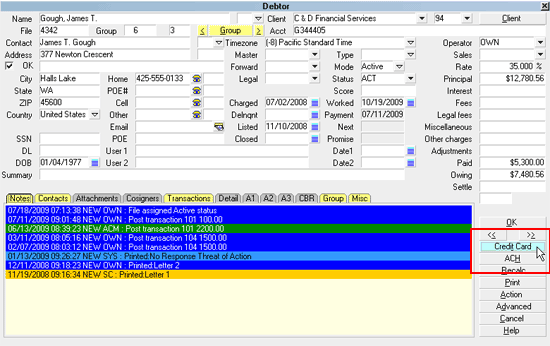
Select the Credit Card button
If this is the first time you are accessing this screen, after signing
into Collect!, you will be prompted to enter your Billing Tree
Credit Card login credentials.
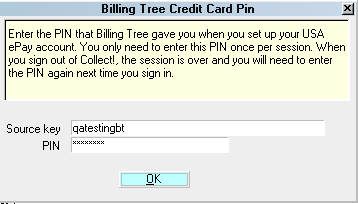
Billing Tree Credit Card PIN
Once you enter your Source Key and PIN, they stay in
effect until you sign out of your current Collect! session.
If you have entered your PIN into the
Credit Card Setup screen, it will be
stored and used each time you log into
Collect!. You will not be prompted to
enter a PIN. Only User Levels 1, 10 and 99
will see the prompt. Click OK to advance to
the next screen if there are no changes.
When the Credit Card Payment Tasks menu is displayed,
select the RECURRING PAYMENTS button.
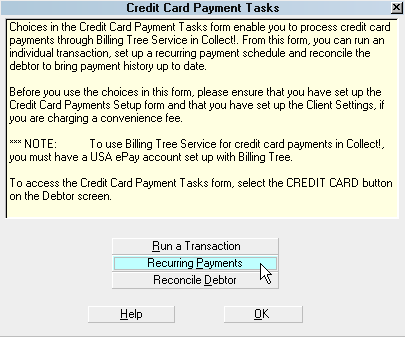
Select the RECURRING PAYMENTS button
This will open the Recurring Credit Card Payments screen.
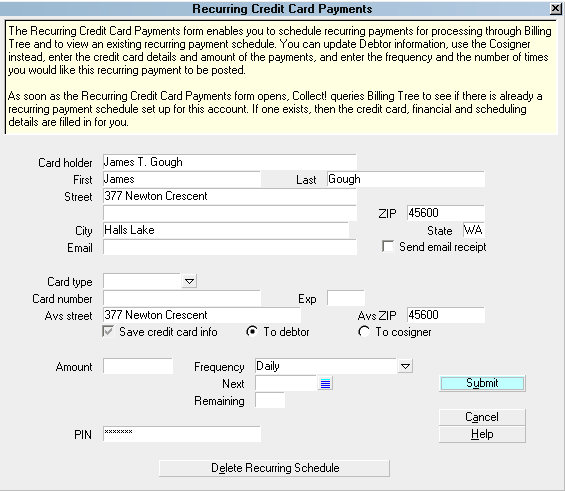
Recurring Credit Card Payments
Information from the Debtor Name and Address fields will
be auto-filled for you, and you may input the rest of the
indicated fields.
Some information in the popup will be auto-filled for you and
the rest requires input. A field-by-field description of entry
fields may be found on the Help page
called Recurring Credit Card Payments.
Special points of note on this intake screen are:
a) A valid billing address for the card holder is required.
b) A valid 2-character state code is required.
c) A valid zip code is required. The transaction
will be rejected if an attempt to put in a placeholder,
non-valid zip is attempted in the absence of one which
is known.
d) If you enabled convenience fees for this debtor's client,
the check box will be accessible and require your endorsement
to charge the convenience fee by checking the "Apply fee"
box first, before you see the fee amount populate.
You can fill in the rest of the details. The "Save
credit card details" box is presented both checked ON and
read-only greyed out. This is because the module must
save the information for a recurring schedule so that
there is parity between Collect! and Billing Tree to match
the transactions during Reconcile Credit Card History
batch processes. What you may select, is whether you want
to save this information in PCI compliant format to the
Debtor, or to the Cosigner with the Class designation of
CC Payer. Older versions of Collect! use "Other" as the
Class.
If you have enabled convenience fees for credit
credit cards in general, and specifically
for this client, you still will not see
the usual Apply Fee and Fee Amount fields
on the intake screen. These remain hidden
because Credit Card legislation dictates that
you may not charge a fee on more than the
first transaction in a recurring schedule.
The module will automatically apply your
flat fee with your Setup designated transaction
type on the first payment of every recurring
schedule you process through the module.
Click the SUBMIT button to submit the payment schedule to the
Credit Card Gateway on the Billing Tree site.
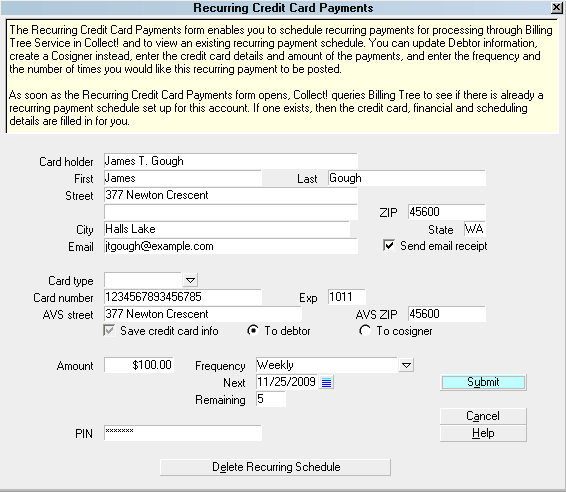
Ready to Submit Recurring Credit Card Payments Schedule
You will receive an acknowledgement like the following popup.
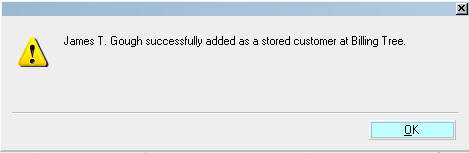
Credit Card Schedule Stored at Billing Tree
You will not see the credit card payment processed
and posted in the Transaction Tab on the account
until (a) the next payment due date has arrived and
(b) your office has submitted a Reconcile Credit
Card History batch processing file for download of
the payment confirmation.
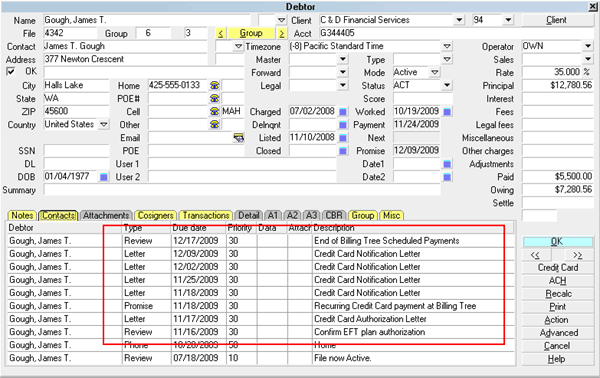
As part of the automation, a Promise contact to keep track of the
payment schedule is posted.
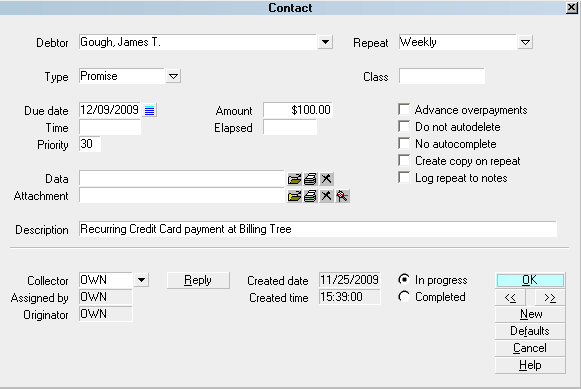
Promise Contact for Recurring Credit Card Payments
Also part of the automation, the module proactively
schedules a Review now that is forward due-dated so that
there is an implanted reminder of when the recurring schedule
has ended and it may be time to do any of renegotiate your
next level of payment plan, send a PIF release and close your file, etc.
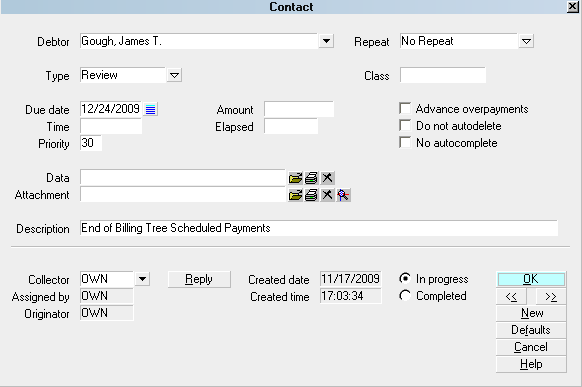
Review Contact for Recurring Credit Card Payments
If you set up EFT Notices, the module will automatically
schedule those letters to be sent in the requisite timelines
designated in your module preference settings.
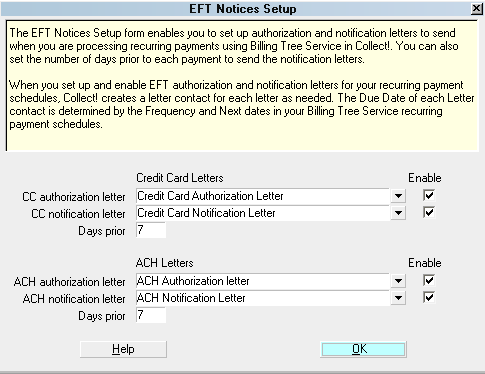
EFT Notices Setup
EFT Notices and Reviews

Save Credit Card Info
The "Save credit card info" switch is ON and read-only,
greyed out. Your choices in a recurring intake screen
with respect to this option are to save the card information
to either "To Debtor" or "To Cosigner", but the info must
be saved. The module requires the information so that
future uploads/downloads between itself and Billing Tree
have the requisite information to ensure transaction matching
integrity for the course of the recurring payment schedule.
Insofar as the end- user is concerned, this information is
stored in PCI compliant masked format to protect the card
holder's privacy and card security in your system.
If the debtor is the CC Payer, then the details
will be saved into the Detail Tab off the debtor main screen.
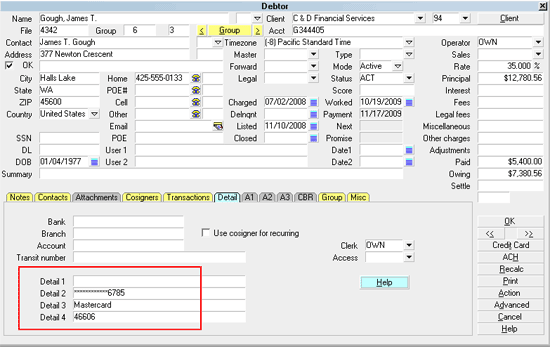
Credit Card Info Saved to Debtor Detail
Detail 2 is the masked Credit Card Number.
Detail 3 is the Credit Card type.
Detail 4 is Billing Tree's unique Client
Number for the stored debtor. *** IMPORTANT: Don't
change this number!
Reminder that the module does write to fields
in the Debtor and Transaction Detail Tabs.
If you currently utilize these fields for
any site proprietary reason, contact Technical
Services to go over your options to move
data to new locales before rolling out usage
of this module. It will overwrite fields
in the designated tabs.
Save Credit Card Info To Cosigner
Alternatively, you can save the card info to a Cosigner who
either a responsible party on the debt or is a third party
payer. A third party payer will auto-setup with the Cosigner
Class to CC Payer. Older versions of Collect!
use "Other" as the Class.
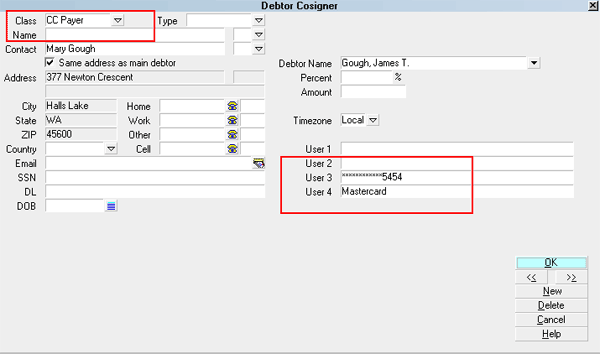
Name, Address and Credit Card Info Saved to Cosigner
User 3 is the masked Credit Card Number.
User 4 is the Credit Card type.
You may designate only one CC Payer Cosigner
and one Recurring Credit Card Schedule
at a time, per debtor file.
When you save the credit card information to the Cosigner,
the Client # is still stored in the Debtor Detail 4 field
because the stored client is always the Debtor.
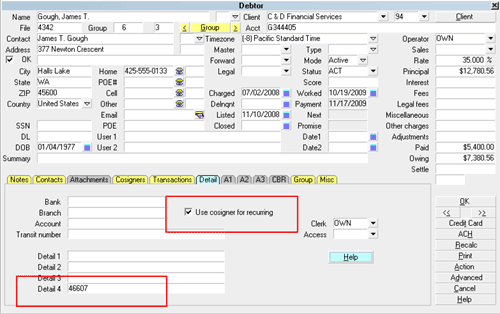
Client Number in Debtor Detail
Detail 4 is Billing Tree's unique Client
Number for the stored client. *** IMPORTANT: Don't
change this number!
Use Cosigner For Recurring
When you select "To Cosigner" to store your payer
information, Collect! switches ON "Use cosigner for
recurring" in the Debtor Detail screen.
Use Cosigner for Recurring
Use Cosigner for Recurring is a switch
Collect! uses to reconcile payments when you have
used the Cosigner as the Payer. *** IMPORTANT: Leave
this switch ON if the Payer is the Cosigner.
You MUST leave this switch ON for the duration
of your payment schedule so that module
can verify the credit card information
during Reconcile Credit Card History
uploads/downloads.
Transaction Details
Collect! does not evidence posting of any recurring
credit card payments until you run Reconcile Credit
Card History. To keep your files up-to-date with all
card approvals/declines, you should run your batch
process to reconcile at least once per business day.
The additional benefit to doing so is that if any debtors
made external payments directly on the Billing Tree Gateway
and not through your office and the module, is that these
payments are also downloaded and posted to your system
with the Reconcile process. For more detailed information,
see RECONCILE CREDIT CARD HISTORY in these pages.
Debtors who wish to pay externally must use their Collect! file
number as their unique account number when paying directly on the
Billing Tree website.
There is specific information that you will see written
to the Transaction Detail Tab when a recurring payment
has been approved and posted into the system.

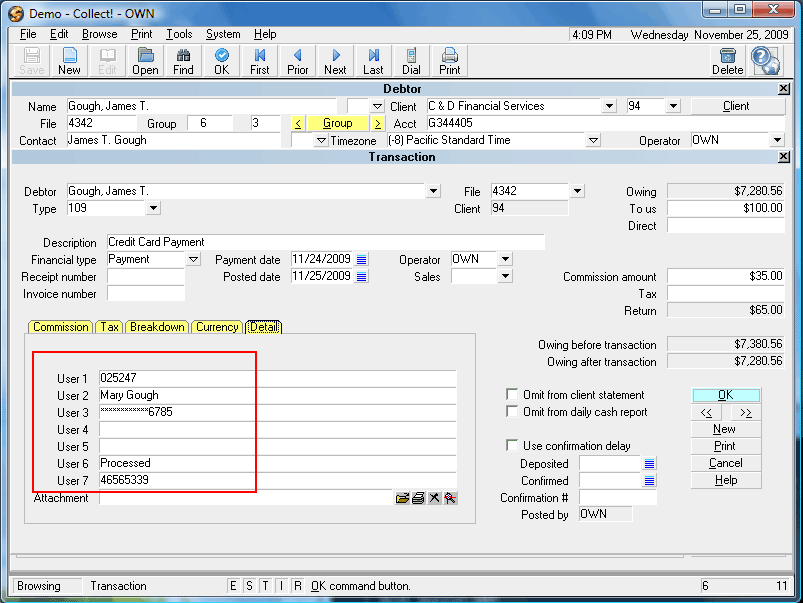
Transaction Details
Credit card, unique tracking and confirmation details are stored as follows:
User 1 is the Authorization Code.
User 2 this field stores the Payer's name
if the Payer is not the Debtor.
User 3 is the masked Credit Card Number.
User 6 displays "Processed" for successful submits.
User 7 is the unique Transaction Reference Number
assigned to this credit card payment.
Reconcile Credit Card History
The Reconcile Credit Card History is a batch process that
queries Billing Tree for all credit card payments processed
by them but which have not yet been posted in Collect!.
The parameters include those transactions processed
by Billing Tree since the Last Reconcile date stored in
Collect!, new declines or chargebacks, and unreported external
payments made by debtors directly at the Billing Tree Gateway (and
provided they have used their Collect! file number as their unique
identifier on the Gateway website).

Reconcile Credit Card History
 Debtors may enter their own payments directly at
the Billing Tree website provided they are
advised to use their Collect! file number as
their unique identifier.
Debtors may enter their own payments directly at
the Billing Tree website provided they are
advised to use their Collect! file number as
their unique identifier.
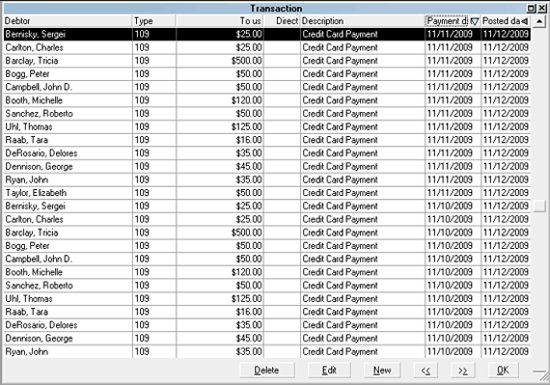
Credit Card Transactions Posted
To download the latest batch of credit card approved payments
not yet posted in Collect!, you access through the menu path
of " Daily Administration\ Payments and Charges\Reconcile Credit
Card History".
Users of CV11.6.2.7 and higher who are also licensed
for the Scheduler Module now have an enhanced automation
with the addition of the Reconcile process being added
to the Scheduler Task list of options. You may run this
process offline and unattended. Contact us at
sales@collect.org for module pricing.
Once the process is invoked, as information is exchanged
between Collect! and Billing Tree you will see a summary
screen to let you know what actions were taken. If payments
cannot be matched, i.e. if there was a file number entry
error directly in the Gateway website OR some edit in Collect!
subsequent to the arrangement entry was made causing a
mismatch in data, the module saves all pertinent payment
exception information to a file that you can use to
manually post the transactions mismatches once you have
located the accounts and matched the payments to the files.
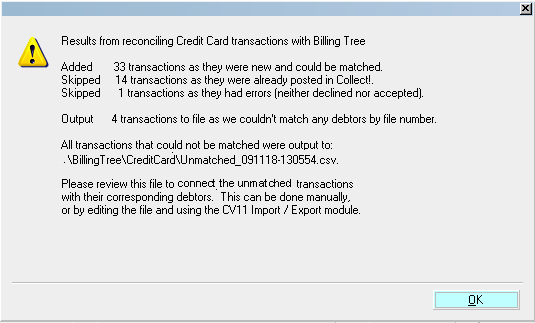
Reconcile Credit Card History Results
If any unmatched transactions are returned, the module stores
the information in a file in the "CV11\bin\BillingTree\CreditCard"
folder as a CSV called Unmatched with a date/time stamp to make
the name unique: i.e. Unmatched-150519-153321 is May 19th, 2015
created at HH:MM:SS of 15:33:21.
If a credit card is declined when an attempt is made by Billing
Tree to process a recurring payment, then Collect! processes
the payment as "Declined" and uses your settings from the
Credit Card Setup options.
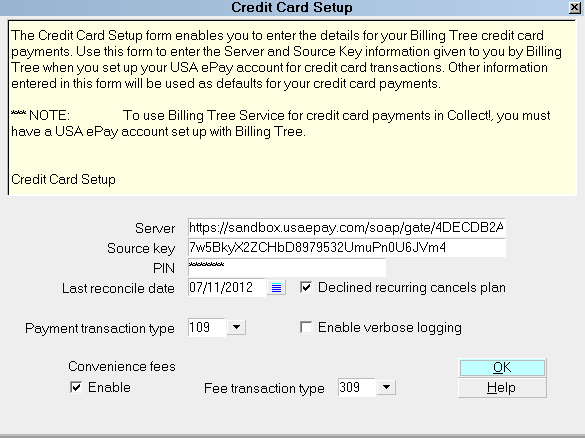
Credit Card Setup
As of version CV11.6.2.9, if a file number match is made during
reconciliation but the transaction is skipped or errored out
for any reason, you will now see a Noteline logged to the specific
debtor account that the transaction belongs to identifying
what was skipped or errored. The noteline will be prefixed
"Failed Transaction:" and indicate that an "Error" occurred,
as well as provide the Payment Date and amount. This is a
transaction that would need to be manually reviewed for what
caused the issue and corrective action would depend on what was
ascertained as root cause (i.e. was the transaction manually
modified between upload of transaction and download of process
confirmation).
It also writes a detailed log into the path
"CV11\bin\BillingTree\CreditCard\usaepay.txt".
See Also
- Billing Tree Topics
| 

Was this page helpful? Do you have any comments on this document? Can we make it better? If so how may we improve this page.
Please click this link to send us your comments: helpinfo@collect.org