Historical CBR Reporting
Historical credit bureau reporting was developed in Collect!
to help users to rerun a credit bureau report when the
credit bureaus failed a file.
This simple process goes by the date your Metro
contacts were marked done. Collect! reactivates
Metro contacts for a particular report, recalculates
debtors back to the selected date, runs the report
again and recalculates debtors again so their
financials are current. Rerun your credit reports
once for each month you need to report again.
It is best to perform this procedure when you
are signed in using Exclusive mode. When Collect!
recalculates accounts during this process, other users
may be slowed down.
Done Date For A CBR Batch
You will need the Done Date of the Metro contacts
for each of the credit reports you want to rerun.
 When you successfully complete a credit
bureau report and mark the contacts as done,
all the contacts reported in the report will have the
same Done Date.
When you successfully complete a credit
bureau report and mark the contacts as done,
all the contacts reported in the report will have the
same Done Date.
To confirm that there are Metro contacts for a particular
date,
1. Select Browse from the top menu bar
and then select Contacts from the drop-down choices.
2. When the list of contacts is displayed, press F6 to
bring up the Edit Search Criteria form.
3. Select YES for the item labeled Done.
Select METRO for the item labeled Type.
Enter the DONE DATE in the item labeled Done
Date.
4. Select the SEARCH button. Say YES to tag matching
contacts.
This displays a list of contacts that confirms for you
that there are contacts matching the Done Date
you want to use for your historical reporting. Exit of
Collect! and then sign back in to proceed with
historical reporting.
1. Sign into Collect! using Exclusive mode and
stop at the Main Menu.
2. Run credit bureau reporting exactly as you normally
do, each and every time, with the additional settings below.
a.)In the Report To Credit Bureaus form, in
the field labeled Done Date, enter
the done date for the first credit bureau report you want
to rerun.
b.) Put a check mark in the field
labeled Completed only
 This may make a difference in the result file.
The only reason they would not have been completed
would be due to a problem with Credit Report Details or
other needed data. Please refer to
How To Run A Credit Bureau Report for more information.
This may make a difference in the result file.
The only reason they would not have been completed
would be due to a problem with Credit Report Details or
other needed data. Please refer to
How To Run A Credit Bureau Report for more information.
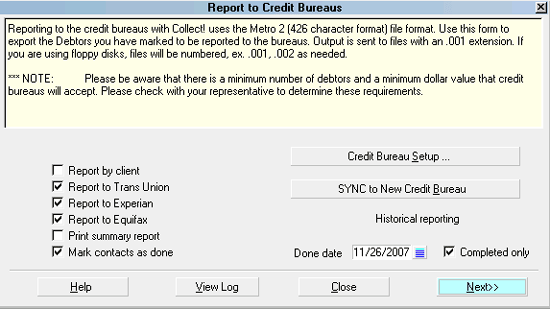
Settings for Historical CBR Reporting
3. Run the report to all three credit bureaus. Collect! will
make three sets of files, placing them in the CBR folder
created in your Collect! database folder.
Collect! creates a folder in the working
database folder called CBR. There you will find credit
bureau folders, that is, EQUIFAX, TRANS UNION
and EXPERIAN. Under these folders are the
DATED .001 files you send off to your vendor.
If you need to do more than one batch of reports,
Be careful! These files are day date stamped
and they will over write each other. After
running each historical credit report for the vendors,
you should rename these files before re-running the
next month's report.
4. Repeat this procedure for each batch or report to be
reproduced.
If you have other disks, this is a great way to
compare results.
That is all there is to it. You are ready for your next
credit bureau report.

Historical Reporting In Progress Contacts
If you do NOT switch ON Completed Only,
in Step 2b above, Collect! will report Metros that are NOT
marked done, PRIOR to the date you enter in
the Done Date field. You can mark the
contacts done after you complete the historical report.
Switch ON Mark contacts as done and
Collect! will prompt you to complete the contacts when
the report is finished.
See Also
- Credit Bureau Reporting Topics
|
Was this page helpful? Do you have any comments on this document? Can we make it better? If so how may we improve this page.
Please click this link to send us your comments: helpinfo@collect.org