Loading A New Import Library
If you import data from multiple sources into Collect!, you
may want to load an alternate import library for each type
of file that you process. This allows you to keep your
import routines separate.
Collect! creates a subfolder in the CV11\import folder
for each new library that you load. You can load a library that
already contains import maps, or you can load a brand new
empty library and create the specifications from scratch.
Then use Select Import Library to view the list of available libraries,
including any new libraries you create. They can be selected
and used as required.
We will step through the process of adding a new import
library to the list of registered libraries available through
Select Import Library.
We will cover:
- Loading a pre-existing import library
- Loading a new empty import library
 These steps apply to CV11.3 Build 1.1 and newer. For
previous builds, you may want to refer to the Help documentation
for your Collect! version.
These steps apply to CV11.3 Build 1.1 and newer. For
previous builds, you may want to refer to the Help documentation
for your Collect! version.
Loading A Pre-Existing Import Library
Use this procedure to create a new import library and load
a previously saved import library. After that, you can open the
new library and edit it as needed or use it as is to import data
into Collect!.
 Please refer to Help topic, Save File Formats for
information about creating your XML import file.
Please refer to Help topic, Save File Formats for
information about creating your XML import file.
1. Copy your pre-existing import library XML file to a
TEMP folder.
2. Select File from the top menu bar and then select
Import/Export to view the submenu.
3. Select Customize Import/Export and then select
New Import Library.
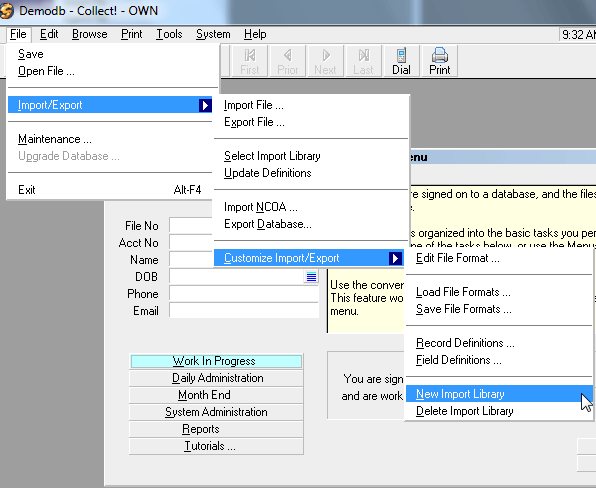
Import/ Export Menu Creating New Library
4. You will be prompted to enter a name for your new
library. Maximum 8 CHARACTERS. Select OK to continue.
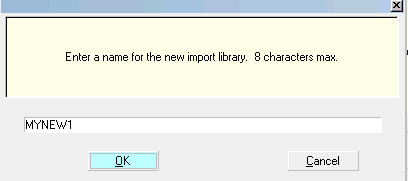
Enter A Name for Your New Library
5. Collect! will let you know that you have successfully
created a new library and have registered it with the
RDM server. A new folder is created in the CV11\import
folder with the same name that you see in this prompt.
This is also the name that will be displayed in the
choices for Select Import Library. Select OK to continue.

New Library Name
6. Now you can use the Select Import Library choice
to use this new library.
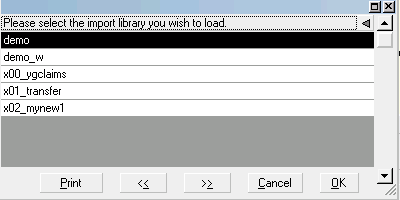
New Libraries in Select Import Library List
7. Update Definitions
Whenever you select a different import library, you should update
your field definitions through File, Import, Update Definitions.
Select YES when the prompt appears and Collect! will update
the definitions.
When you Update Definitions, there may be discrepancies,
if your Collect! Build is different from the Build the XML import file
was created in. If so, you may need to modify the import map.
You can view the subindex and fieldindex names in the
Field Definitions accessed through File, Import/Export,
Customize Import/Export->Field Definitions. Please ask
Technical Services for help if you have discrepancies and you
are not sure what to do.
8. Once the library is selected you can use Import/Export,
Customize Import/Export-> Load File Formats to load your
pre-existing XML import library into your newly created
library. Please refer to Help topic, Load File Formats for
details.

Loading A New Empty Import Library
Next, we will use similar steps to create an empty
import library.
Use this procedure to register a new empty import map
with the RDM server. After that, you can open the new library
and edit it as needed.
Please be aware that creating a new empty
library will not automatically load the Record and Field
Definitions. You must " Update Definitions" right after
creating your new empty library.
1. Sign into Collect! as you would normally and stop
at the Main Menu.
2. Follow Steps 2 through 5 above to create a new import
library.
3. Now you can use Select Import Library to load this new library.
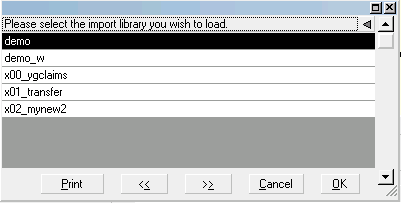
New Library in Select Import Library List
New Library Selected
4. You must Update Definitions to load the Record Definitions
and Field Definitions into your new library. This is covered next.
Loading Record And Field Definitions
To load Record and Field Definitions into your library.
select File, Import/Export, Update Definitions. Then
select YES when prompted to "Rebuild the form field ID list."
After the list of definitions is rebuilt, you are ready to
create your import maps.
Use Import/Export, Customize Import/Export,
Edit File Format to build your new import map.
You can also populate your new empty import library
with a previously saved XML import map file. Please refer to
Help topic, Load File Formats for details.
Summary
The New Import Library feature in CV11 allows you to
register any number of new import libraries to use in Collect!.
You can create a brand new library or load a pre-existing one.
Each library that you use must be registered with the
RDM server. The New Import Library function takes care of
this and you can seamlessly switch libraries as needed to
import many types of data files into your system.
See Also
- Import/Export Topics
|
Was this page helpful? Do you have any comments on this document? Can we make it better? If so how may we improve this page.
Please click this link to send us your comments: helpinfo@collect.org