TCN Recorded Calls
The TCN Module was designed to streamline your
steps and processes to submit call campaigns to
TCN Broadcasting, and then import the results
of those call campaigns into Collect!. If you
establish a call recording agreement with TCN,
it is also possible to store the recorded calls
from those campaigns on each file with the
date/time/ phone number on which the call took place.
When you are using call recording with your campaigns,
TCN will create a file for you to download that contains
WAV files and an HTML index page. You must download the
file and unzip it into the directory that you identified
as the "Recorded call path" in your TCN Setup. This
will enable the files to be found by your system and
available to be listened to, as needed.
The screen to configure your TCN connection is located
on the menu path "Systems\ Preferences\TCN Setup".
Wav File Directory
If you are going to be using the call recording service,
you must define the file path where this information will
be stored. This is configured in the TCN Setup screen,
located in Collect! via the menus "System\Preferences\TCN Setup".
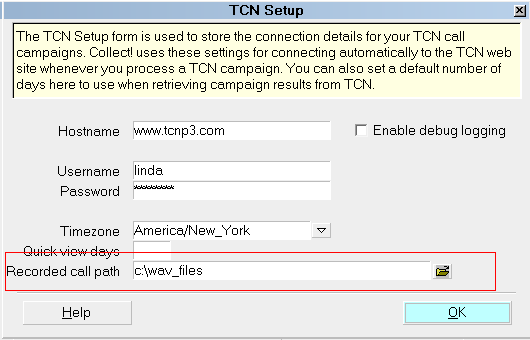
Recorded Call Path
 The folder you enter in the Recorded Call Path is
where you should unzip the WAV file you
download from the TCN website.

Process Call Campaign
Once you have saved your WAV files and unzipped them, the next
step is to incorporate them into Collect! via batch process.
The exact steps for this process are described in the Help topic,
Processing Results from Call Campaigns. The following are
important highlights and details to be aware of.
The path to campaign processing is "Tools\ Batch Processing\Process
TCN Campaign". When you click Next to proceed, you will get the
TCN Select Function popup. Click the radio button for Download Report.
This will open the TCN Download Report screen. You will see the
field called Import Routine which has a drop-down arrow to for
you to choose which import map you want to use. To upload call
results along with the call recording WAV file, select TCN Call
Report with Call ID.
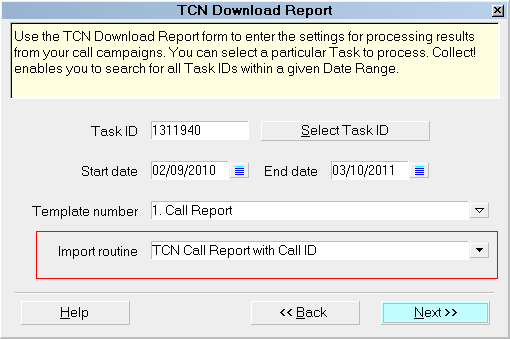
Select TCN Call Report with Call ID
This import map has a special section for creating and saving
the correct name of the WAV file related to the phone call.

Call ID Import Map
Import maps are accessed in the menu path
" Main Menu\File\ Import/Export". If you are looking to run an
import, you click right on Import File. If you are looking
to review or modify an existing import map, the full menu path
is; "Main Menu\File\Import/Export\Customized Import/Export".
The "TCN Call Report with Call ID" import map creates a Phone
type Contact inside the Debtor screen Contact Tab for each
debtor that had a call result in the campaign. It stores
the recorded call as an Attachment in the Phone Contact event
screen, linking the WAV file to that account.
The screenshot below depicts how the import builds the
WAV file name from the data sent to you by TCN.
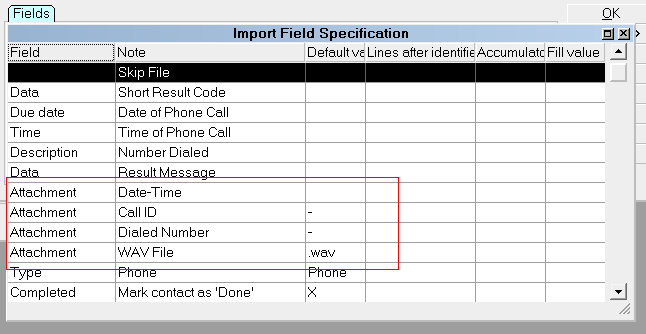
Contact Attachment Field Specifications
 The fields in the Call ID import map match
the Report Template for "Call Report"
stored for your account at the TCN
Broadcasting website.
The data sent by TCN also provides the Date, Time, Call ID
and Dialed Number.
The "Call Report Template" shown below is a screenshot from
the TCN website.
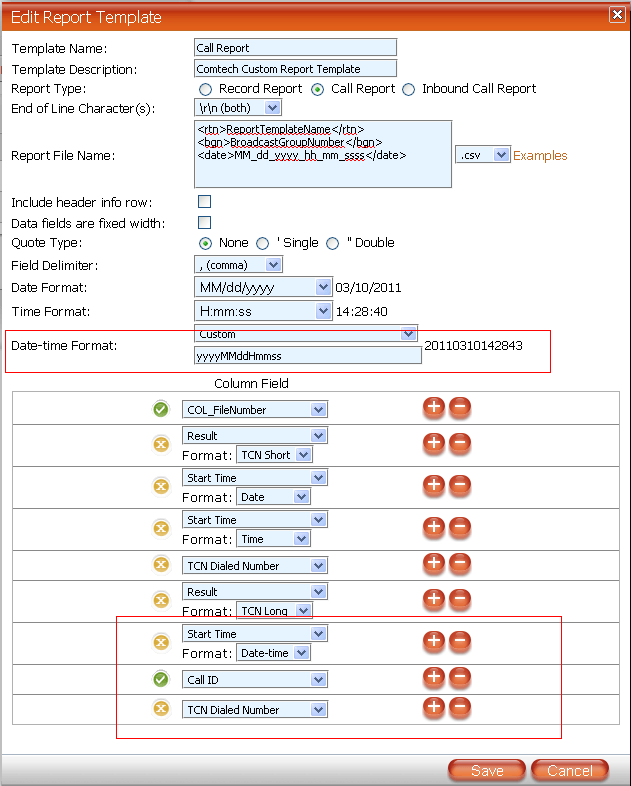
Report Template for Call ID Campaign Results
 Your "Call Report Template" that you set up
on the TCN website MUST have the correct
data fields in it, in the correct order,
as shown above.

Phone Contact With Wav File Name
Once the import of the call campaign is processed, you will
have a completed Phone Contact in your debtor accounts which
appears as below. It will be in the Contacts Tab on the
debtor screen. Note the WAV file name stored as an
Attachment on the actual Contact.
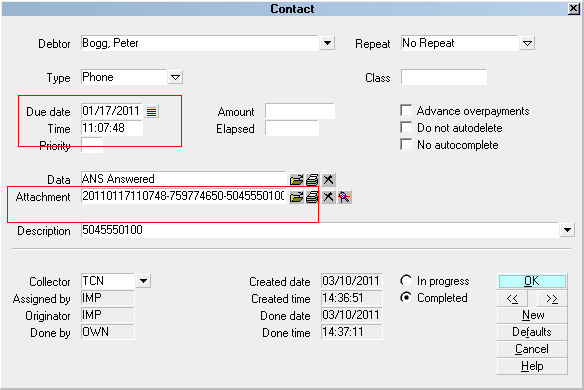
TCN Phone Contact with WAV File
Notice that the Date and Time of the Contact are the same
as the first part of the WAV file name. This is the naming
convention used by TCN Broadcasting.
This is how the WAV file is named:
WAV File Name:
20110117110748-759774650-5045550100.wav
WAV File Name Sections:
yyyyMMddHmmss-{Call ID}-{Dialed Number}.wav

Access To Listen To A Recorded Call Wav File
To listen to the recorded call, you must have an outside
of Collect! application on your PC that can open files
with the *.wav extension.
To access, open a Phone Contact that has a WAV file name
in the Attachment field.

TCN Phone Contact with WAV File
Click the Folder icon next to the Contact's Attachment
field.
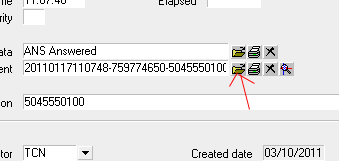
Selecting the Folder Icon
If Collect! cannot find a file with the name in the Attachment
field, it will display a message. The error message shows
you the path to where the system is expecting to find the WAV
file.
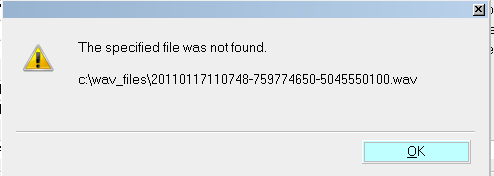
Collect! Cannot Open WAV File
This path is the one which was specified in your TCN Setup.
Check to make sure that the WAV file that you are trying
to access hasn't been accidentally stored somewhere else.
 You will also receive a popup message if
it is detected that it cannot find application
on your PC that will open the WAV file.
Your inhouse System Administrator would
your go-to party in this case as these
applications to listen to WAV files are
outside of Collect!.

See Also
- TCN Topics

| 
Was this page helpful? Do you have any comments on this document? Can we make it better? If so how may we improve this page.
Please click this link to send us your comments: helpinfo@collect.org