Payment
The client Payment tab is used to store payments received
from Clients as a result of your invoicing them for
collection services rendered. The tab is located in the
lower portion of the Client screen with the other sub-file
tabs ( Debtors, Invoices, Notes, Contacts, Attachments).
You may also post other charges to the Client's account,
such as legal costs, collection fees, and other incidental
charges as per your agreements with your clients. Charges
to the client are applied by using a negative sign in front o
f the amount to be charged, as this will add to their balance
forwards for that remittance period.
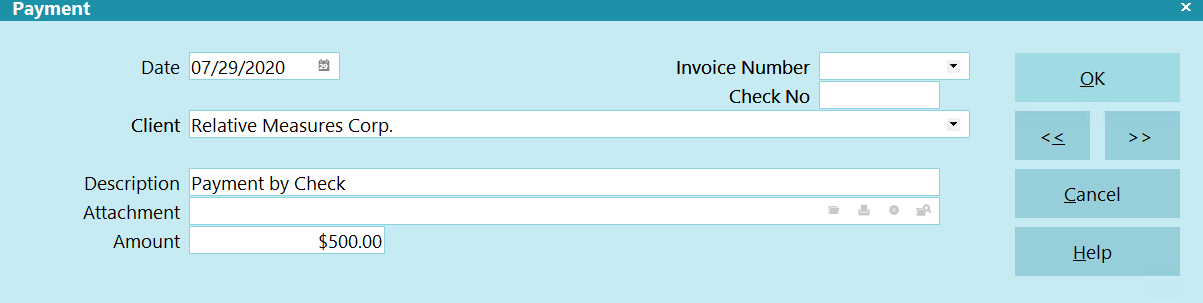
Client Payment Screen
Payments are accurately reflected in your month end
Statements/ Invoices.
The Payment is credited to the Client's account.
 The Payment tab on the Client screen is NOT used for Debtor
payments. To apply Payments from Debtors, use the
Transaction tab on the Debtor screen. This can
be accessed on a per debtor basis or via the
menu path" Daily Administration\ Payments and Charges\Debtor
Payments and Charges".
The Payment tab on the Client screen is NOT used for Debtor
payments. To apply Payments from Debtors, use the
Transaction tab on the Debtor screen. This can
be accessed on a per debtor basis or via the
menu path" Daily Administration\ Payments and Charges\Debtor
Payments and Charges".
If Collect! finds a single unpaid invoice, and you have
'Enable split payment' checked on the Company Detail form,
Collect! will pre-fill the payment record with the invoice
information from the unpaid invoice. You can then edit
the payment as needed.
Client
This is the name of the Client for whom
you are about to post this current payment
or charge. If this is blank, press F2 OR
click the drop-down arrow to pick from your
Client list. If you are posting from the
Payment Tab on a specific client screen, you
should see the current Client's name
already populated in this field.

Date
This field displays the date you received
and deposited the payment. Press F2 OR click
the calendar icon at the right of the field OR
manually input the date. This date will be
used when generating statements.
By default, the current date is displayed.
It is very important to NOT back-date a
client payment into a month or other
statement cycle that you have previously
finalized by generating/printing your
Statements and Checks for. The system has
no way to include a new transaction
line item into the accounting for a period if
that period is already considered closed.
Amount
This field shows the amount of the Client
payment or charge to the Client account. Please
note positive entries are credits to the
Client's account while negative entries are
debits.
Description
This is a brief description of the payment
or charge for your internal records.
Client Payments appear on statements prefixed with
"Client Payments Processed".
Attachment
This field will display an Attachment File Name if you
have created an Attachment for this payment. It will
remain empty if there is no Attachment for this
payment.
Payment attachments are files that can be 'attached'
to payments. This is a very handy way of keeping
track of scanned original invoices, MS Excel
spreadsheets or any other appropriate file type
associated with a payment.
To the right of this field there are four buttons. You
can use these buttons to perform the following actions.
- Select a file from the Attach folder
- Open a file
- Print a file
- Delete a file
To ATTACH AN EXISTING FILE to this payment
select the Magnifying Glass button. This feature lets
you attach any kind of file to your payments in
Collect! As long as Windows is set up to handle
that file type, you can instantly display any type
of original information about any payment.
To CREATE AN ATTACHMENT, select the Open
button and the Text Editor will start. Enter text
as needed and then press F8 to save and exit.
 If you put a URL in this field, Collect! will
use your web browser to go to the web
site when you select the OPEN button.
If you put a URL in this field, Collect! will
use your web browser to go to the web
site when you select the OPEN button.
To PRINT THE DISPLAYED FILE, select the
Print button.
To DELETE THE FILE, select the button with the stylized X
on it. This prompts you to delete the file.
Payment attachments created by Collect! are text files
stored in the ATTACH folder. They are named {client#}.###
where client# is the Client Number and ### is a
sequence number. A single client can have up to 999
attachments.
You can also select other file types, as long as Windows
knows how to display the types you choose.
Collect! stores payment Attachment files by default
in the bin\global\\attach\client folder.
Invoice Number
This field stores the invoice number of the invoice
that this payment is associated with. On the
Invoice/Statement record, the field that this is linked
to is the COUNTER field.
Check No
This field allows you to store the check number if
the payment received was via a check. This is a number
only field.
Delete
This button is visible on the list of
all Client payments. Selecting this
button will delete the highlighted record
from the database.
Edit
This button is visible on the list of
all Client payments. Selecting this button
will allow you to edit any data on an
existing record.
New
This button is visible on the list of all
Client payments. Selecting this button
will save any data you have entered and
create a new record.
Help
Press this button for help on the
Payment screen and links to related
topics.
Cancel
Selecting this button will ignore any data
you have entered and return you to the
previous screen.
OK
Selecting this button will save any data
you have entered and return you to the
previous screen.
<<
Selecting this button will take you back
to another record.
>>
Selecting this button will take you forward
to another record.
Importing Client Payments
You can import and export Client Notes, Client Attachments,
Client Contacts and Payments. This requires that you are
licensed for the optional Import/Export module.
Sample import maps are shipped with Collect! and are
available for download from the Member Center.
| 
Was this page helpful? Do you have any comments on this document? Can we make it better? If so how may we improve this page.
Please click this link to send us your comments: helpinfo@collect.org