How To Manage Post-Dated Checks
This document presents ideas and solutions for handling promised
payments with Collect!'s Take Checks Over the Phone feature.
Take Checks Over the Phone allows you to accept banking
information over the phone and to print a check or a batch of
checks for debtor payments. Setting up this feature and using it
for single payments is discussed in How To Take Checks Over the Phone.
You can use this same feature for post-dated checks and
promised payments as discussed in this topic.
The Post-Dated Checks package is available for download
at the Collect! Member Center.
Download Post-Dated Checks Package
 It is important to note that creating post-dated
checks works with future payment dates. If you enter today's
date in the procedure that is described below, it may give
unexpected results. This routine is for post-dated checks.
For ordinary checks by phone - not post-dated, please refer to
How To Take Checks Over the Phone.
It is important to note that creating post-dated
checks works with future payment dates. If you enter today's
date in the procedure that is described below, it may give
unexpected results. This routine is for post-dated checks.
For ordinary checks by phone - not post-dated, please refer to
How To Take Checks Over the Phone.
There are several possible solutions. We will discuss a few
of the most common scenarios.
- Single
This would be a promise to pay one amount at a future date.
- Revolving
This would be a promised payment of a consistent amount
at consistent intervals, monthly, for instance.
- Varying
This would be any specific number of payments that are
promised on staggered dates.
Legal statutes in most areas require that a letter
precedes the withdrawal of post-dated amounts to inform the
debtor that the funds will be withdrawn from their account. So
our solutions include scheduling and printing this letter, as well
as sending a confirmation letter when the agreement to take
checks over the phone is first contracted.
Post-Dated Check Setup
To use this sample, there are several areas that need to be
visited in Collect! to set up the items we need for this feature.

1. Bank Information
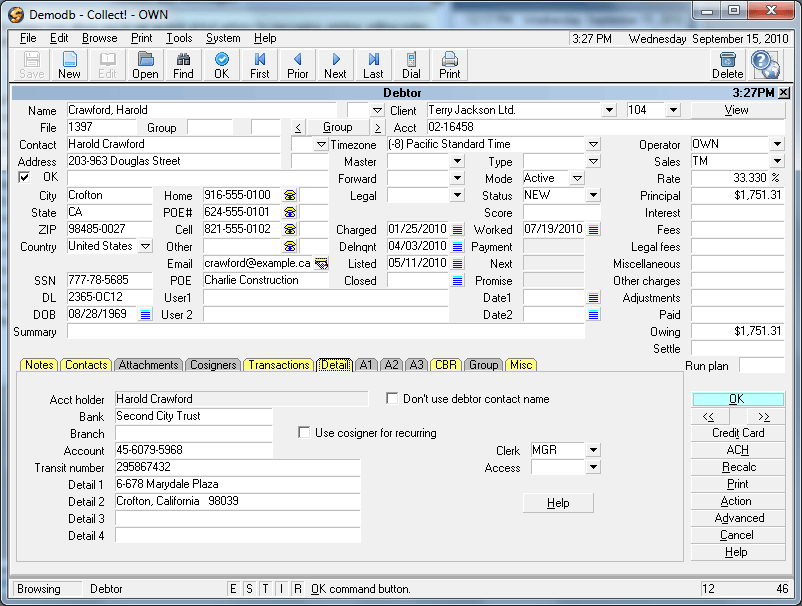
As with all check printing in Collect!, the Debtor's Bank
information must be entered into the Debtor Detail. That
is not covered in this topic. Please refer to Help topic,
How To Take Checks Over the Phone for information
about correctly entering Bank Account details.
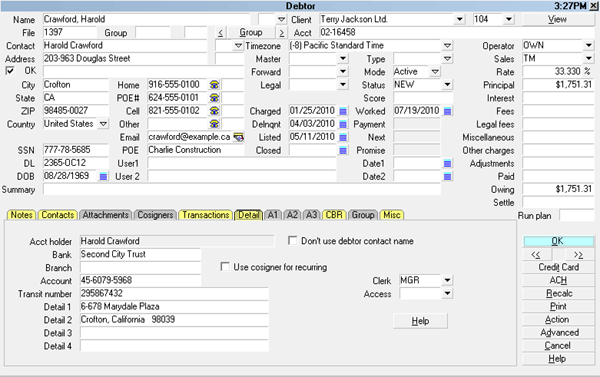
Bank Information in Debtor Detail
2. Create Status Codes
We need two Debtor Status Codes:
PDC - Post-dated Single/Varying
RPD - Post-dated Revolving
Creating A New Status Code
1. Select System from the top menu bar and then select
Contact Management Settings, Status Codes from the
drop-down choices. The Debtor Status list is displayed
showing all Status Codes currently defined in your system.
 When creating status codes, use descriptions that
clearly explain what the Debtor Status is for the particular
code. This will make it easier to pick the correct code
form the list.
When creating status codes, use descriptions that
clearly explain what the Debtor Status is for the particular
code. This will make it easier to pick the correct code
form the list.
2. Select the NEW button at the bottom of the form and a
blank Debtor Status form will display.
The Debtor Status form is very simple. However,
the codes you create can have far-reaching effects as you
work your accounts.
3. Enter PDC in the Code field and Post-dated Single/Varying
in the Description field.
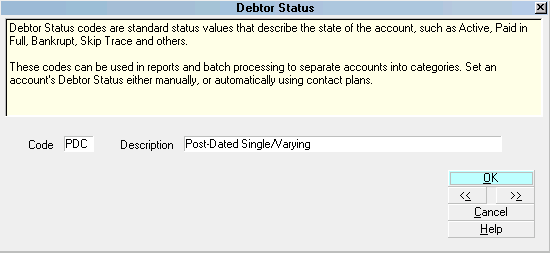
PDC Debtor Status Code
4. Select OK and your Code is added to the list and can be
accessed anywhere Debtor Status Codes are used in Collect!.
5. Repeat Steps 2 through 4 and create your RPD status code.
Type Post-dated Revolving in the Description field for this
status code.
3. Create/Import Letters And Reports
Several reports were created to implement the Post-Dated Check
routine.
Letters
Single/Varying PDC Confirm
Confirms that a check will be posted for a single transaction.
Revolving PDC Confirm
Confirms that a revolving Promise to pay has been started and
gives the date the check will be posted.
Revolving PDC Withdrawal
Alerts the debtor that a check has been posted in a
revolving Promise and gives the date the next check
will be posted.
Also, the Checks reports that shipped with Collect! are
included. If you already have them in your database, you
can rename the old ones before importing the new ones.
Checks
Check - Form #1000
This replaces the current report by the same name.
Please rename the old one if you have it in your system!.
Check - Form #1000 Batch
This replaces the current report Check - Form #1000 - Batch.
The new report can be used for all your batch printing of
checks, even the ones that are not for post-dated checks.
Please rename the old report if you have it in your system!.
These reports are contained in one file
named pdctemplate.rpt. Please import this
into your database as described below.
How To Import These Letters And Reports
1. Select Print from the top menu bar and then select
Customize Printing from the drop-down choices.
2. From the submenu, select Import Report Template. The
Import Collect! Report dialog will display. Navigate to the
directory where the report file is that you want to import.
3. Highlight the pdctemplate.rpt file and select OPEN or
double-click on the file to open it.
4. Your reports will be imported immediately and a message
will be displayed informing you that a number of reports have
been imported.
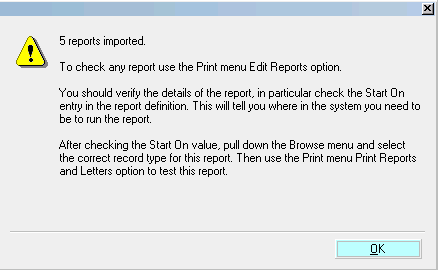
5 Reports Imported
5. To check the reports, select Print from the top menu bar
and the select Customize Printing, Edit Report Template.
The Report Definition list will open, displaying all the reports in
your working database.
6. You will find your newly imported reports typically, at the
bottom of the list.
4. Create/Import Contact Plans
There are two contact plans that implement the post-dated
check routine. Please import them into your system.
Contact Plans
pdc.cpl - PDC
This runs the plan to schedule letters and payments.
zz1.cpl - zz1
This schedules the revolving letter to precede each withdrawal
when they are promised at consistent intervals, monthly,
for instance.
How To Import These Contact Plans
1. Select System from the top menu bar and then select
Contact Management Settings from the drop-down choices.
2. From the submenu, Import Contact Plan. The Import
Collect! Contact Plan dialog will open. Navigate to
the location of the *.cpl files. Each file must be imported.
3. Select the first file, pdc.cpl, and press OK. Your contact plan
will be imported immediately and a message will be displayed.
The message will contain the full name of the contact plan
you imported.
4. Open the form again and select the second file, zz1.cpl,
and press OK. Your contact plan will be imported immediately
and a message will be displayed.
5. To view the plans, select Contact Plans, View from the
System, Contact Management Settings menu.
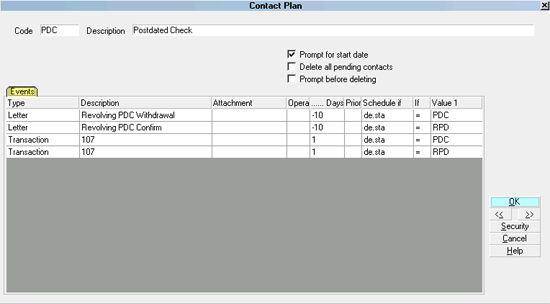
PDC Contact Plan
5. Create/Modify Transaction Type 107
Next, we will modify this transaction type to run the
contact plan, zz1.
1. Select System from the top menu bar and then select
Financial Settings from the drop-down choices. Select
Transaction Types from the side menu and a list of
Transaction Types will display.
2. Highlight Code 107 - Check Payment Taken By Phone
by using the up/down arrow keys.
3. From the button selections at the bottom of the dialog box
select EDIT to open the Transaction Type 107 form.
4. Locate the "Run contact plan" field at the lower right hand
corner of the form.
5. Select Contact Plan zz1 from the pick list or type it into
the field.
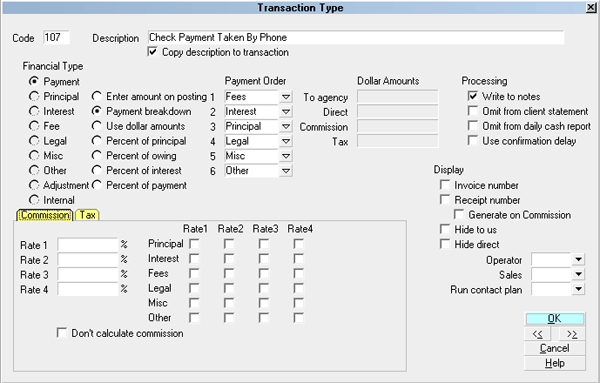
Run zz1 Plan from Transaction Type 107
6. Select OK all the way back to the Main Menu.
Post-Dated Check Operation
Whether your collectors set the post-dated operation
in motion or send a WIP to an operator of your choice depends
on you. We will document the process from the point where the
correct operator is looking at the debtor's account and is ready
to enter the information to set post-dated checks in motion.
1. Change the Debtor's status code as follows:
PDC
This means one SINGLE check promised at a future date
OR several checks promised on various staggered dates.
RPD
This means an amount promised at consistent intervals, for
instance, monthly promised payments.
2. Type in PDC in the Action field to run the scheduling plan.
You will be prompted for a Start Date and then events will
trigger based on the code in the Debtor's Status Code field.
You should select the date that the Promise is due.
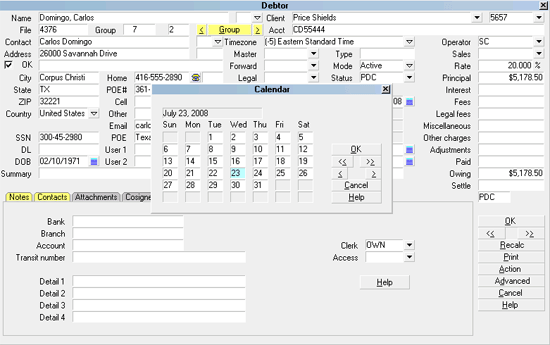
Enter Date of Promised Payment
3. Enter appropriate information regarding the transaction
amount and date the amount is to be withdrawn. Note that
the earliest date that should be entered is tomorrow.
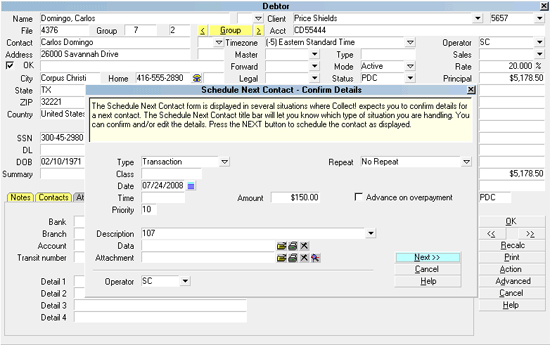
Enter Details of Post-Dated Transaction
It is important to note that creating a post-dated
check transaction works with future payment dates. If you
enter today's date in the transaction contact, it may give
unexpected results. This routine is for post-dated checks.
For ordinary checks taken over the phone, not post-dated,
please refer to Help topic, How To Take Checks Over the Phone.
4. If this is a VARYING type of post-dated payment, then
run PDC again, as many times as needed, until you have
entered amounts and dates for all promised
payments. ONLY do this if the dates are staggered
and inconsistent AND you have chosen status code PDC.
Collect! will schedule transaction and letter contacts
according to the choices you have made.
Status code PDC with contact plan PDC run once will schedule
one confirmation letter and one transaction with no repeats
and will be posted on the date entered. Run contact plan PDC
again as needed to schedule additional transactions to be
posted on staggered dates that you enter.
Status code RPD with contact plan PDC run once will schedule
one confirmation letter and one transaction that is set to repeat
Monthly. When the transaction is posted, a confirmation letter
will be scheduled informing the debtor of the next payment due.
Scheduled letters and transactions must be processed
using batch processing to be printed or posted.
This is described below.
Post-Dated Batch Processing
To complete the scheduling of letters and posting the
transactions, you will have to run your batch processes.
This will post the appropriate transactions and print
the confirmation and withdrawal letters.
1. Every evening, do your Scheduled Batch Letters.
2. Each morning Process all contacts previously scheduled
and make sure the choice 'transactions' is chosen. Check
to ensure that transactions have been posted.
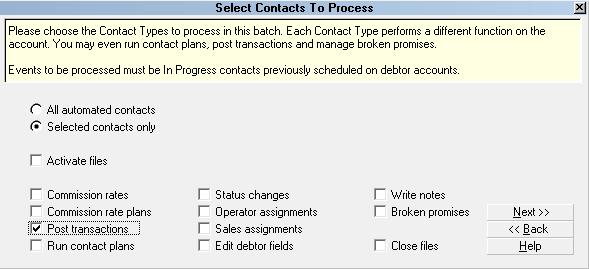
Process Transaction Contacts
All that remains is the printing of the checks. This is
accomplished with a report as described below.
Post-Dated Check Printing
When you are ready to print your checks, use the report
called Check - Form #1000.
BE SURE TO PICK THE CORRECT REPORT! This report
will pick up ANY check by phone transactions that have not
been printed yet, even those scheduled through an ordinary
checks taken by phone transaction and not yet printed. The
report is set up to only print transactions posted up to and
including today, not transactions with future posted dates.
The report inserts the word "printed" into the User 6 field
of the Transaction after the check is printed.
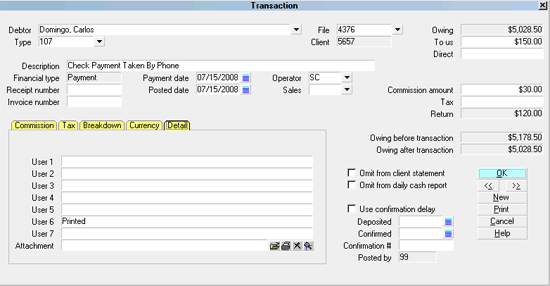
Check Printed
This ensures that it will not be printed again, even if you
have to start the batch again for any reason. It will pick up
where you left off since any printed checks will now
have "printed" in the transaction and will not be picked up again.
If you print this report to screen to look at the results,
"printed" is still inserted into the User 6 field. When you try
to print it for "real" to the printer, it won't print. So, you have
to go into the transaction and remove the word "printed"
from the User 6 field first.
Billing Tree Module For Post-Dated Payments
The Billing Tree module enables you to process credit card and
ACH payments electronically through Collect!'s Billing Tree
connection. This is a full-featured solution for managing single
and recurring payments made by credit card or by bank draft.
External payments posted at the Billing Tree web site are
also reconciled and posted within Collect!. Recurring
scheduled payments are fully managed within Collect!'s
promised payment system.
See Also
- How To Take Checks Over the Phone
- Billing Tree Topics
| 
Was this page helpful? Do you have any comments on this document? Can we make it better? If so how may we improve this page.
Please click this link to send us your comments: helpinfo@collect.org