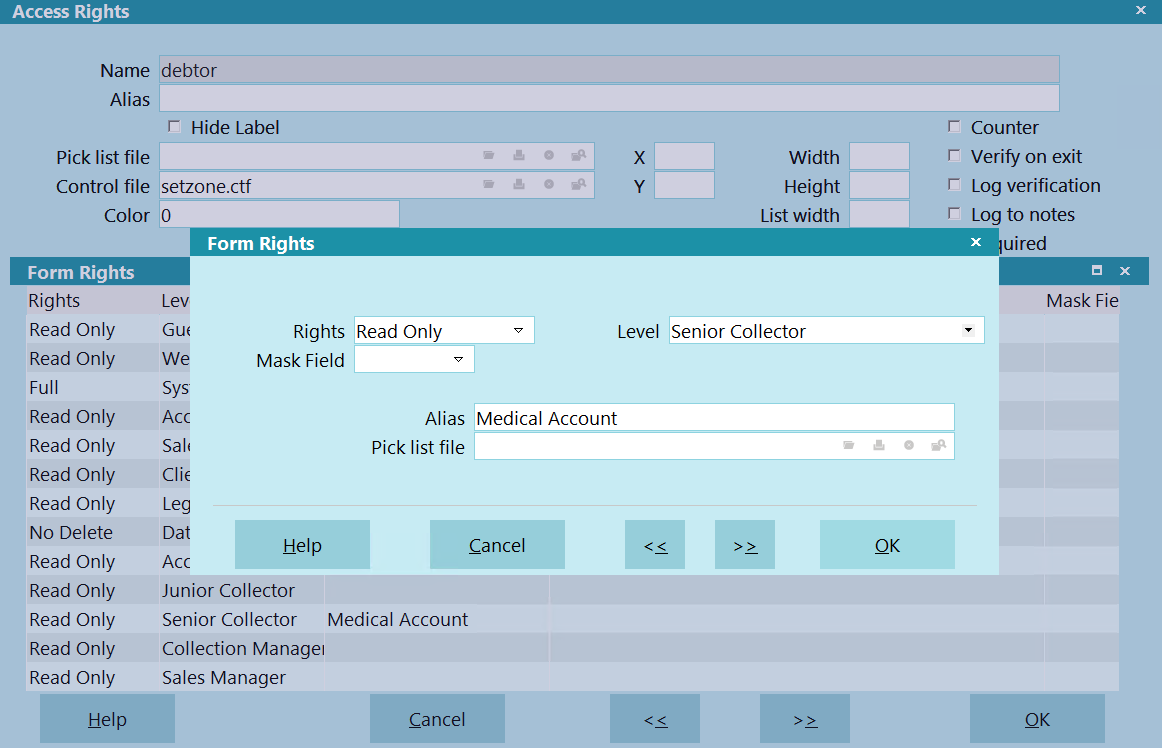
Form Rights
The Form Rights form contains several settings
that allow you to set security privileges and
display properties for a selected menu, form
or field in Collect! for a particular user level.
The chosen user level may have its own alias
name for the field, form or menu item and its
own pick list attached to it.

Form Rights
When you are viewing the Access Rights
form, you may see a list of users displayed
in the Form Rights sub form. The Form Rights
list displays those Users who have rights to
access the given form or menu, and the extent
of their rights.
Rights
Use the arrow to drop-down a list of Access Rights choices.
Access Rights include Full, No Delete, Read Only and No
Access.
 These settings have different effects
depending on whether you are setting
rights for a menu item, a form or a field.
Please refer to Help topic
How to Use Access Rights for details.

Level
Click in this field or on the down arrow to open the
Operator Level list. Choose a user level to allow it
to access the item. You can set up your user groups
and their rights through the System menu by choosing
Rights, User Levels. Collect! ships with several default user
groups which you can modify, if necessary.
 WARNING: Please be careful. If you inhibit
the System Manager from accessing the
Access Rights list you will be unable to
change the rights in the future!

Mask Field
If you would like to mask a field with stars, you can
select a value in this field. There are 3 options:
- None - No Masking
- Partial - Masks all but the last 4 characters
- Full - Masks all characters

Alias
This name overrides the system default name for
the form or field whose Access Rights you are
modifying. When the specific user group chosen
in the Level field signs into Collect!, the alias you
type in here will display as the name of this menu,
form or field. For example, you may have a group
of operators who work certain account types, while
other operators manage different account types.
Each group can have the forms it uses in Collect!
set up with labels that suit its particular function.
The names you choose should be very intuitive
and logical.
 WARNING: Do not rebuild your Access Rights
list when signed in as a User with aliases.

Pick List File
The Pick List File shows you the name of the
Pick List attached to this field. Pick lists can
be attached to just about any field in the system.
Pick Lists give the user a list of choices to choose
from for the field.
 The Form Rights Pick List field gives you
the ability to assign a special pick list to
a particular user level. This is very useful
for limiting the operator's choices. For
instance, you can create one pick list for
your system level users and another for
your collectors. An example would be the
Debtor Status field. Perhaps you want
your collectors to be able to change the
Status, but limit them to a few choices.
This is where you could benefit from
setting the pick list in Form Rights for
the user level you have assigned to
your collectors.

Help
Press this button for help on the Form Rights
dialog and links to related topics.

Cancel
Select this button to ignore any changes you may
have made and then return to the previous form.

OK
Selecting this button will save any data
you have entered and return you to the
previous form.
<<
Selecting this button will take you back
to another record.
>>
Selecting this button will take you forward
to another record.

| 
Was this page helpful? Do you have any comments on this document? Can we make it better? If so how may we improve this page.
Please click this link to send us your comments: helpinfo@collect.org