Contacts Versus Contact Plans
This quick tour introduces you to using contacts and contact plans.
When you have finished reading it, you will be more familiar with
creating both contacts and contact plans and will be able to see
the difference between them.
We will cover:
- Single Contact - What is a
Contact? Creating a New Contact. Components of a Contact.
Default Settings for Contacts. Managing Contacts.
Reloading Your WIP List. What's Next?
- Contact Plans
- What is a
Contact Plan? Creating a New Contact Plan. Events.
Creating an Event. Using Contact Plans.
Results of Contact Plans. Later On.
- What's the Difference Between Contacts and
Contact Plans?
Single Contact
What is a Contact? A contact is a single scheduled item, which alerts
the collector or system that some task has to be performed on a
specific account. The tasks help make up your collection strategy
and are part of the sophisticated contact management system
which forms the backbone of Collect!.

Creating A New Contact
On the Debtor form select the CONTACTS tab. What you
see next depends on whether or not the account already has
contacts scheduled.
If this is the first contact to be scheduled on this
account, a message will be displayed, "Contact not found.
Create a new one?"

Prompt To Create A New Contact
Select the YES button. A fresh screen for a Contact will appear.
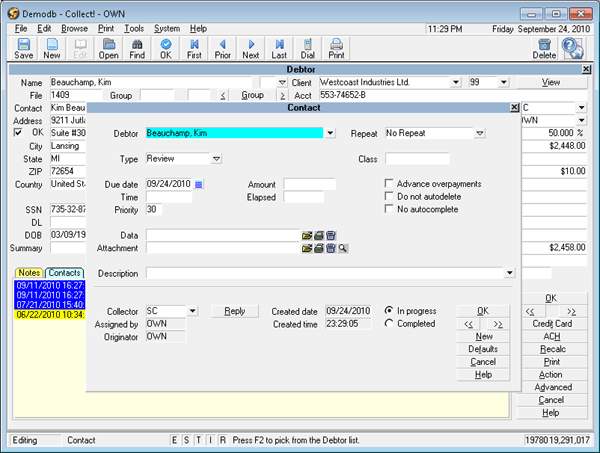
New Contact form
If there are already contacts listed for the account,
they will appear in a list as follows.
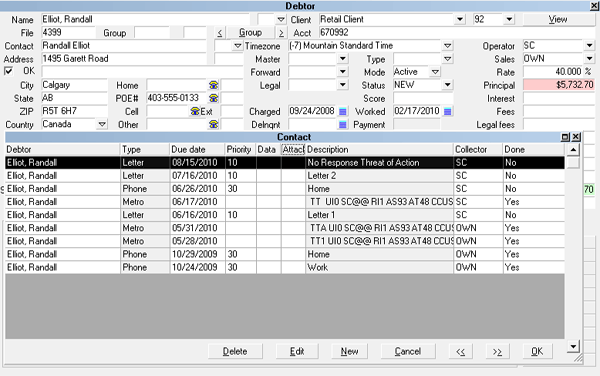
List of Contacts Scheduled for an Account
You can select any one of the line items to view details
of a contact scheduled for this account, regardless of whether
it has been completed or not.
This list of contacts, in addition to your account Notes,
forms the history of the account.
Select the NEW button on the Contact form or at the bottom
of the list of Contacts. You will see the following screen.
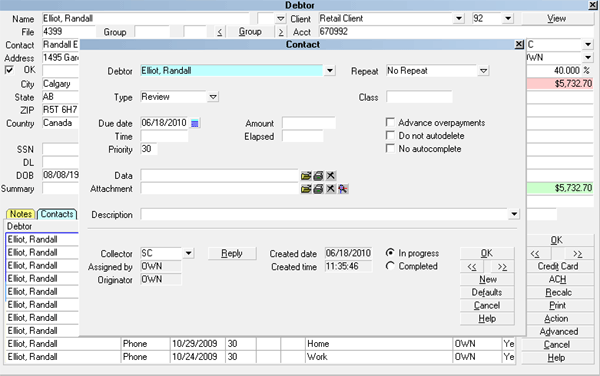
New Contact form

Components Of A Contact
Whether you have created a new contact where there previously
was none, or you are adding to the list, the screen you see has
the same components. Let's look at these different components
one at a time and in detail.

Debtor
This is the name of the Debtor as it appears on the account and
is automatically pulled from the account each time you create
a new contact.

Due Date
The Due Date is the date you want the event to occur. Select
the striped box to the right to make the Calendar appear.
You can choose the date you want the event to occur by
selecting the date from the calendar, otherwise the date is
today's date (the same as your computer date).

Repeat
A contact can be scheduled to repeat at regular intervals
such as daily, weekly, monthly or not repeated at all.
Repeat occurs when you print a letter, post a promised
payment or batch process previously scheduled contacts.
As of version CV11.6.2.9, you now have the choice of
selecting First Day of the Month and Last Day of the Month
as your frequency cycle.

Max Intervals
This field is visible when you select a REPEAT
value. Collect! uses it to determine how many
times this Contact is repeated.

Priority
The Priority code you enter indicates how important this
contact is to you. You can enter a number from 1 to 99.
Collect! understands that 99 is your top priority and 1 is
your lowest. Typically, promises are higher priority than
a review.

Time
A contact can be scheduled to happen at a particular time of day.
Collect! uses the 24 hour clock, i.e. 13:10 is actually 1:10 PM.
When the clock on your computer matches the time on the
contact, a box will pop up alerting the collector to go to
the account.
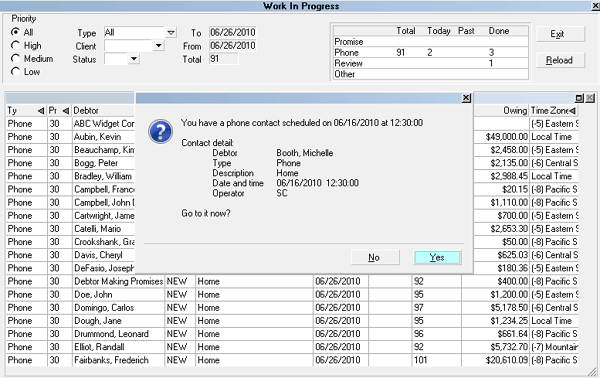
Timed Contact in WIP List
This only works when you are working accounts through your
WIP List.
TYPE
There are many types of contacts you can schedule, ranging
from promises, letters, reviews and changes of status to
credit bureau reports and posting a transaction. To see the
full variety select the down arrow on the Type field.
CLASS
This is a user defined field.
AMOUNT
If this is a reminder of a promise to pay, enter the dollar value
of the promise.
DESCRIPTION
Consider the Description field as a note to advise the collector or
the system what is supposed to happen. If the contact type is
a Letter, Status Code or some other item which can be automated,
a down arrow will appear on the right of the field. If the type is Other
or Review, or a type which has no pick list attached type, free form
a little memo. On a review you might type a specific instruction to
the collector.
ATTACHMENT
This is a large space into which you may enter a much larger
memo or series of instructions. Typically, such information is
relevant only to this one contact, otherwise it would appear in the
notes to be available to anyone at any time.
DEFAULTS
The Defaults button leads you to global settings for your contact
management. This is not the place to set information
for this individual contact, but rather for the whole system.
COLLECTOR
The Collector field by default displays the operators ID as it
appears on the account, however by selecting the down arrow,
you can view the entire list of operators you have entered into
the system and choose whomever you want to carry out
this contact.
ASSIGNED BY
The Assigned by field displays the ID of the operator who is
creating the contact, the individual who is currently signed
into the system.
ORIGINATOR
In Collect!, you may move contacts from operator to operator
many times. You may find it useful to know who actually initiated
the contact. The Originator of the contact can differ from the
Assigned by if you practice using the REPLY button discussed next.
REPLY
If you receive a contact in your task or WIP List, you may wish to
forward it to another operator or answer the contact and send your
answer back to the original operator. To do so, select the REPLY
button and choose the operator you wish to send the contact to.
We use the contacts and reply buttons in our office as a mini email
system for information, which is account specific. When the
designated operator receives the contact, they have all the relevant
data at their fingertips.
CREATED DATE
The Created Date is the date of your computer setting on the day the
contact was created.
CREATED TIME
The Created Time is the time of your computer setting when you are
creating the contact.
IN PROGRESS
When the dot is in the center of the In Progress field, the contact has
yet to be done. If it requires manual intervention, it will be in the
collector's WIP List. If it is a background task, it will be carried out
at the appropriate time.
COMPLETED
When the dot is in the center of the Completed field, the contact has
been done - the letter printed, the phone call made or whatever the
specific task was. The contact information will remain a part of the
account information for your reference.

Default Settings For Contacts
You have probably noticed that each time you click for a new
contact, some fields are filled in for you. We made some decisions
for you so that when you installed Collect!, you did not have to do
quite as much work. To alter the defaults, select System from the
top menu bar and then select Preferences, Plans and Reference Tables,
WIP Options.
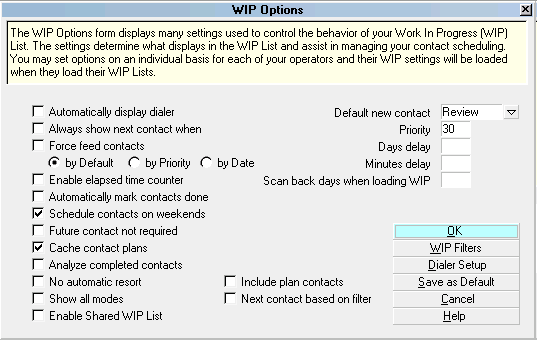
WIP Options form
On the lower right, you will see 'Default new contact'. You may select
whatever type, priority, delay you wish. The objective of this setting is
to save you time, so think carefully about what the most common
scenario might be. Most of the time, you would want a review or
phone call. Once you have made changes to these settings, select
the SAVE AS DEFAULT button to keep your new settings ready for
the next contact.
 Once you have saved the Operator Configuration for
an operator, you can use the Copy Operator Configuration
feature, to set the same settings for all operators in your
system with the same User Level.

Managing Your Contacts
What happens to the contacts now? The contacts you schedule
are the tasks that appear in your collector's To Do List or
Work In Progress. An important detail to remember is that only
the tasks which require manual intervention and which have not
been completed by your date selection will appear in the
Work In Progress list. Collect! installs with logical default settings
but you can alter them to suit your needs.
Here is an example of those default settings. Notice only Promises,
Phone calls, Reviews and Other are ticked. These items do require an
individual to perform an activity. Items like writing a note, changing the
status and printing a letter are background tasks and are typically
performed in a daily batch. Operators don't need to waste their time
controlling these types of contacts, so we don't overload and clutter
up their Work In Progress lists.
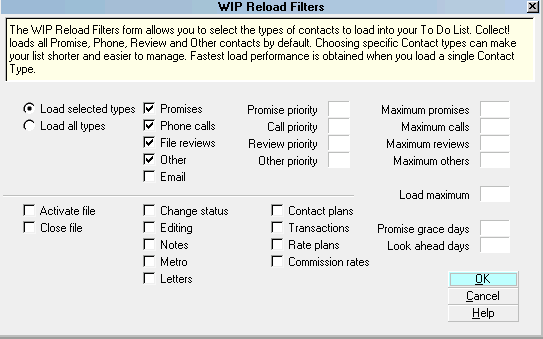
WIP Reload Filters with Contact Types to Load
There are other settings that help to further define what will appear in
the collector's Work in Progress list. Use settings as displayed
below to further control large lists by electing to display only the
contacts which are due or past due.
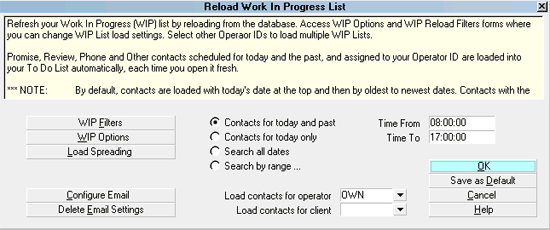
Reload Work In Progress settings
The default settings selected in these forms assist greatly in
controlling and effectively managing what could become a huge
volume of unwieldy data. Collectors are able to handle priority
tasks like promises first, followed closely by phone calls,
which are more time sensitive than an account review.
Such elegant management ensures that accounts are followed
up in an orderly and timely manner as depicted in this display
of a Work in Progress list.
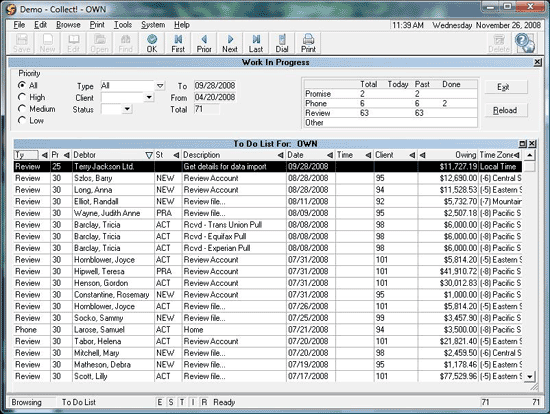
Work In Progress To Do List
Don't be alarmed if one of your accounts does not appear in a
Work in Progress list. A non appearance means one of a few things.
- Either there is no future contact scheduled,
- The scheduled contact is in the future and your settings indicate
today and past only,
- Or the contact type scheduled is of the variety which does not
require manual intervention.
To verify this, select the CONTACTS tab on the Debtor form.
If all the contacts are completed, or do not require manual
intervention, you will probably want to set a review for some
appropriate time in the future.
The only time every account you have listed may appear in
the Work in Progress list is when you are just getting started
and allocating the basic contact management, or you have not
been getting your work done.
Careful management of contacts makes Collect! a pleasurable
and time saving experience. Remember the WIP List is not a display
of all accounts, rather a display of all contacts that require
operator intervention and are either due to be tended or past due,
depending on the settings you use.

Reloading Your WIP
Once you have created account follow-ups or contacts, you may
notice that even those which you know fall within the date and
type parameters you have chosen do not display.
Don't worry, you must reload your WIP List to have them display.
This delay or forcing of the display means that Collect! has one
less task to deal with on the run. Select the RELOAD button
on the WIP List form. This will display the Reload form.

Reload Work In Progress form.
If you simply wish to refresh your list, select the OK button.

What's Next?
You have just learned how to create a single contact on an
account, when and how it will operate and just what to expect
from that contact. Once you have practiced creating contacts
and have used them, you will be ready to automate your contact
management. Learn how to make Collect! do the work for you.
Single contacts are only the tip of the power in the Collect!
contact management system.

Contact Plans
Manually scheduling contacts is great, but there are many times
when you would be entering the same contact over and over again,
or when you need to enter several contacts to work the account
properly. For those times, you want a contact plan to let Collect!
do your work for you.
What is a Contact Plan? A contact plan is made up of single
contacts (like we just learned about). When many contacts are
used together as a single entity, it is called a Contact Plan.
To avoid confusion, we refer to each of the components in a
contact plan as an "event."
An Event can be a letter, review, change in status, posting of a
transaction and many other types of events. An event may be
scheduled to run immediately or at a predetermined date and
time in the future. An event may be assigned to the operator
you specify, have a specific priority or be scheduled to run
only if a certain condition is met. The demonstration database in
Collect! contains many samples of contact plans. To review the
contact plans in the system, create a new debtor and try these
examples. To run a contact plan, click your mouse on the Action
button accessing the list of pre-set contact plans.
This sampling will give you an idea of the power available. As part
of your system setup, we strongly recommend you create your
own contact plans. These plans form a major part of your collection
strategy and will unlikely be the same as our samples. Your
collection strategy is what sets you apart and should be carefully set up.

Creating A New Contact Plan
Select System menu from the top menu bar and the select
Contact Management Settings, Contact Plans, View. Select
the NEW button on the bottom of the screen. This is a template
for us to use to create a new contact plan.
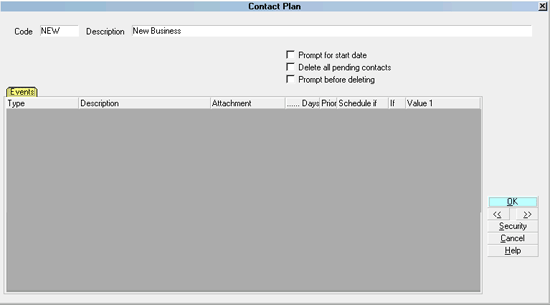
Contact Plan form
In the Code field, type a three digit code which will make sense
to you and make a more complete description below in the
Description field. Each contact plan can have security set up to
allow only operators with specific access levels to use them.
You might want to prevent a junior collector from closing an
account, for instance.

Events
Click your mouse on the Event bar and when prompted to create
a new event, select YES. Remember, each event in a contact plan
is the same as a single contact (as in the previous section) only
now we are going to make several events work together.

Event form
Notice the fields are very similar to the ones listed for single contacts:

Type
There are many types of contacts you can schedule, ranging
from promises, letters, reviews and changes of status to credit
bureau reports and posting a transaction. To see the full variety,
select the down arrow on the Type field.

Description
Consider the Description field as a note to advise the collector
or the system what is supposed to happen. If the contact type
is a Letter, Status Code or some other item which can be
automated, a down arrow will appear on the right of the field.
If the type is Other or Review, or a type which has no pick
list attached, type a little memo. On a Review, you might type
a specific instruction to the collector.

Assign To Account Operator
Dot this radio button if you want this event to be
assigned to the operator whose ID appears on
the account.

Assign To Current Operator
Dot this radio button if you want this event to be
assigned to the operator who is signed in and
entering the information.

Assign To Specific Operator
Dot this radio button if you want this event to be
assigned to an operator in your list other than the
account operator or the current operator.

Prompt To Confirm Details
Some events, such as the date, may be variable. Select
the most common setting and then put a check mark in this
check box. This will give the user an opportunity to make
choices when the contact plan is used.

Delete Same Type Contacts
Should you get a response from the debtor, the letters
already scheduled may become irrelevant. In which case,
Collect! will remove any letters already scheduled, replacing
them with your new choice.

Delete Same Description Only
Further to deleting contacts of the same type, Collect! can
monitor that only a contact which is identical in every way
will be deleted so as to avoid duplication.

Allow All Users To Delete
You can also ensure that any one who runs this plan will
delete the contacts specified.
Careful!
This switch overrides access rights. That means ANY user
level who runs this plan will delete same type contacts on the
account, even if their access rights level does not allow editing
or deleting contacts.

Schedule If
The Schedule If concept is very powerful and allows you to have
certain events to occur on an account, only if a specific condition
is met.
An example might be requesting an event such as a phone call to occur:
Only if the debtor Owing (select the down arrow in the first field
and select de.ow),
Is greater than, (click into the next pick list, and select [>],
Click into the third field and type a criteria [$100].
When this type of selection is used, the phone call will only be
scheduled if the balance on the debtor account is more
than $100. Conversely, you may wish to have a contact that
sends a letter to the account if the balance is less than $100,
thus reserving manpower for higher yield accounts and
automating the rest.
 To compare two fields of the same data type, simply
use the @fieldcode in the Value field.
For example: Schedule If: de.li < @de.ch
In this example, de.li is chosen from the pick
list for the 'Schedule If' field. Less than [<] is chosen from the
pick list for the 'If' field and @de.ch is entered
manually in the Value field. This only works if both fields are the
SAME DATA TYPE, for instance, both dates or both currency.
 Only use fields from the Debtor record!!

Schedule If Security Level
You can also schedule events to trigger off the User Level
of the Operator who owns the Debtor the plan is run on.
Select os.ul from the Schedule If
pick list and then for your criteria, put in the number of
the User Level or range of numbers for User Levels.
Please refer to Help topic, Schedule If User Level for
more information.

Priority
The Priority code you enter indicates how important this
contact is to you. You can enter a number from 1 to 99.
Collect! understands that 99 is your top priority and 1 is
your lowest. Typically promises are higher priority than
a review.

Schedule Immediately
The event with the schedule immediately flag on will not
delay. The event will be scheduled now. In the case of a
letter series, you probably want Letter 1 to go out right away.

Delay Days
You may elect to delay an event by a specific period of time.
In a letter series, you will want a second letter to be delayed
a period of time according to the statutes of your area, or
your own collection strategy.

Day Of Month
You may wish to schedule a reminder letter to go out one
week before the monthly payment is due. This date selection
is absolute.

Same Day Next Month
This is much the same as setting a specific day of month but
will repeat the action for you.

Timeless
The timeless switch is typically used either where the time
of day is irrelevant or when the contact event is one which is
a background task.

Delay
You may elect to delay an event for a specific period of time.
In the case of the caller getting a busy signal, they may wish
to reschedule the call with a 15 minute delay.

Time Of Day
An event can be scheduled to run at a specific time of day
using the Collect! 24 hour clock. Simply type in the digits of
the hour, a comma and the digits of the desired minutes.

Repeat
A contact can be scheduled to repeat at regular intervals
such as daily, weekly, monthly or not repeated at all. As of
version CV11.6.2.9, the intervals of First Day of the Month and
Last Day of the Month have been added.
Repeat occurs when you print a letter, post a promised
payment or batch process previously scheduled contacts.

Max Intervals
This field is visible when you select a REPEAT
value. Collect! uses it to determine how many
times this Contact is repeated.

Creating An Event
Select the type of event you wish to use and using a
combination of menu selection, mouse clicks and
keystrokes, fill in the Event form. The sample
below shows a first Dunning Letter in a series.

Letter 1 Event
To create a second event select the NEW button at the bottom
of the screen.
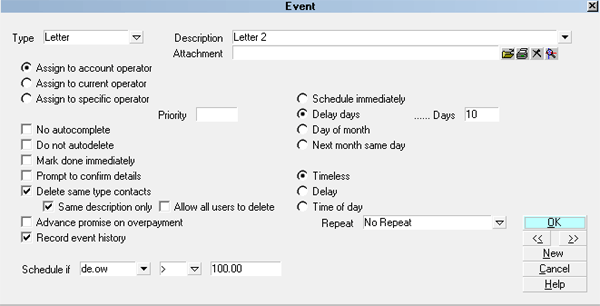
Letter 2 Event with Delay Days and Schedule If
In a single contact plan, you may wish to schedule a letter
series, change the account status at appropriate intervals,
schedule phone calls and so much more. Each event is one
building block to a complete collection strategy.
This is a fairly typical contact plan with many events.
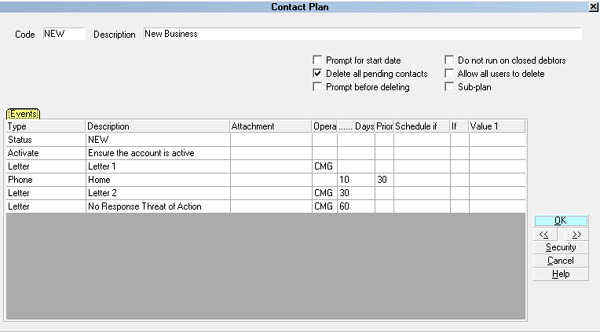

Using Contact Plans
Contact plans can be versatile, time saving and powerful. While
getting started, use your contact plans on one debtor at a time.
On the Debtor form, during the course of working the account,
type in the code for the plan you select, or click the Action button
to select from your list of contact plans. You can also enter a
contact plan code in the Client Settings to run a contact plan
as the account is being entered.

Results Of Contact Plans
The results of using contact plans are the same as using single
contacts. Events occur. According to the settings in your
Work in Progress list, many items will display as daily
collector tasks. Other items, which do not need user intervention
will be processed as part of the daily batch processes. Either
way, the event will remain as a permanent record of the
account history.

Later On
Once you have gained a comfort zone, you can apply contact
plans to a group of accounts in an incredibly fast batch process
or when you import accounts into Collect!.

What's The Difference Between A Contact And A Contact Plan
What is the difference between a contact plan and a contact?
If this quick tour has been effective, you will know the answer
to this, if not a prompt may help.
- A contact is a single event or activity you schedule to happen
to an account now or in the future.
- A contact plan is a series or group of events of varying types
you schedule as one block to happen to an account now and
at pre-designated times in the future.
Go ahead and test your ideas on the Demonstration database.
Regardless of your level of experience, protect yourself and
each time you create a new contact plan, test it thoroughly
before you run it live on your data.

See Also
- Developing Collection Strategies
- Contact Plan Topics

| 
Was this page helpful? Do you have any comments on this document? Can we make it better? If so how may we improve this page.
Please click this link to send us your comments: helpinfo@collect.org