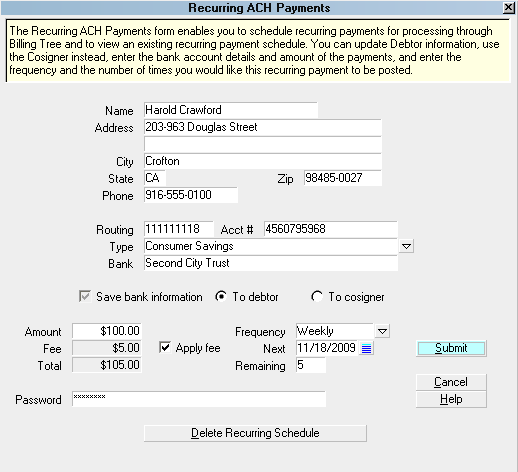
Recurring ACH Payments
For create a cyclic ACH arrangement on a fixed interval,
click the ACH button in the lower right of the debtor
screen and select Recurring Payments from the ACH Payment
Tasks menu. This window once completed will initiate series
of automations in Collect!.
In addition to entering new arrangements, this screen is
used for all of the following:
- view existing arrangements
- modify/update existing arrangement terms
- modify/update debtor details (i.e. demographic, banking)
- substitute a Cosigner/ACH Payer name in place of the debtor
As soon as the Recurring ACH Payments window opens,
Collect! queries to see if there is already a recurring
payment schedule set up for this account. If one exists,
then the bank account, financial and scheduling details
of the existing arrangement are auto-filled for you.
Recurring ACH Payments
 You can create a new payment schedule by
deleting the existing one. Only ONE recurring
payment schedule may exist on an account at
any given time.
You can create a new payment schedule by
deleting the existing one. Only ONE recurring
payment schedule may exist on an account at
any given time.
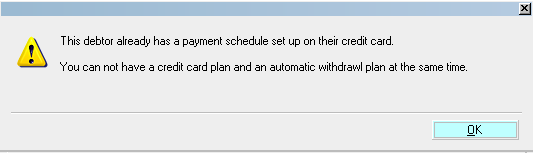
Recurring Plan Exists Already
When you schedule recurring ACH payments for processing,
Collect! posts a transaction for each payment. The Payment
Dates entered reflect the arrangement due dates. The Posted
Date is populated with the date you entered the arrangement,
OR, if you are running the most current version of Collect!
in 2015, you have the option to choose to leave the Posting
Date blank until the transaction is finalized by Billing Tree
on its due date via Reconciliation. This option is located
in your ACH Setup options in your System\ Preferences menu
path.
Whether blank or reflecting the date the arrangement was
data entered, the Posted Dates are updated to the actual
processing date upon the payment's submission to Billing
Tree.
 WARNING: If you are not using the ACH Setup option
to leave the posted dates blank, you
will want to set the Company Details switch
for "Statement uses payment Date" to ensure
that entire arrangements not yet realized
do not get expressed on your client remittances.
As well, ensure you have Reconciled all your
ACH transactions prior to running your client
Statements, encompassing the same outside date
that you will use in your From/To statement date
range.
WARNING: If you are not using the ACH Setup option
to leave the posted dates blank, you
will want to set the Company Details switch
for "Statement uses payment Date" to ensure
that entire arrangements not yet realized
do not get expressed on your client remittances.
As well, ensure you have Reconciled all your
ACH transactions prior to running your client
Statements, encompassing the same outside date
that you will use in your From/To statement date
range.
We recommend that all sites run Reconcile ACH History on a daily
basis to keep all records up to date. This process not only
submits all recurring payments which have come due, but will
also download external payments, reversals and log any unmatched
transactions in your CV11\bin\BillingTree\ACH folder.
Convenience fees are also posted when you run your
daily reconciliation.
Users of CV11.6.2.7 and higher who are also licensed
for the Scheduler Module now have an enhanced automation
with the addition of the Reconcile process being added
to the Scheduler Task list of options. You may run this
process offline and unattended. Contact us at
sales@collect.org for module pricing.
The following are the mandatory fields which must be populated
in order for a valid ACH payment be be submitted and accepted
by Billing Tree for processing.
Name
Enter the payer's name if it is different
from the name already auto-filled for you.
By default, this field is filled with the
Name from the Debtor screen. You can edit
this as needed for the transaction. If you
choose to save this information, the system
will update the Debtor screen for you. If
you are entering the info for a third party
payer, the system will include this Name.
Choose "To Cosigner" and the system will
save this information by creating a new
Cosigner window with the Class of "ACH
Payer". This will allow you to distinguish
the difference between a responsible party
and a potential unresponsible payer on the
account.

Address
Enter the payer's Street Address. By
default, this field is filled from the
Debtor account information.
You can edit this as needed for the
transaction. If you choose to save
this information, the system will update
the Debtor screen for you. If you are
entering the info for a third party payer,
the system will include this Address.
Choose "To Cosigner" and the system will
save this information by creating a new
Cosigner window with the Class of "ACH
Payer".
Address 2
This is an optional second Address line.
By default, this field is filled from the
Debtor account information.
You can edit this as needed for the
transaction. If you choose to save this
information, the system will update the
Debtor screen for you. If you are entering
the info for a third party payer, the
system will include this Address 2.
Choose "To Cosigner" and the system will
save this information by creating a new
Cosigner window with the Class of "ACH
Payer".
City
Enter the payer's City. By default, this
field is filled from the Debtor account
information.
You can edit this as needed for the
transaction. If you choose to save this
information, the system will update the
Debtor screen for you. If you are entering
the info for a third party payer, the system
will include this City. Choose "To
Cosigner" and the system will save this
information by creating a new Cosigner
window with the Class of "ACH Payer". Older
versions of Collect! use "Other" as the Class.
State
Enter the payer's two character State code.
By default, this field is filled from the
Debtor account information. This is a
required field and must be a valid 2-digit
code.
You can edit this as needed for the
transaction. If you choose to save
this information, the system will update
the Debtor screen for you. If you are
entering the info for a third party payer,
the system will include this State. Choose
"To Cosigner" and the system will save this
information by creating a new Cosigner
window with the Class of "ACH Payer". Older
versions of Collect! use "Other" as the Class.
ZIP
Enter the payer's ZIP code. By default,
this field is filled from the Debtor
account information. This is a required
field and must be a valid zip. Billing
Tree REJECTS submission if the zip is not
valid.
You can edit this as needed for the
transaction. If you choose to save this
information, the system will update the
Debtor screen for you. If you are entering
the info for a third party payer, the
system will include this Zip. Choose
"To Cosigner" and the system will save
this information by creating a new Cosigner
window with the Class of "ACH Payer". Older
versions of Collect! use "Other" as the Class.
Phone
Enter the payer's Phone number. By default,
this field is filled from the Home phone
number on the Debtor account information.
You can edit this as needed for the
transaction. If you choose to save this
information, the system will update the
Debtor screen for you. If you are entering
the info for a third party payer, the
system will include this Phone. Choose "To
Cosigner" and the system will save this
information by creating a new Cosigner
window with the Class of "ACH Payer". Older
versions of Collect! use "Other" as the Class.
Routing
Enter the Routing number for the Bank
that this ACH payment will be drawn from.
This is a 9-digit number and must match
the routing number of the payer's bank.
When this transaction is processed, it is
stored in the Debtor Detail Tab, ABA field,
if the payer is the Primary debtor, OR to
the Cosigner User2 field, if you chose to
"Save bank information" to Cosigner, with
the Class of "ACH Payer". Older
versions of Collect! use "Other" as the Class.
Acct #
Enter the payer's Bank Account Number. This
must be the account that the ACH payment
will be drawn from.
When this transaction is processed, it is
stored in the Debtor Detail Tab, Account
field if the payer is the Primary debtor,
OR to the Cosigner User3 field, if you
chose to "Save bank information" to
Cosigner, with the Class of "ACH Payer". Older
versions of Collect! use "Other" as the Class.
Type
Select the Type of bank account from the
pick list provided.
When this transaction is processed, it
is stored in the Debtor Detail Tab, field
label Detail 1 if the payer is the Primary
debtor, OR to the Cosigner User4 field,
if you chose to "Save bank information"
to Cosigner with the Class of "ACH Payer". Older
versions of Collect! use "Other" as the Class.
Bank
Enter the name of the Bank this ACH payment
will be drawn from.
When this transaction is processed, it is
stored in the Debtor Detail Tab, Bank field,
if the payer is the Primary debtor, OR to
the Cosigner User1 field, if you chose to
"Save bank information." to Cosigner, with
the Class of "ACH Payer". Older versions of
Collect! use "Other" as the Class.
Save Bank Information
Click the software switch to select this
option if you want to save the entered
bank information to the debtor's Detail
Tab, or to the Cosigner window with the
Class of "ACH Payer". Older versions of
Collect! use "Other" as the Class.
To Debtor
This option will update all information
which differs from the prefilled fields
back to the main debtor screen as well as
save details to the Detail Tab if you
accept the selected radio button default
"To Debtor". It is important to make
sure your site has " Log to notes" checked
on the Access Rights preferences for any
field which could potentially be overwritten
by this auto-update if you want to save the
old info to your debtor Notes.
To Cosigner
Clicking the radio button for Cosigner will
only be accepted by the system if you have
entered a name that is different from the
auto-filled debtor name.
This will create a Cosigner window with
the Class "ACH Payer". The Class "ACH Payer"
must exist in your pick list for the Cosigner
"Class" Access Rights for this feature to
work correctly. Older versions of Collect!
use "Other" as the Class.
Amount
Enter the Amount of the ACH payment you are
about to process.
Date
Select the payment Date of the ACH payment
you are about to process.
Fee
This field displays the amount of the
Convenience Fee.
This field is Read Only. You must check
the "Apply fee" box FIRST for the amount
of the convenience fee to auto-fill.
Unless you have enabled each client to
allow ACH convenience fees, the Fee amount
will remain blank and the "Apply fee" check
box will remain Read Only and not
accessible. See "Advanced Client Settings"
for more information.
Apply Fee
Check this ON to activate the convenience
fee for this transaction and invoke display
of the fee amount to be applied when the
payment is processed.
If you have not enabled convenience fees
for this Client, then the Apply Fee field
will be greyed out/Read Only. See "Advanced
Client Settings" for details.
Total
This is the sum total of the (Amount +
convenience Fee, if any) that will be
drawn from the payer's bank account as
a SINGLE transaction on the debtor's side
of the bank records. If your site applies
convenience fees, you will see a total of
TWO transactions; the ACH Payment and the
convenience Fee are separate in Collect!.
Frequency
Select the payment frequency from the pick
list attached to this field.
If there is already a recurring ACH payment
schedule set up for this account, this field
will be populated with the payment frequency
when you open the Recurring ACH Payments screen.
Next
Select the date for the first payment.
If there is already a recurring ACH payment
schedule set up for this account, this field
will be populated with the date of the next
scheduled payment when you open the Recurring
ACH Payments screen.
Remaining
Enter the number of payments you wish to
schedule.
If there is already a recurring ACH payment
schedule set up for this account, this field
will be populated with the number of payments
remaining when you open the Recurring ACH
Payments screen.
Password
This is your Billing Tree ACH Password. The
system auto-fills this info for you after
you have entered it for the first time
for the current login session.
Only User Levels 1, 10 & 99 will see the
Password field beyond the initial current
session signon to Billing Tree.
Delete Recurring Schedule
Click this button at the bottom of the
Recurring ACH Payments window to remove an
existing recurring arrangement. The module
will automatically:
Remove all the future dated transactions
posted and pending in the Transaction Tab.
The Promise Contact for this payment
schedule will be marked as "Stopped" but
it will remain In Progress for your attention.
The Billing Tree Review Contact marking
the end of the payment schedule will have
its Due Date changed to the Date you deleted
the recurring schedule.
You will be prompted by popup asking
"Should I remove the Billing Tree scheduled
ACH Payments and notification letters?".
If you click yes, the system will
automatically remove any future due-dated
transactions in the Transactions Tab and
delete all future due-dated ACH Notification
letter Contacts currently scheduled.
Help
Click the HELP button to be auto-navigated
to our webpage, Help Documents, for more
info on ACH Payments and related topics.
Cancel
Select the CANCEL button to close this window
without submitting the payment schedule.
Submit
Select the SUBMIT button when you have
completed entering the requisite fields.
If you have missed a mandatory field or
entered invalid data (i.e. zip code), you
will receive a popup advising of why the
transaction(s) cannot be submitted. Simply
follow the directions and resubmit.
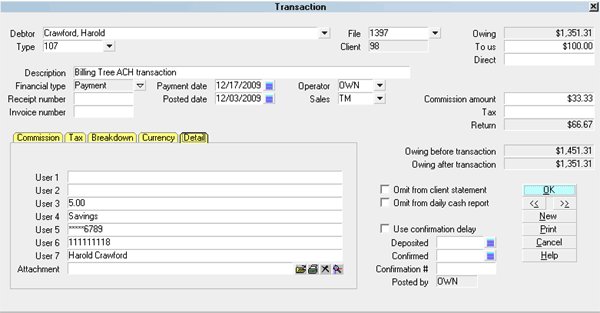
Transaction Details
After you have successfully processed a
single ACH payment, you can view the
results immediately in the Transaction
record, Details Tab.
User 2 is a unique Reference # with a naming
convention of "filenumber-date-time-fee".
User 3 is the convenience Fee amount, if any.
User 4 is the Bank Account type.
User 5 is the masked Bank Account Number.
User 6 is the Bank's ABA routing number.
User 7 is the ACH Payer name.
Confirmation # is a unique Transaction ID
assigned by Billing Tree. You will see
this number on the main Transaction screen,
just above the "Posted by" ID in the lower
right side of the window.
NSF Payments
When you reconcile ACH history, the module
will download any reversals for payments
previously confirmed and auto-post them
for you if you have reversal transaction
codes entered in your ACH Setup options.
Any Unmatched reversals will be found in the
CV11\bin\BillingTree\ACH folder for manual
review and handling.
Promise Details
When you schedule recurring ACH payments, AND if you
have enabled 'Automatically manage promises when posting'
in your ' Payment Posting Options' Setup, then Collect!
will auto-manage the Promise contact it creates at
the time you entered the recurring arrangement. This
includes auto-advancing the next Promise Due Date when a
payment is finalized by Reconciliation.
If you delete a recurring schedule, the Promise Contact
will be marked as "Stopped" but it will remain In Progress
for your attention.
Review Details
When you schedule recurring ACH payments, Collect!
creates a Review with a Due Date matching the last
Payment Date in your payment schedule.
If you delete a recurring schedule, the Billing Tree Review
Contact marking the end of the payment schedule will have its
Due Date changed to the Date you deleted the recurring
schedule.
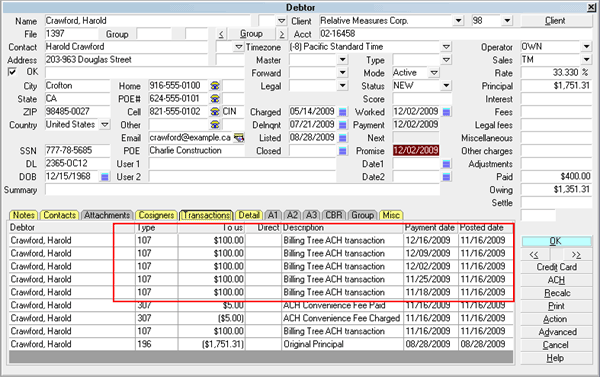
Transaction Details
After you have successfully scheduled recurring ACH
payments, you can view the resulting ACH payment
transactions posted in Collect!. Each transaction has
a Payment Date calculated from the values in the
Frequency, Next and Remaining fields. The Transaction
Detail tab of each transaction entry contains the
banking details.
ACH Transaction Schedule Posted
When you run Reconcile ACH History, any payments that
have come due will be processed. Convenience fees will
be posted, if applicable. The visible verification that
the payment has been processed successfully by Billing
Tree, is evidenced by the tracking information and
confirmation number that will now be in the individual
transaction record itself (Confirmation #) and within
the Transaction Detail tab.
Recurring ACH Payment
 Recurring ACH Payments are not processed by
Billing Tree until you run Reconcile ACH
History.
Recurring ACH Payments are not processed by
Billing Tree until you run Reconcile ACH
History.
Users of CV11.6.2.7 and higher who are also licensed
for the Scheduler Module now have an enhanced automation
with the addition of the Reconcile process being added
to the Scheduler Task list of options. You may run this
process offline and unattended. Contact us at
sales@collect.org for module pricing.
EFT Notices Details
If you set up and enabled ACH authorization and notification
letters in the EFT Notices Setup window, Collect! will create a
letter schedule that matches the payment dates in your
schedule. Collect! uses the " Days Prior" setting in the EFT
Notices Setup to calculate the Due Date for each letter.
If you delete a recurring schedule, Collect! will delete any
remaining authorization and notification Letter Contacts from your
Contacts tab.
NSF Payments
When you reconcile ACH history, Collect! posts a reversal for
any payments that are returned for any reason (i.e. NSF,
account closed, any stops or holds on the account). The convenience
fee payment is also reversed. If you switched ON "NSF cancels
recurring payments" in the ACH Payments Setup, Collect!
also removes all details of the recurring ACH payment schedule
from the account, including post-dated transactions and
EFT notices.
See Also
- Billing Tree Topics
| 
Was this page helpful? Do you have any comments on this document? Can we make it better? If so how may we improve this page.
Please click this link to send us your comments: helpinfo@collect.org