How To Use The Attachment Form
The Attachment form provides a convenient place for storing extra information about a debt, a Debtor,
or a Client. It may be used to store any kind of additional information with an account--even
documents and files. You may want to use it for information about insurance, or doctors or equipment.
Perhaps you want to store credit reports or credit scores, skip tracing data, or other information
that your suppliers send to you. You may also use the attachment to record all incoming data for
auditing purposes. You can store virtually any number of attachments with each account.
How can attachments be of the most benefit to your operations? The flexibility of the attachment
form requires that you spend some time thinking about this. You may want to customize several of the
Attachment field labels to reflect the kind of information you are storing. You may want to use the
indexed fields or modify the pick lists. As in most things, it is best to start with simpler uses
and add functionality when you are more familiar with using attachments.
On the Client and Debtor forms, you will see the Attachment tab. Select this to create an attachment
or view the list of attachments that are already connected to the account. Choose an attachment or
press New to create one. This takes you to the Attachment form.
This topic covers two aspects of using attachments:
The Attachment Form, containing many fields where you can enter information.
The Attachment File, where you can put the file name of any type of file that you
want to attach to the debtor's account.
At the end, you will find links to topics that explain some of the special ways you can use
attachments.
Attachment Form
This is a very flexible form. It has many fields that can be filled in. Several fields can be used
as indexes to speed up find and sort routines. There are date and currency fields. A pick list can
be attached to any field. Field labels can be renamed to be intuitive. Information from the fields
can be pulled into reports and letters.

Attachment Form
Click Here to View this Form.
Click Here to Close this Form.
The Attachment form may be used to store additional
information about a debtor or an account. You can attach
any kind of information or even different files to your
accounts with an attachment. Several of the fields on
this form are indexed for fast retrieval when reporting or
calculating. As long as Windows is set up to handle the
file type, you can instantly display any type of original
information about any account. Please see the Help topic
How to Use the Attachment Form for details about some of
the many ways you can use the attachment form.

Attachment
Class
This field displays a pick list choice. Use it to
categorize your attachments. Please see the Help
on How To Use Pick Lists for information about
building your own list or adding to the defaults
provided by Collect!.

Type
This is for further categorization.
If you enter Type 1, 2 or 3 here, the A1, A2 and A3
tabs will take you to these attachment types
when you select the tabs A1, A2, and A3 on the
Debtor form. Also those buttons will display orange
when you have attachments that you classified as
these types.

Subclass
This is a hidden field which stores the textual value
of the Type pick list selection. You can insert it as a
column when you are viewing all Attachments. This
makes it easier to examine and locate the exact
information you need when browsing Attachments,
especially if you are using Dynamic Attachments.
You can also use this field in reports.

Description
Enter a description for this attachment. When you
select Browse from the top menu bar and choose
Attachments, your description will be displayed in
the list.

Index 1
Enter information here that you need quick access to.
For example, if this is a Vehicle attachment you would
probably want to enter the VIN number here.
Similarly, if it is an Asset attachment, you might enter
a property identifier here.
You can quickly find attachments with this index by using
the Browse menu Find By option, and selecting Index 1.
Enter the index to search for when prompted.

Index 2
Enter additional information here that you need quick
access to.
For example, if this is a Vehicle attachment you would
probably want to enter more Vehicle Identification data here.
Similarly, if it is an Asset attachment, you might enter
an additional property identifier here.
You can quickly find attachments with this index by using
the Browse menu Find By option, and selecting Index 2.
Enter the index to search for when prompted.

Date 1
This is an indexed date that you can use to quickly locate
attachments by date.
For example, if this is a Vehicle attachment you might enter
the date the vehicle was entered into the system.
You can quickly find attachments with this index by using
the Browse menu Find By option, and selecting Date 1.
Enter the date to search for when prompted.

Date 2
This is another indexed date that you can use to quickly
locate attachments by date.
For example, if this is a Vehicle attachment, you might enter
the date the vehicle was located.
You can quickly find attachments with this index by using
the Browse menu Find By option, and selecting Date 2.
Enter the date to search for when prompted.

Date 3
This is a user-defined date field.

Date 4
This is a user-defined date field.

Value
A numeric field for your use. The field type is a 16-bit
integer that can only store values from -32768 to 32767.

Factor
A numeric field for your use. The field type is a 16-bit
integer that can only store values from -32768 to 32767.

Credits
A currency field for your use.

Debits
A currency field for your use.

Result
A numeric field for your use.

User 8
This field is for your own definition and use.

User 9
This field is for your own definition and use.

User 10
This field is for your own definition and use.

User 11
This field is for your own definition and use.

User 12
This field is for your own definition and use.

User 13
This field is for your own definition and use.

User 14
This field is for your own definition and use.

User 15
This field is for your own definition and use.

User 16
This field is for your own definition and use.

User 17
This field is for your own definition and use.

User 18
This field is for your own definition and use.

User 19
This field is for your own definition and use.

User 20
This field is for your own definition and use.

User 21
This field is for your own definition and use.

User 22
This field is for your own definition and use.

User 23
This field is for your own definition and use.

User 24
This field is for your own definition and use.

User 25
This field is for your own definition and use.

User 26
This field is for your own definition and use.

User 27
This field is for your own definition and use.

User 28
This field is for your own definition and use.

User 29
This field is for your own definition and use.

User 30
This field is for your own definition and use.

User 31
This field is for your own definition and use.

File
This can contain a complete filename to any
kind of file attached to this account. You can
even store links to HTML documents or
web sites.
There are four buttons to the right of this field.
These buttons let you:
- Open the file or go to the web site
- Print the file
- Delete the file - CAREFUL!!! Actually deletes!
- Select a file from your system without opening it
This feature lets you attach any kind of file to your
accounts in Collect!. You can attach credit reports or
information returned from some other type of query.
As long as Windows is set up to handle the file type,
you can instantly display any type of original information
about any account. There are many possibilities. You
can even use an import routine to read information,
create a file for the account and attach it to this field
for quick retrieval.
 If you put a URL in this field, Collect! will use
your web browser to go to the web site when
you select the OPEN button.
 To remove a file from this field without deleting it,
simply click into the field and backspace to
erase the file from the field. The DELETE
icon actually deletes the file from your PC!

Update Debtor
The Attachments Tab provides you with the ability to store
skip trace or alternate address information which you may have
obtained from other sources such as directories, credit bureaus,
or skip locate information providers. Data you receive may be
manually entered or electronically imported into an Attachment
with the Class "eBureau" and Type "Alternate Address". The
benefit to using this window is that it contains an Update
(debtor) button which will automatically populate the main
debtor screen with your data without your having to manually
transfer the new information yourself.
Please refer to the Help topic Update Debtor for more information.

Update Debtor

Created
This field will display the date the attachment
was created.

Created By
This field will display the ID of the operator
who created this attachment.

Modified
This field will display the date the attachment
was last modified.

Modified By
This field will display the ID of the operator
who last modified this attachment.

OK
Selecting this button will save any data
you have entered and return you to the
previous form.
<<
Selecting the BACKWARD navigation button
will take you back to the previous record.
>>
Selecting the FORWARD navigation button
will take you forward to the next record.

New
Select this to open a new attachment form.

Delete
Select this to delete the currently displayed attachment.

Cancel
Select this button to ignore any changes you may
have made and then return to the previous form.

Help
Press this button for help on the Attachment
form and links to related topics.

Open Folder
This button is visible only in the list of Attachments.
Select it to open the Attachment folder for the account.
You can then open any file contained in the account's
Attachment folder. If there are no attachments with an
entry in the File field, selecting this button will do nothing.

Edit
This button is visible only in the list of Attachments.
Select it to open the currently selected Attachment
for editing.

Detail
This button is visible only in the list of Attachments.
Select this to open the highlighted attachment.


Skip Tracing
When the Type field is set to "Alternate Address," Collect! will display Update and Undo buttons.
The Alternate Addresses was a way for keeping track of addresses returned from an outside source
where you could update the account, then revert the address if it was bad.
The recommended practice now is to create separate Address records and use the Display on Main Screen
box to update the account.
Click Here to View this Form.
Click Here to Close this Form.
The Address record stores information about each address
related to your Debtor accounts. You can store as many address
records as needed. The active address can be transferred to the
Debtor screen to display to the end user in the address fields.
Whenever you type into the address fields on the Debtor screen,
Collect! will create a new Address record if one does not exist
for the address you are typing.

Address Record
Whenever you update an existing address in the address fields,
Collect! will create or modify the Address records as needed.
When you leave an Address record or tab out of the address fields
on the Debtor, the Address Record list is sorted with all the
ACTIVE = YES at the top, sorted by "most recently modified,"
then all ACTIVE = NO sorted by "most recently modified."
Source
This field may be used to hold information about where
the Email address was obtained. Several default values
are supplied but the pick list may be modified as needed.

Address
Enter the address.

Address 1
Enter the address 1.

City
Enter the city.

State
Enter the address.

ZIP
Enter the address.

Country
Enter the country.

OK
Switch this ON if this is a good address.

Display On Main Screen
Switch this ON to display this Address in the Debtor's
address fields.
 If you uncheck this box, Collect! will clear the
address from the address fields on the Debtor screen.

Include In Batch Emails
Switch this ON to include this Address when printing batch letters.
 Even with the box checked, it will not be included if
the OK field is set unchecked, unless you have
Print to unverified addresses enabled on the batch.

Created
This read only field displays the Date this Email record
was created. Next to it, is the ID of the Operator who
created the record.

Created Time
This read only field displays the Time this Email record
was created.

Modified
This read only field displays the most recent Date when
this Email record was modified. Next to it, is the ID of the
Operator who edited the record.

Modified Time
This read only field displays the most recent Time when
this Phone record was modified.

Source
This field may be used to hold information about what
type address this is such as Home or Work.

Timezone
This field holds a POSITIVE or NEGATIVE integer
indicating the Timezone of this Debtor. Timezones
are standard integer values calculated from GMT
(Greenwich Mean Time).

Debtor
This field contains the name of the Debtor attached to
this Phone record.
 As this record is shared by the Debtor, Client,
Cosigner, and Associate records, the name for
the owner records is accessible via a report code
along with the Debtor File and Client Number.
Make sure that when you are referencing a phone
number related to a Cosigner or Associate to use
the correct File or Client number codes.

OK
Select this button to save any changes you have
made and return to the previous form.
<<
Select this button to navigate to the
previous record in the database.
>>
Selecting this button to navigate to the
next record in the database.

New
Select this to open a new blank Email form.

Delete
Select this to delete the displayed or highlighted
Phone record.

Cancel
Select this button to ignore any changes you may
have made and return to the previous form.

Help
Select this button for help on the Email form and
links to related topics.


Attachment File
On the Attachment form itself, there is are 4 File fields. This field can hold the file name of an
attachment file. Any type of file can be attached to the account. As long as Windows is set up to
handle the file type, you can instantly display any type of original information about the account.
Additional information about using the File field is provided further on in this topic.

Field Labels - Dynamic Attachments
You can change the field labels on the Attachment form to suit your needs and make them more intuitive.
As this record is typically use to build user defined custom forms, we recommend using Control Files
to get your labels. This allows the attachment record to be dynamic. Please refer to
How to Use Control Files for more information.
 If you are already using a control file and pick lists for your Attachments, please be aware
that the new control file and pick lists may change some of your choices. So proceed with
caution, or try this out in your Demodb database first.
 The files for Dynamic Attachments are also available for download at the Member Center.

Control File
The sample control file is assigned to the Class and Type fields and the Attachment form through
the Access Rights. The control file assigns a pick list to the Type field depending on the choice
that is displayed in the Class field.

Pick Lists
The control file assigns a pick list to the Class field. Several additional sample pick lists are
chosen dynamically by the control file based on the selection in the Class field. There is a pick
list for each one of the different Class choices. Many different types of details are provided for
insurance, assets, credit bureau pulls, court cases, skip tracing and more.

Dynamic Changes
When you select a Class, the control file sets a Type pick list. When you select a Type, the fields
on the Attachment form change to enable you to enter data relevant to the Class and Type of data you
are storing.

Setting Up Dynamic Attachments
 If you are already using control files and pick lists with your Attachments, you may want
to rename your existing control and pick list folders before proceeding as some of the files
may be overwritten in Step 1.
- Copy the sample control and pick list folders to your database folder.
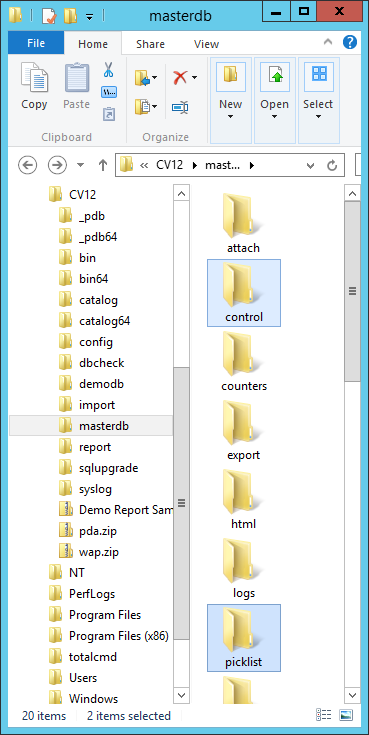
Control and Pick List Folders in Database Folder
- Sign into your database as a user with level 99 to set the control file and pick lists in the
steps that follow.
 If you are not familiar with using the Access Rights form to assign control files, please
refer to Help topic, How to Use Access Rights.
- Attach the attach.ctf to the Attachment Class field.

Access Rights for Attachment Class Field
- Attach the attach.ctf to Type field.
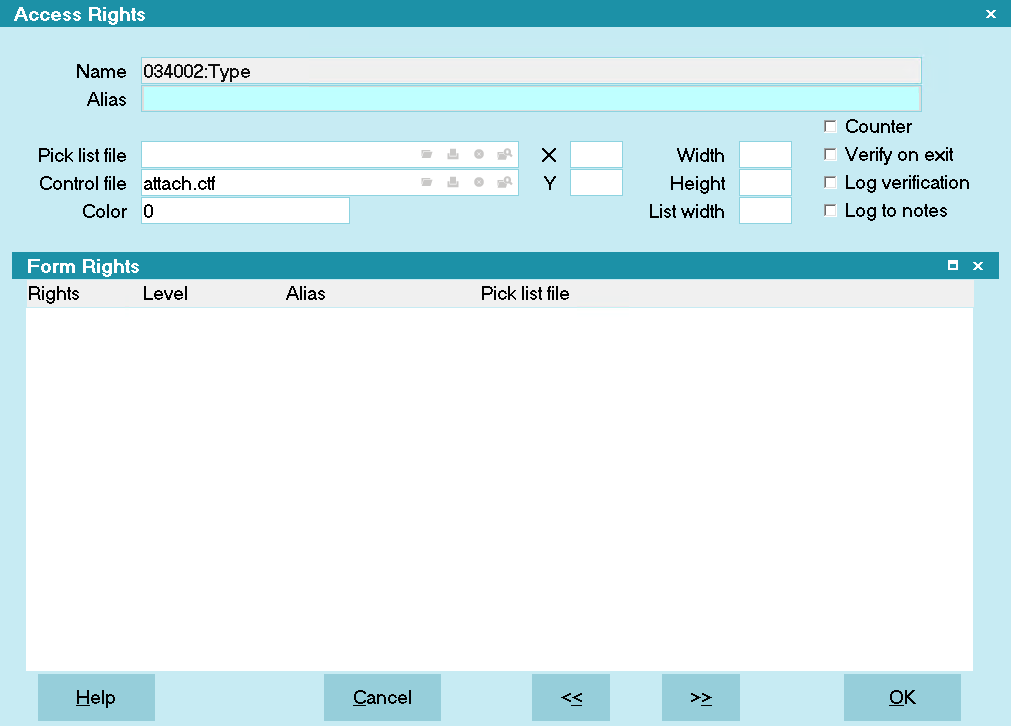
Access Rights for Attachment Type Field
- Attach the attach.ctf to the Attachment form.

Access Rights for Attachment Form
 To attach the control file to the Attachment form, click anywhere in the gray area of the
Attachment form to display the Access Rights form for the Attachment form itself, rather
than any one of the fields on the form.
- Sign out and back into your database with any other user level that is not user level 99. When
you view an Attachment or create a new one, you can now select a Choice from the Class field,
the Type pick list will change dynamically to match your choice. Selecting a choice from the
Type pick list will change the field names so that relevant labels are displayed, matching
the Class and Type of data you are entering.

Fields Available for Skip Debtor Information
 If you have existing Attachments in your database you may need to reset your choices when
you view the Attachments for the first time.

Browse Attachments
When using Dynamic Attachments, the Type of Attachment is dynamically set according to the Attachment
Class. This means that the list of Attachments, viewed from the Browse menu, Attachments option,
will not display the correct value in the Type field until you actually open the Attachment. If this
is confusing, you can hide the Type field when viewing the list of all Attachments. Please refer to
Help topic, How to Customize List Views, for details.
In the Demodb database, the Attachment Subclass field is visible in the Attachment list view. This
is a hidden field which stores the textual value of the Type field pick list for each attachment.
This makes it easier to find what you are looking for when browsing the list of Attachments. Class,
Subclass and Description enable you to quickly locate and examine the information you need.
 If this field is not visible in your Attachment list view, please refer to Help topic,
How to Customize List Views, to insert the column into your list view.
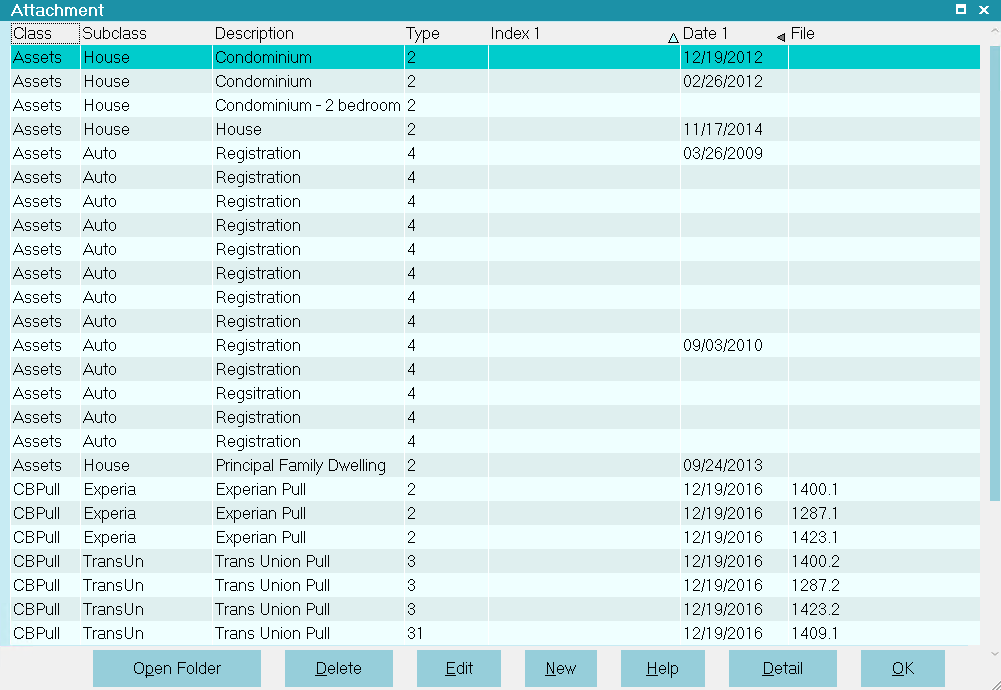
Attachment Subclass Column Displays Type

Edit Search Or F6 Attachments
If you want to do a search using Edit, Search or F6 on the list of Attachments when using Dynamic
Attachments, you may notice that the Field choices are aliased depending on the current Class and
Type. This may not be appropriate for your Search criteria.
There is an easy way to set the Class and Type for your Search as outlined in the steps below.
- Select Browse from the top menu bar and then select Attachments from the drop-down
choices.
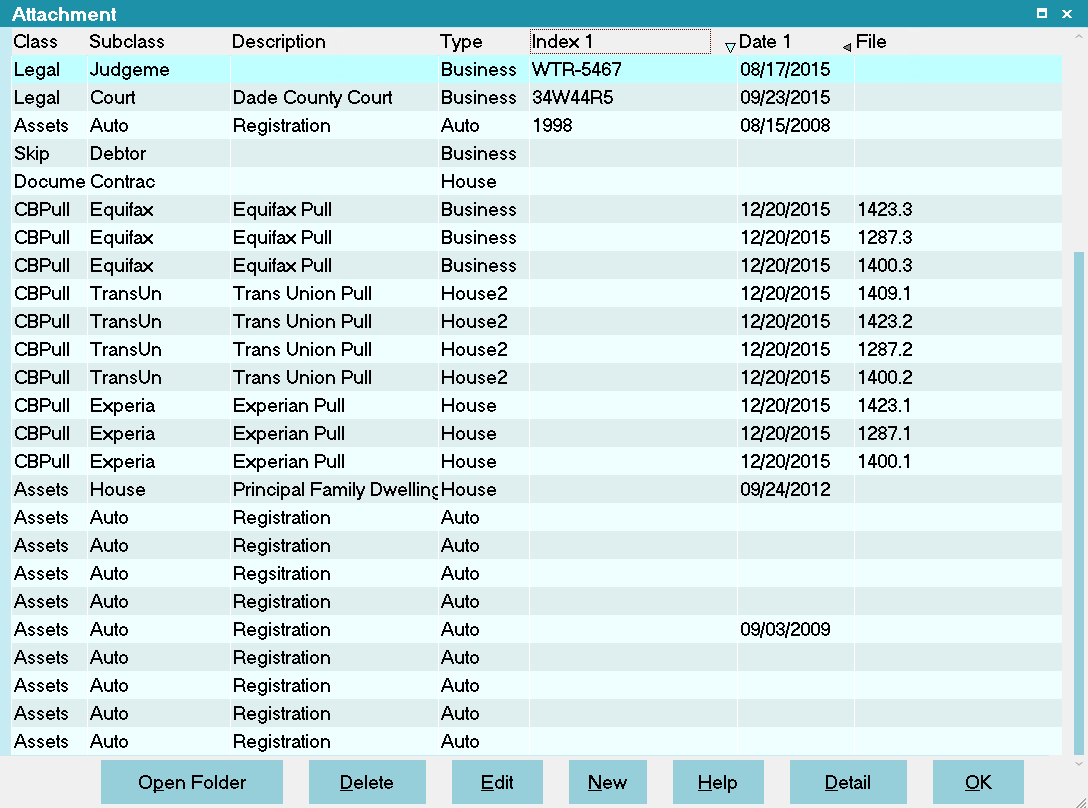
List of All Attachments
- Press F3, or select the NEW button, to open a new Attachment.
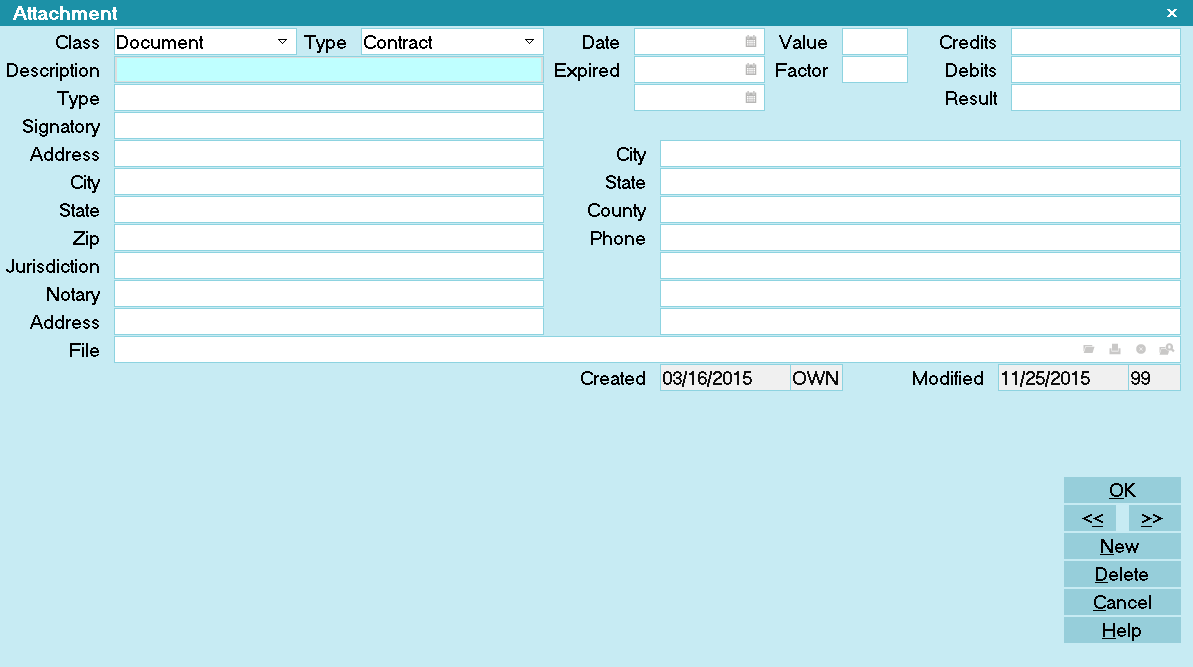
Default New Attachment
- Select the Class of Attachment you wish to search.

Selecting Class of Attachments
- Select the Type of Attachment you wish to search. Notice that the aliases of the Attachment
fields, match your Class and Type.
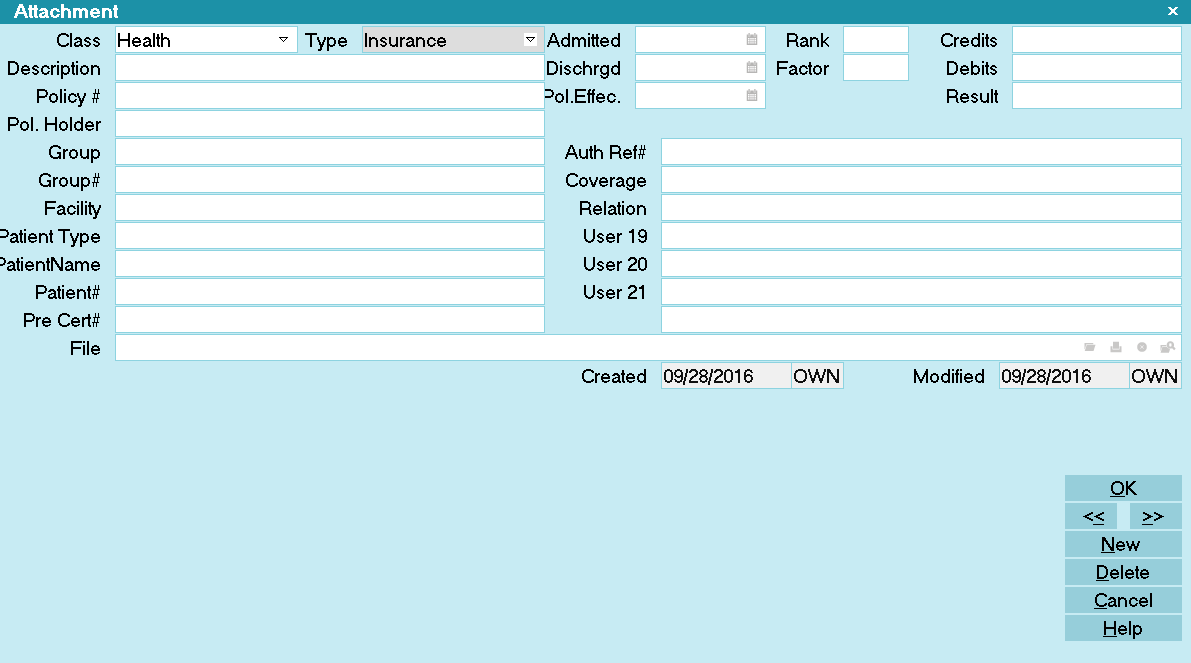
Class and Type of Attachment Selected
- Select OK to close the Attachment and return to the list. The Attachment you just created will
be highlighted.

Health Class Attachment Highlighted
- Press F6, or select Edit from the top menu bar and then select Find from the drop-down choices.
This will open the Edit Search Criteria form with the proper aliases in the left column for
the type of search you wish to perform. Notice as well, that you can also select any Type in
that particular Class to broaden your search.
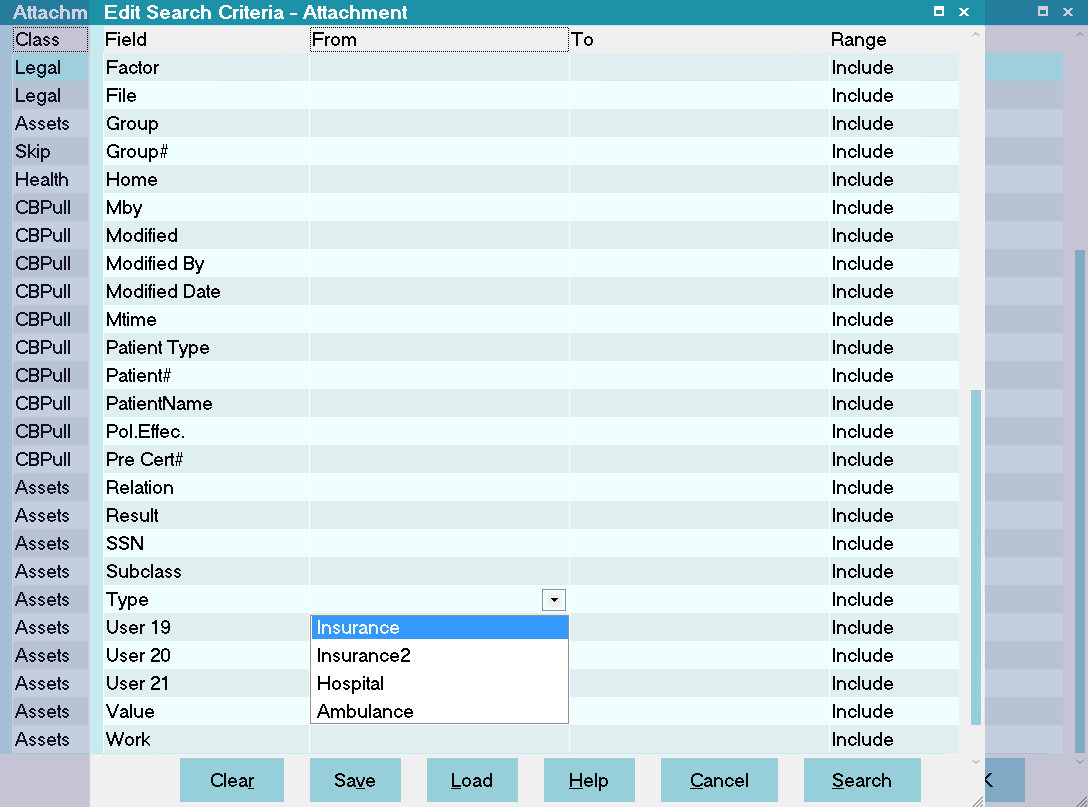
Edit Search Criteria Type Pick List
- To search a different Class, you can open the Attachment that you created and select a different
Class and Type.
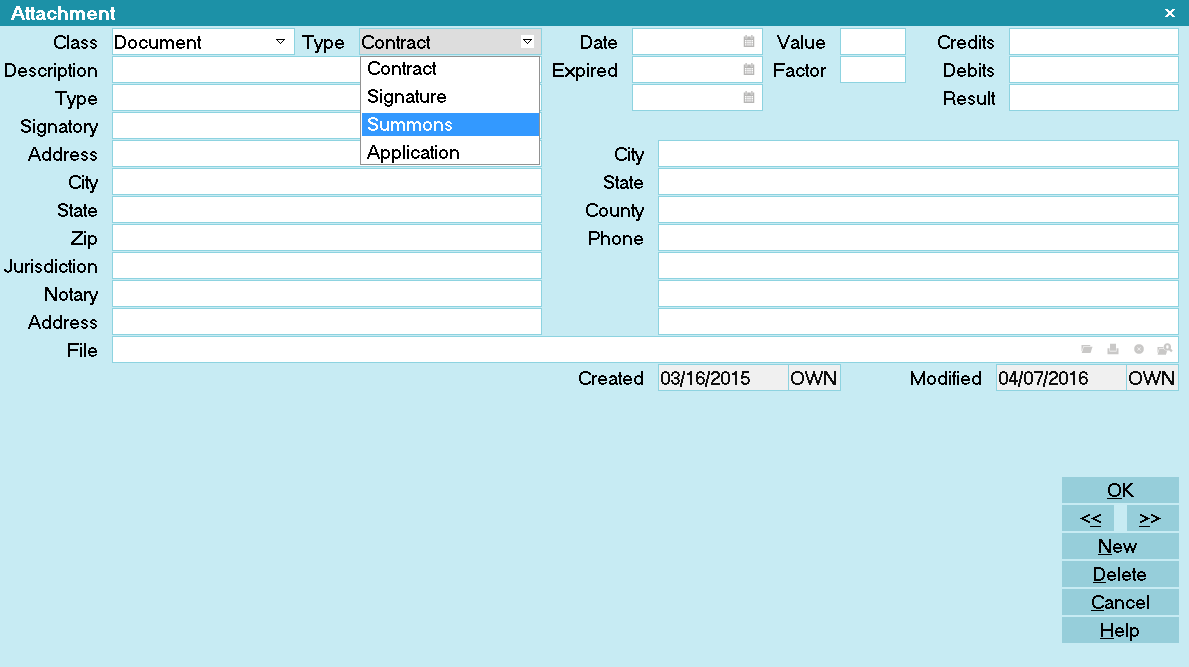
Setting Class and Type for Document Search
- Now when you press F6 or Edit, Find, the Edit Search Criteria field choices will reflect your
latest choice of Class and Type.
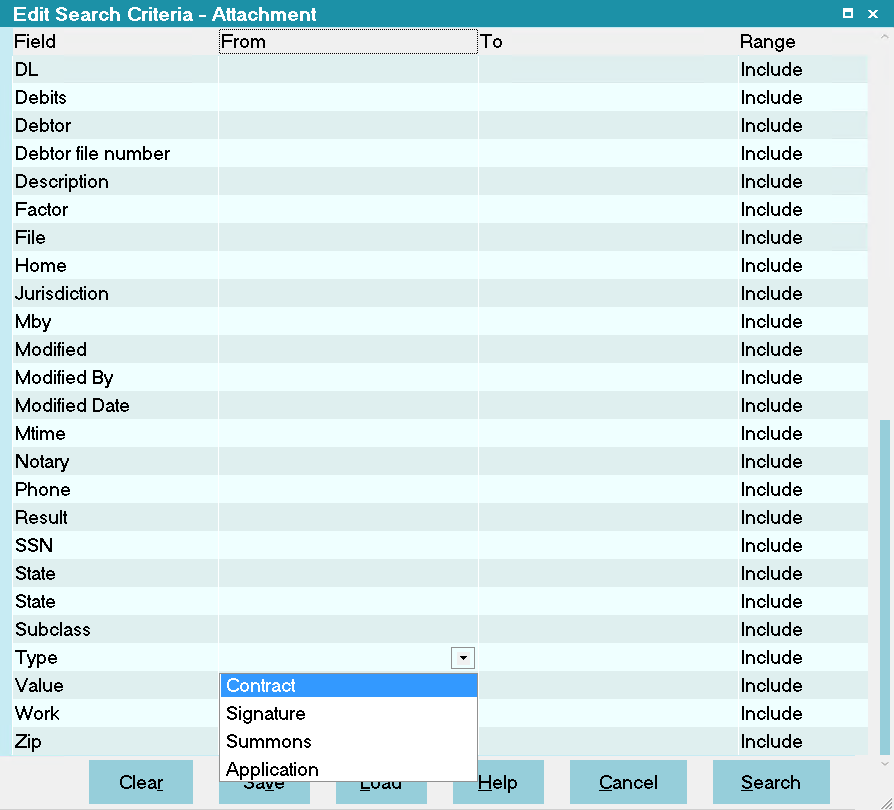
Setting Class and Type for Document Search

Drag And Drop Attachments
As a convenience, Collect! offers the ability to drag and drop attachments on to the Collect! Window.
- Open the debtor that you want to attach the document(s) to. This does not work for Clients.
- Drag 1 or more files from your computer to the Collect! program window.
- Go to the attachments tab and edit the records as necessary. Collect! will pre-fill the
attachment record with:
- The filename of the file
- The file path of where the file was placed in the global folder
- The domain name of the user who created the attachment
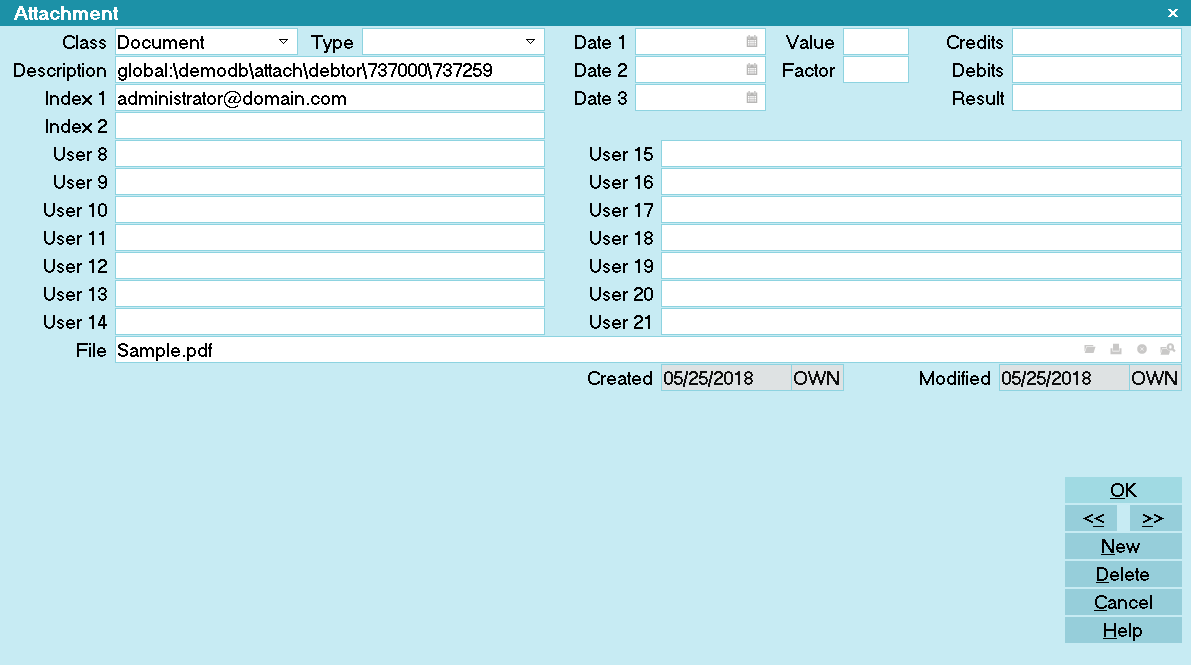
Attachment Window after Creation via Drag and Drop

Summary
Collect!'s Attachment form enables you to store many different types of information. Using Dynamic
Attachments enables you to change the pick list choices and field labels to match whatever Class
of data you want to store. When you view each attachment, you will see the information displayed
according to the Class and Type of attachment you are viewing. When viewing the list of all
Attachments, you can use the features of Dynamic Attachments to set the Class and Type for your
search criteria.

| 
Was this page helpful? Do you have any comments on this document? Can we make it better? If so how may we improve this page.
Please click this link to send us your comments: helpinfo@collect.org