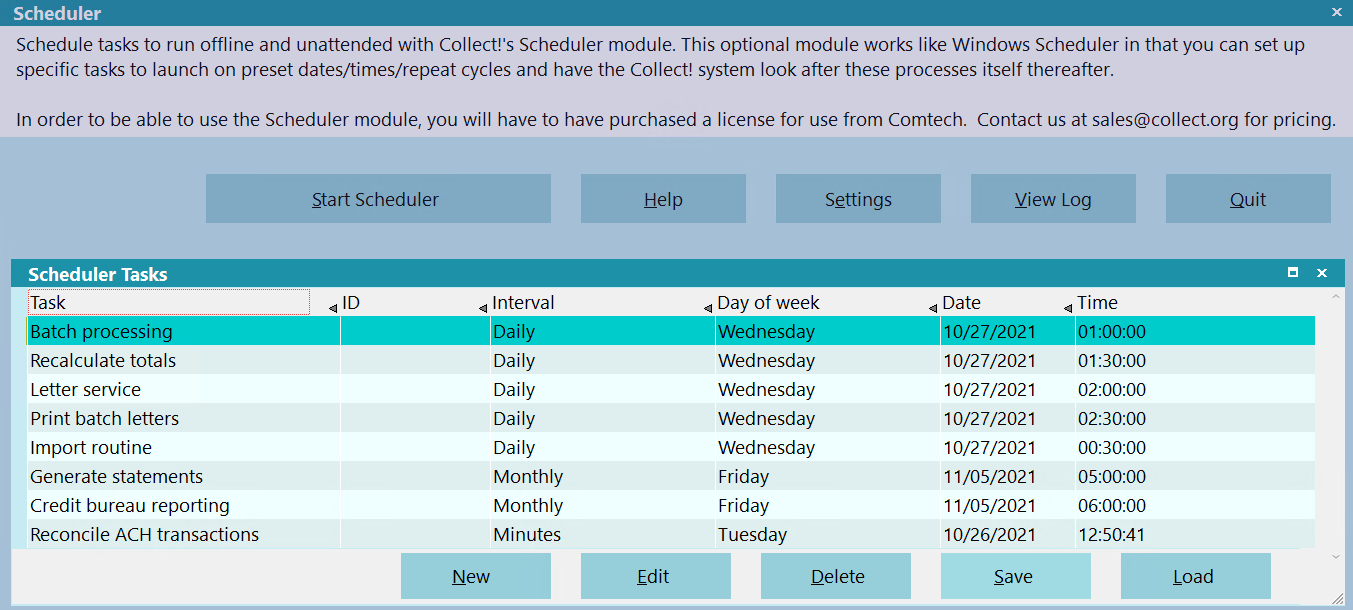
The Task Scheduler allows you to automate a variety of routine tasks and larger processes. Depending
on your backup schedule, you can set tasks, particularly larger ones, to run overnight.
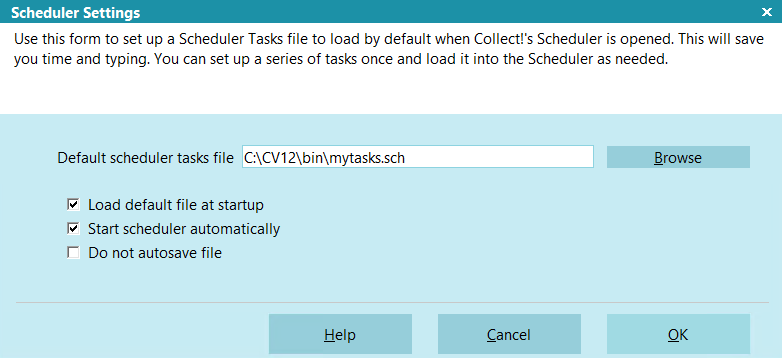
Use this form to set up a Scheduler Tasks file to load by default
when Collect!'s Scheduler is opened. This will save you time
and typing. You can set up a series of tasks once and load it
into the Scheduler as needed.
Scheduler Settings
To save a Scheduler Tasks file, select the SAVE
button on the Scheduler form when you are viewing a list of
scheduled tasks. This creates a special file with an *.sch
extension that can be read by Collect!.
Each database in Collect! stores its own configurations
from the Scheduler Settings form. The settings you set here
will be used whenever you sign into the database you are
in when you set the configuration. So if you are signed into
the masterdb, you are setting defaults
for the masterdb.
Default Scheduler Tasks File
Enter the name of the Scheduler Tasks file that holds the list
of tasks you wish to run. By default, Collect! stores task files
in the Collect\bin folder and you can just type in a filename.
Or, you can use the BROWSE button to locate the Scheduler
Tasks file you wish to use.
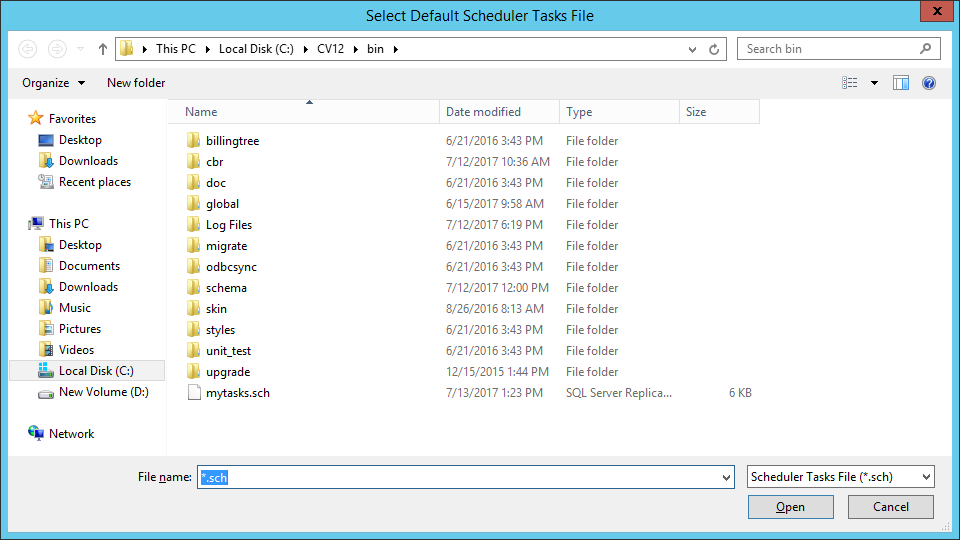
When the 'Select Default Scheduler Tasks File'
dialog appears, it will only show files with the *.sch
extension that Collect! uses for saved Scheduler
Tasks files.
Browse
Select this button to open the 'Select Default Scheduler
Tasks File' dialog where you can select a previously saved
Scheduler Tasks file that you want to use as your default
when the Scheduler is started. Select the file you wish to use
and select OPEN. The next time you open the Scheduler,
Collect! will load the file you selected as your default.
Select Default Scheduler Tasks File
Automatically Load Default File
Switch ON 'Automatically Load Default File' to load the
scheduled tasks when you open the Scheduler. This is
useful when you have a series of tasks that you run on
a regular basis. When you sign in as a Scheduler Operator,
the Scheduler will display the list of tasks already for you
to press START SCHEDULER with no further action
required on your part.
Start Scheduler Automatically
Switch ON 'Start Scheduler Automatically' if you want
the Scheduler to start as soon as you sign into Collect!
as a Scheduler operator.
This will only work if you have tasks in the
Scheduler Tasks list. So make sure you are
using this switch with "Load Default File At
Startup" switched ON and that you have a
valid default file that contains your previously
saved tasks.
Do Not Auto Save
Switch ON 'Do not auto save' if you want Collect! to not save
the scheduler file each time a task runs.
WARNING: This may disrupt events from running as they will not
have the correct date and time settings from the last
time the task ran.
Log File Settings
When a task runs, Collect! writes a date/time stamped
entry to the log file. By default, this file is located in
Collect\bin\scheduler.log.
Scheduler Tasks For Each Database
The settings you set in this form are for the database you are
signed into. If you wish to configure Scheduler defaults for
other databases, sign into them and set the settings.
You can also set a task file to load automatically in the Collect!
shortcut, using the /sch: command line option.
This command will load the tasks file into whatever database
you sign into using the shortcut.
For Example:
C:\Collect\bin\cv13.exe /sch:demo.sch
Load the Scheduler Tasks file named demo.sch
when Collect! starts.
The /sch setting takes precedence
over any file specified in the Scheduler Settings "Default scheduler
task file."
Please refer to Help topic, Command Line Startup Options for
details.
Help
Select the HELP button for Help on the Scheduler Settings
form and related help topics.
Cancel
Select the CANCEL button to ignore any changes you
have made and return to the previous form.
OK
Select the OK button to save any changes you
have made and return to the previous form.
If you plan to use a single Scheduler configuration file, you can fill in the path and file name to
the file. This is optional and will be discussed further later.
Checking the Load Default File at Startup will automatically load the Default Scheduler Tasks File.
This is optional and will be discussed later.
Start Scheduler Automatically will start the Scheduler when a Scheduler Operator signs in. Check
this box.
Do not Autosave File will not save the file; therefore, it will not save the next task date and time.
Typically, it should be left unchecked.
You can create new Tasks, editing existing ones, and load or save the file.
If you have an existing file to load, it must match the type of Collect! that was used to save it.
For example, SCH files saved by a 32 bit version of Collect! can only be opened by a 32 bit version
of Collect!. The same applies to 64 bit versions of SCH files.
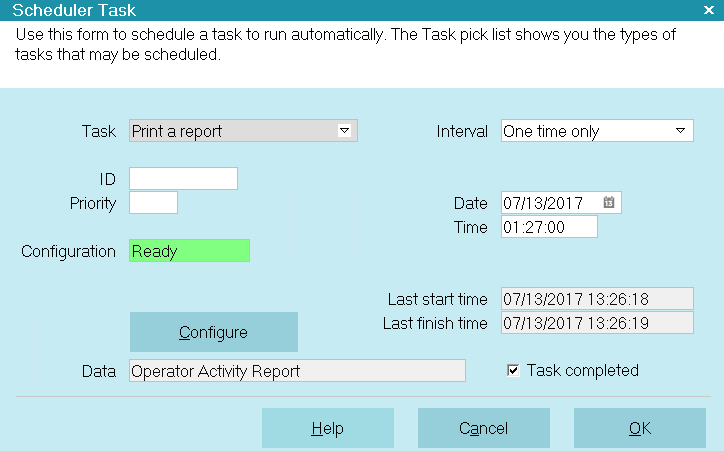
Use this form to schedule a task to run automatically. The
Task pick list shows you the types of tasks that may be
scheduled.
Scheduler Task
Task
Select a Task from the pick list.
If you select a task that requires further configuration,
the Configuration field will be displayed. Select the
CONFIGURE button to set the task.
CAREFUL: You cannot change the Task type after you have
attached a configuration to it. If an error is made,
delete the task entry and restart.
ID
Give your task a unique ID. This ID can be used to
help identify your tasks in the scheduler log as
well as in the scheduler task list.
Priority
Set a priority here. Collect! will sort the list of
tasks based on priority before processing the tasks.
Configuration
This field is visible for certain tasks that
require additional settings. It displays "Not Ready"
if you have not entered the settings appropriate for
this task.
If this field appears and shows "Not Ready," click the
CONFIGURE button to enter the necessary details for
scheduling the task that you selected.
An additional field labeled DATA becomes visible when
you have set a configuration for your task.
Scheduler Task With Configuration
Data
This field is visible only when you have selected a
task that requires configuration. After you configure
the task, certain details are displayed in this field,
for instance, the name of a report that is scheduled
to print or the name of an import routine that you
have scheduled to run.
Interval
Choose an interval for running this task. Additional fields
become visible depending on the interval you select.
Intervals you may choose are:
One Time Only
Daily
Weekly
Biweekly
Monthly
Minutes
Date
This field is visible only if you have chosen the
One Time Only interval. Select the Date icon to
bring a calendar or type in a Date as 07/21/2006.
Day Of Week
This field is visible only if you have chosen the
Weekly interval. Select the field's pick list to
choose a Day of Week to run this task.
Day Of Month
This field is visible only if you have chosen the
Monthly interval. Enter the number for the
Day of Month to run this task.
Time
Enter the Time that you want this task to start. This field
uses the 24 hour clock.
For example, 19:30:00 starts the task at 7:30 PM.
For repeating tasks, when you stop the Scheduler, this
Time value will update to display the next Start Time.
Minutes
Enter the number of minutes you want to use as the
repeating interval for this task.
If your task takes longer that the interval you set, Collect!
will use the original scheduled time to begin the next interval.
This means that if you have set a task to repeat every 20 minutes,
starting at 06:00, and it takes 25, Collect! will immediately
run the task again to process the missed interval for 06:20.
If the task normally takes 25 minutes to run, then this could
cause Collect! to cycle endlessly. You should ensure that the
interval for each task is set to an amount longer than the normal
time is takes to complete the task.
Collect! starts processing tasks as soon as the scheduler launches.
In other words, if the Collect! scheduler starts at 06:00 and has
Minute tasks for every 15 minutes, the first task will be processed
at 06:00, then the next one at 06:15, and so on.
Last Start Time
This is the date and time the task was last started.
This is useful to let you know how long the task
actually runs.
This field is visible only when a task has already run
at least once.
Scheduler Task Last Start Time
Last Finish Time
This is the date and time the task was last completed.
This is useful to let you know how long the task
actually runs.
This field is visible only when a task has already run
at least once.
Scheduler Task Last Finish Time
Task Completed
This field shows is visible only if Collect! was able to
complete the scheduled task. A check mark in the
box indicates that the task completed as scheduled.
Scheduler Task Completed
You can remove the check mark if you would
like to reschedule the task to run again.
Configure
Select the CONFIGURE button to enter the additional
settings required by your task. You will be presented
with the necessary lists and screens to properly
complete the configuration for your chosen type of task.
The screens that you see while configuring are the same
screens you would see if you were manually scheduling
the task, so you should proceed with setting up just as
if you were running the task manually.
You are sometimes prompted to enter a file name if the
Task needs to read a file. By default, Collect! looks in the
Collect\bin folder, or you can specify a complete path when
prompted.
You should never automatically schedule a task
that prompts for an ID, a Date or any other
user input.
Please be aware that you cannot change the Task type
after you have attached a configuration to it. If an
entry error occurs, delete the record and re-enter it.
If you are editing an existing task, selecting the
CONFIGURE button will show you the current
settings for the task. If the task is a Print Report
task, you will be asked if you want to select a new
report. Select 'No' to view the current settings. If
you select 'Yes', Collect! will clear the
configuration and display the Report Options for
the newly selected report.
Configuration Details For Various Tasks
Almost all Scheduler Tasks require configuration and
display the CONFIGURE button when selected. Tips and
details for configuring these tasks can be found in Help
topic, Scheduler Task Configuration.
You may have tasks scheduled for a certain time
that cannot run at that exact time because another
task is already running. This means that the time
the task actually runs may be different than the
scheduled time. The Task Scheduler is able to
evaluate date values dynamically to take this into
consideration. Collect! determines the date range
based on the configuration settings, not the
computer clock.
Help
Select the HELP button for Help on the Scheduler Task
form and links to related help topics.
Cancel
Select the CANCEL button to ignore any changes you
have made and return to the previous form.
OK
Select the OK button to save any changes you
have made and return to the previous form.
Select a Task type from the list.
ID is a user-defined field.
Priority only applies if 2 tasks are scheduled at the same time.
Set an Interval. Tasks can be One Time, Daily, Weekly, Biweekly, Monthly, or Minutes. See the
Configure Task section below for information specific to each Task type.
Minutes will start running as soon as the Scheduler starts and proceed every specified
minutes until the Scheduler is shut down.
WEEKLY and BIWEEKLY: Select the Day of the Week and enter a Time to run.
MONTHLY: Select the Day of the Month and enter a Time to run.
MINUTES: Enter the number of Minutes to repeatedly run.
Configure Task
If applicable to the selected Task type, click the Configure Button to configure the task.
Please refer to the Help document How To Configure Scheduler Tasks for detailed steps on configuring
tasks, including intervals.
It is assumed that you are familiar with running the tasks manually. If you are not familiar
with the manual tasks, please refer to the applicable videos or Help documentation for each
Task.
Save Your Tasks
If you are running repeating tasks, you will want to save the file to be reloaded the next day.
Click the Save button.
Navigate to a location. Collect! defaults to the active BIN folder.
Type in a filename.
Click save.
Start The Scheduler Manually
Once you have completed your setup, you will see your tasks in the Scheduler Task list.
This step is critical. If you do not click the Start Scheduler button to start
the Scheduler, none of the tasks will process.
At the appointed times, your tasks will run. You can review the results just as you would if you had
run the tasks through the batch processing function.
Start The Scheduler Automatically
To further automate the Scheduler process, you can use Window Scheduler to launch the Collect!
Scheduler.
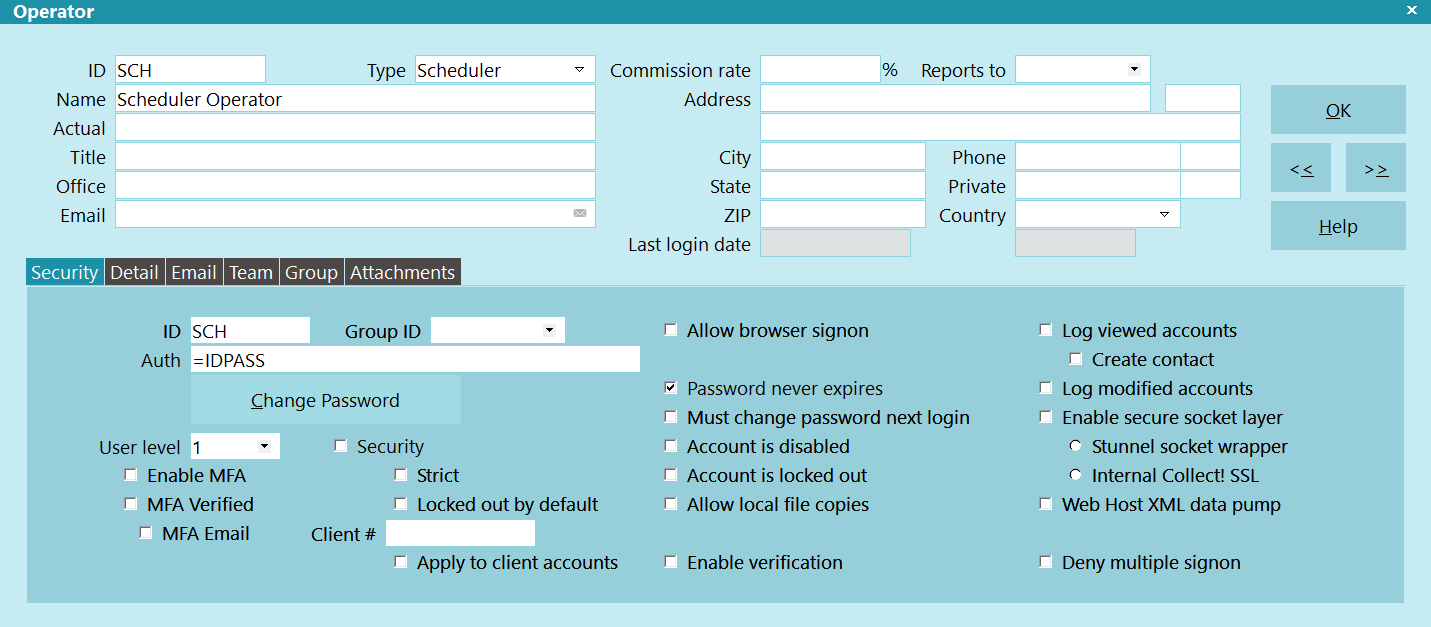
First, you will need to create an Operator dedicated to the Scheduler.
Navigate to System, then Rights, then Operators.
Click NEW to create a New Operator.
Fill in the ID and Name, then Select Scheduler from the Operator Type list.
On the Security tab, check Password never expires, fill in a User Level with high rights like
1 or 10, fill the Auth field with =IDPASS, then click the Change Password button and set a
secure password.
On the Detail tab, check Automatic Recalc and Disable Popup Help.
If you are using the scheduler to Send Batch Emails, on the Email tab, configure the Email
settings based on your company setup.
Click OK to save.
Sample Collect! Scheduler Operator
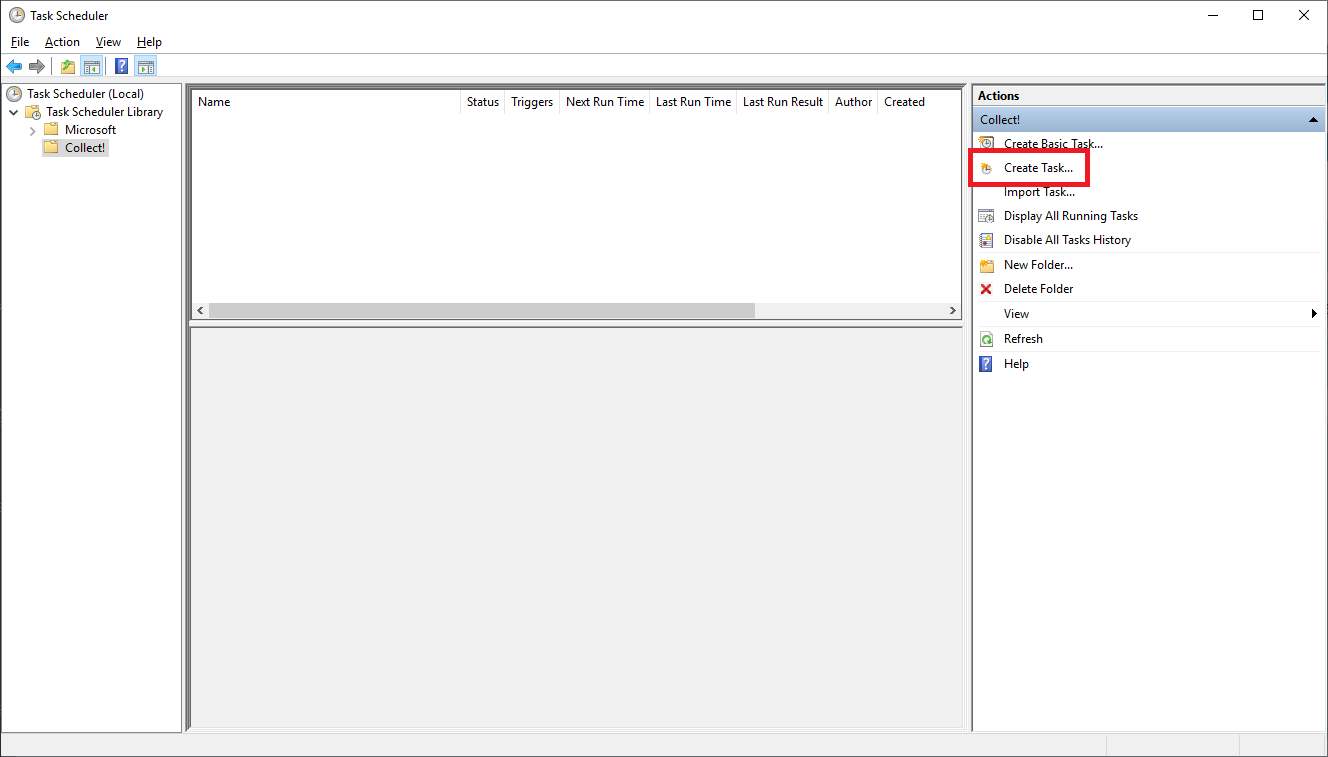
Next, open the Windows' Task Scheduler via Windows Administrative Tools.
Click "Create Task" on the right-side pane or under the Actions menu.
Windows Scheduler - New Task
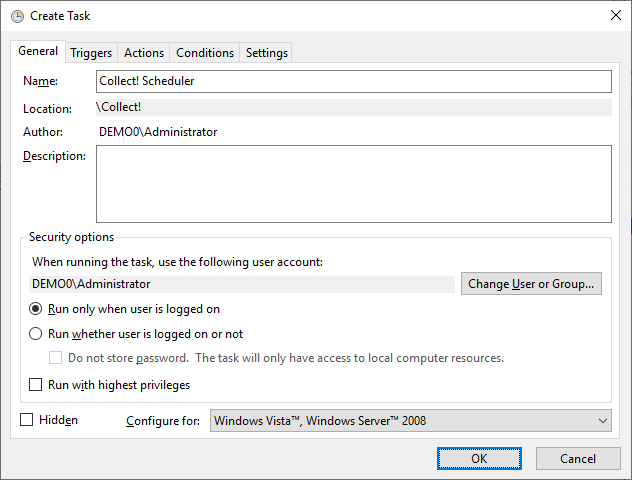
On the General tab, Give the Task a Name.
Windows' tasks are alphabetical, so we recommend using numbers or starting with the word
"Collect!" in order to group your Collect! tasks together. Alternatively, you can use the
Folders under Task Scheduler Library to create a Collect! Folder.
Leave the radio button for "Run only when user is logged on."
WARNING: "Run whether user os logged on or not" is untested and we do not guarantee behavior.
Windows Scheduler - General
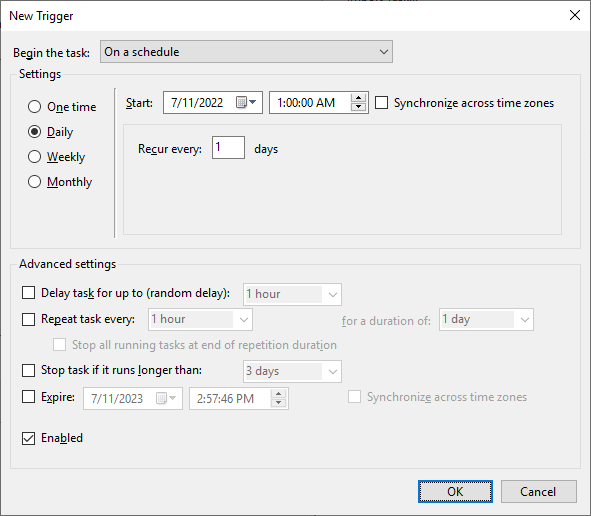
On the Triggers tab, click New to create a new Trigger.
Depending on your configuration and backup schedule, you will want to select daily and set a
time where Collect! is available to run.
You can create multiple triggers. As such, you can create a trigger to start when a user
logs in. This is useful to restart the process if Windows reboots.
If you want the task to only run on weekdays, select Weekly, then select the days of the
week to run.
Click OK to save the Trigger.
Windows Scheduler - Trigger
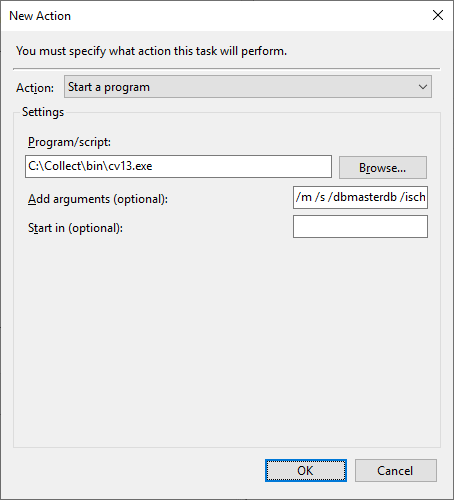
On the Actions tab, click New to create an Action.
Action is Start a Program.
Program/Script is the Collect! application. (EX: C:\Collect\bin\cv13.exe)
Add arguments. Below are some common arguments. (EX: /s /m /dbmasterdb /isch /psch
/sch:tasks.sch)
/s - skips the splash screen
/m - allows Collect! to open if another Collect! window is already open
/min - start Collect! minimized
/db - specify the database to sign in to
/i - specify an ID to sign in with
/p - specify the password for the ID
/sch: - specify the filename of the task file (must be in the bin folder)
/T
If you have several processes, you can break them out in to separate SCH file like Imports,
Reports, and Other. You can then create multiple Windows Tasks for each SCH file. Remember,
Order of Operations is important, so if you do break the tasks out in to separate files,
remember to schedule them in such a way that tasks with dependencies don't start too early.
Click OK to save the Action, then click OK to save the Task.
Windows Scheduler - Action
Right-click the Task and select Run to test it. If you forgot to put =IDPASS in the Auth field,
you will be asked to sign in with Windows Authentication, select No.
On the Scheduler Settings screen, check the Start Scheduler Automatically box, if not already
done.
The /SCH argument is not needed if you have specified the filename in the Scheduler Settings.
If you don't use the SCH argument, remember to check the Load Default File at Startup box
on the Scheduler Settings.
Was this page helpful? Do you have any comments on this document? Can we make it better? If so how may we improve this page.

 To save a Scheduler Tasks file, select the SAVE
button on the Scheduler form when you are viewing a list of
scheduled tasks. This creates a special file with an *.sch
extension that can be read by Collect!.
To save a Scheduler Tasks file, select the SAVE
button on the Scheduler form when you are viewing a list of
scheduled tasks. This creates a special file with an *.sch
extension that can be read by Collect!.

 WARNING: This may disrupt events from running as they will not
have the correct date and time settings from the last
time the task ran.
WARNING: This may disrupt events from running as they will not
have the correct date and time settings from the last
time the task ran.
 Windows' tasks are alphabetical, so we recommend using numbers or starting with the word
"Collect!" in order to group your Collect! tasks together. Alternatively, you can use the
Folders under Task Scheduler Library to create a Collect! Folder.
Windows' tasks are alphabetical, so we recommend using numbers or starting with the word
"Collect!" in order to group your Collect! tasks together. Alternatively, you can use the
Folders under Task Scheduler Library to create a Collect! Folder.
Was this page helpful? Do you have any comments on this document? Can we make it better? If so how may we improve this page.
Please click this link to send us your comments: helpinfo@collect.org