How To Configure Scheduler Tasks
Scheduler Tasks that require configuration will display the CONFIGURE button when you select the
task. Tips and details for configuring the various tasks are supplied in this topic.
Tasks requiring configuration:
Accessing The Scheduler
- Access the Scheduler from the station where it is set up and left running. If you do not
currently have it running, from the Server Station, click Tools, then Scheduler. This will
popup the Scheduler Tasks window.
- Click into the Task List to get the buttons which will enable you to enter New processes as
well as Edit, Delete, Save, and Load existing tasks.
- Click the Task drop-down arrow and select the task type you want to configure.
- Click the Interval drop-down arrow to select the frequency on which you want to run this
process.
- Enter the optional Process ID and Priority.
- Enter the Date and Time you want your auto Task to start.
- Click the Configure button to enter the Configuration screen to configure the task based on
the below instructions.
 If you want your list of tasks to be saved and loaded whenever you start the Scheduler, you
must select SAVE and also, select the SETTINGS button to make sure you are loading the SCH
file that you want. Please refer to Help topic, Scheduler Tasks for details.
 You should never automatically schedule a task that prompts for an ID, a Date or any other
user input! The Scheduler ignores these prompts when performing the task.

Scheduler Task Form
Click Here to View this Form.
Click Here to Close this Form.
Use this form to schedule a task to run automatically. The
Task pick list shows you the types of tasks that may be
scheduled.
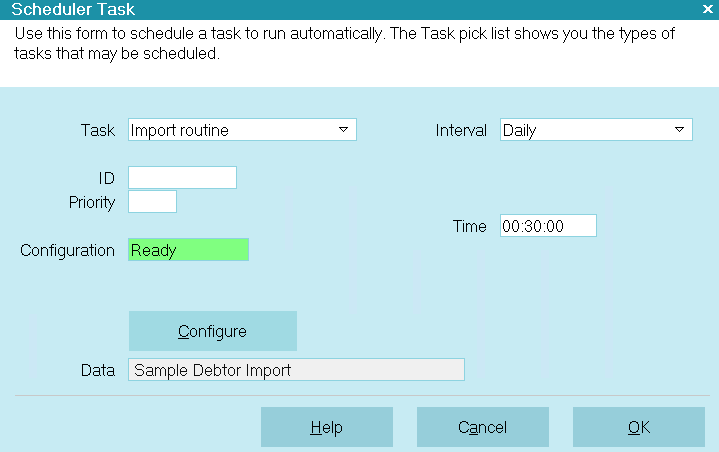
Scheduler Task
Task
Select a Task from the pick list.
If you select a task that requires further configuration,
the Configuration field will be displayed. Select the
CONFIGURE button to set the task.
CAREFUL: You cannot change the Task type after you have
attached a configuration to it. If an error is made,
delete the task entry and restart.

ID
Give your task a unique ID. This ID can be used to
help identify your tasks in the scheduler log as
well as in the scheduler task list.

Priority
Set a priority here. Collect! will sort the list of
tasks based on priority before processing the tasks.

Configuration
This field is visible for certain tasks that
require additional settings. It displays "Not Ready"
if you have not entered the settings appropriate for
this task.
If this field appears and shows "Not Ready," click the
CONFIGURE button to enter the necessary details for
scheduling the task that you selected.
An additional field labeled DATA becomes visible when
you have set a configuration for your task.

Scheduler Task With Configuration

Data
This field is visible only when you have selected a
task that requires configuration. After you configure
the task, certain details are displayed in this field,
for instance, the name of a report that is scheduled
to print or the name of an import routine that you
have scheduled to run.

Interval
Choose an interval for running this task. Additional fields
become visible depending on the interval you select.
Intervals you may choose are:
- One Time Only
- Daily
- Weekly
- Biweekly
- Monthly
- Minutes

Date
This field is visible only if you have chosen the
One Time Only interval. Select the Date icon to
bring a calendar or type in a Date as 07/21/2006.

Day Of Week
This field is visible only if you have chosen the
Weekly interval. Select the field's pick list to
choose a Day of Week to run this task.

Day Of Month
This field is visible only if you have chosen the
Monthly interval. Enter the number for the
Day of Month to run this task.

Time
Enter the Time that you want this task to start. This field
uses the 24 hour clock.
For example, 19:30:00 starts the task at 7:30 PM.
For repeating tasks, when you stop the Scheduler, this
Time value will update to display the next Start Time.

Minutes
Enter the number of minutes you want to use as the
repeating interval for this task.
If your task takes longer that the interval you set, Collect!
will use the original scheduled time to begin the next interval.
This means that if you have set a task to repeat every 20 minutes,
starting at 06:00, and it takes 25, Collect! will immediately
run the task again to process the missed interval for 06:20.
If the task normally takes 25 minutes to run, then this could
cause Collect! to cycle endlessly. You should ensure that the
interval for each task is set to an amount longer than the normal
time is takes to complete the task.
Collect! starts processing tasks as soon as the scheduler launches.
In other words, if the Collect! scheduler starts at 06:00 and has
Minute tasks for every 15 minutes, the first task will be processed
at 06:00, then the next one at 06:15, and so on.

Last Start Time
This is the date and time the task was last started.
This is useful to let you know how long the task
actually runs.
This field is visible only when a task has already run
at least once.
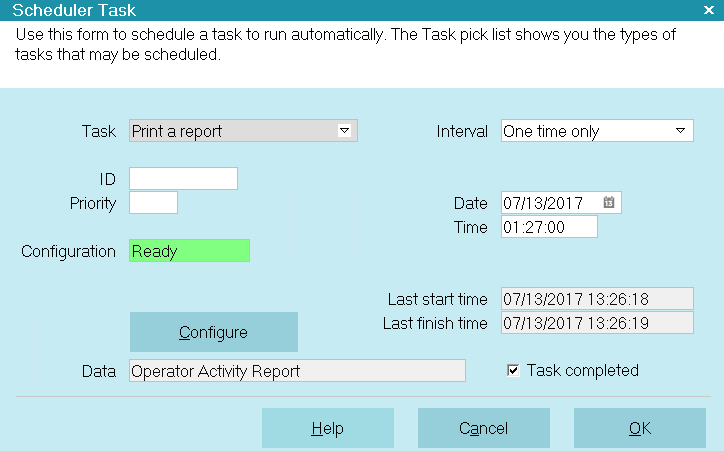
Scheduler Task Last Start Time

Last Finish Time
This is the date and time the task was last completed.
This is useful to let you know how long the task
actually runs.
This field is visible only when a task has already run
at least once.

Scheduler Task Last Finish Time

Task Completed
This field shows is visible only if Collect! was able to
complete the scheduled task. A check mark in the
box indicates that the task completed as scheduled.

Scheduler Task Completed
You can remove the check mark if you would
like to reschedule the task to run again.

Configure
Select the CONFIGURE button to enter the additional
settings required by your task. You will be presented
with the necessary lists and screens to properly
complete the configuration for your chosen type of task.
The screens that you see while configuring are the same
screens you would see if you were manually scheduling
the task, so you should proceed with setting up just as
if you were running the task manually.
You are sometimes prompted to enter a file name if the
Task needs to read a file. By default, Collect! looks in the
Collect\bin folder, or you can specify a complete path when
prompted.
You should never automatically schedule a task
that prompts for an ID, a Date or any other
user input.
Please be aware that you cannot change the Task type
after you have attached a configuration to it. If an
entry error occurs, delete the record and re-enter it.
If you are editing an existing task, selecting the
CONFIGURE button will show you the current
settings for the task. If the task is a Print Report
task, you will be asked if you want to select a new
report. Select 'No' to view the current settings. If
you select 'Yes', Collect! will clear the
configuration and display the Report Options for
the newly selected report.

Configuration Details For Various Tasks
Almost all Scheduler Tasks require configuration and
display the CONFIGURE button when selected. Tips and
details for configuring these tasks can be found in Help
topic, Scheduler Task Configuration.

You may have tasks scheduled for a certain time
that cannot run at that exact time because another
task is already running. This means that the time
the task actually runs may be different than the
scheduled time. The Task Scheduler is able to
evaluate date values dynamically to take this into
consideration. Collect! determines the date range
based on the configuration settings, not the
computer clock.

Help
Select the HELP button for Help on the Scheduler Task
form and links to related help topics.

Cancel
Select the CANCEL button to ignore any changes you
have made and return to the previous form.

OK
Select the OK button to save any changes you
have made and return to the previous form.


Import Routine
Configuration for the Import routine in the Scheduler uses the Import Menu to select the import map
and the data file.
Repeating Intervals
If you are scheduling a file to be imported on a regular basis, you must ensure that the data file
has the same name at each interval. For Example, if your client sends you a CSV file to import each
day called, client98.csv, then the file must be named "client98.csv" every day.
 If your client has to send you a data file where the file name changes each day, you can use
Windows scripting to rename the file before your import routine is scheduled to start.
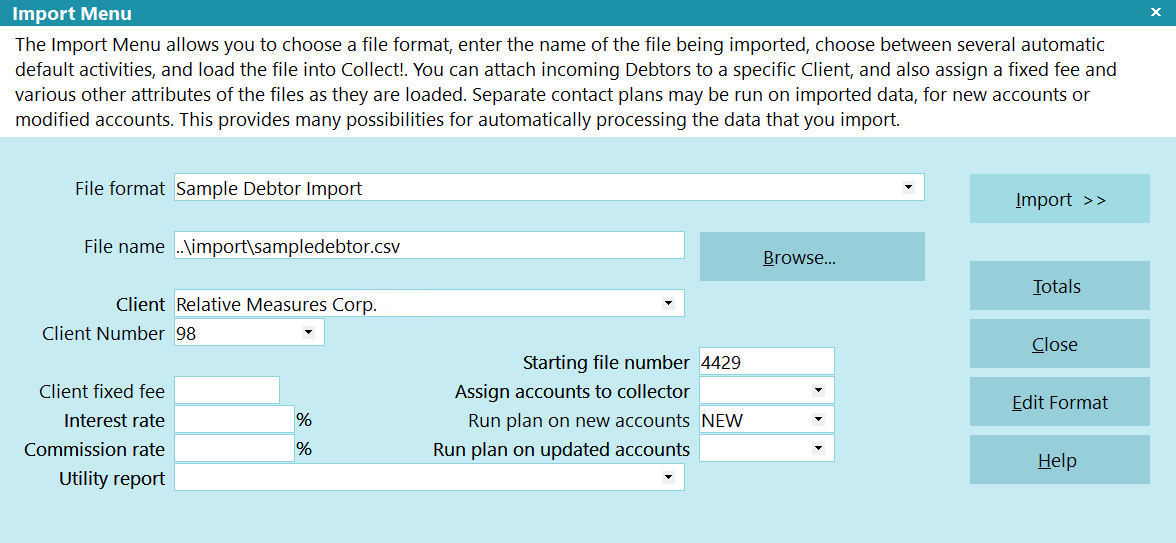
Import Menu

Update NCOA From File
This task uses the exact same functionality as running NCOA through File, Import/Export, Import NCOA,
except that it takes its file name from what you configured in the Scheduler.
Select CONFIGURE to specify the location of the NCOA file.
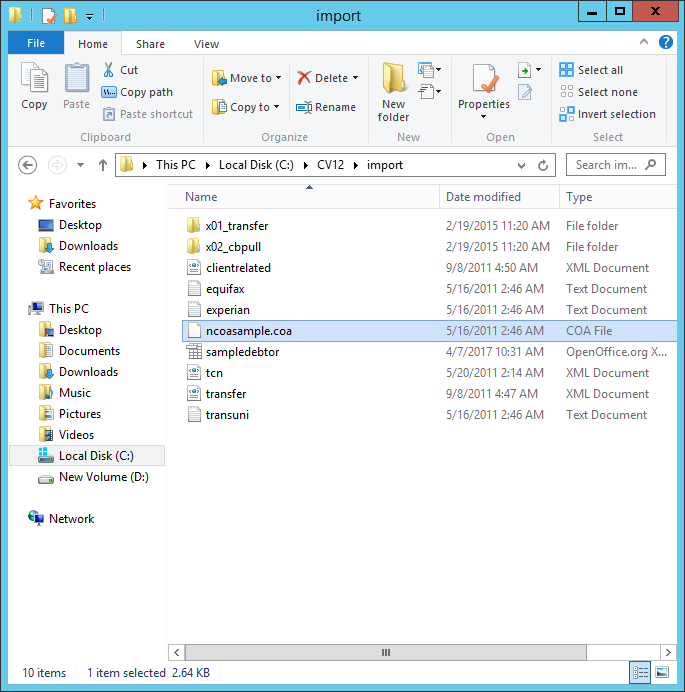
Selecting the NCOA File
The summary of the process will be written to Collect!'s Log Viewer.

Batch Processing
This feature enables you to configure the scheduler to process contacts previously scheduled. You
can schedule multiple batch processing tasks and Collect! will perform them one after another according
to your settings. This enables you to perform any functions that you would normally perform through
the Batch Processing, Process Automatic Contacts screen.
When you select CONFIGURE for a Batch Processing task, you will see the Process Automatic Contacts
screen so that you can select the types of contacts to process.
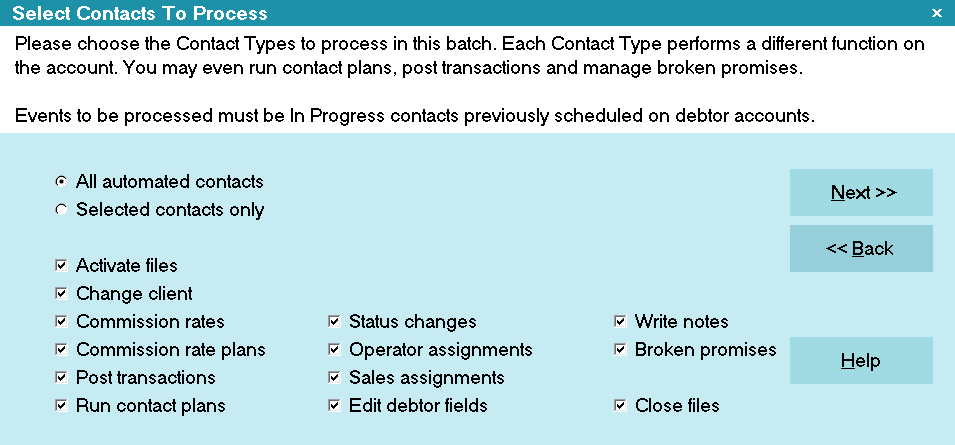
Select Contacts to Process

Recalculate Totals
When you select CONFIGURE for a Recalculate Totals task, you will see the Recalculate Totals screen
so that you can select the settings you need.
When you Recalculate Totals through the Scheduler, you can recalculate all Daysheets or set intervals
and date ranges.
One Time Only
This setting will use the exact Date settings that you specify.
Repeating Intervals
Repeating values do not need a range entered in the "From" and "To" fields. You can leave them blank
and Collect! will recalculate the Daysheets as follows:
DAILY with From and To values:
This will automatically set the "From" and "To" to the date on which the task will run, less a day.
The time in which you schedule this task depends on the processes you want to run after it. For
example, if you want to run analysis reports at the end of the day, then you would schedule this
task for each night after your business closes and before you schedule the reports to print. If you
want to print debtor letters and you charge interest or late fees, then you would want to schedule
this task for after midnight and before you run your batch letters.
WEEKLY with From and To values:
This will recalc "From" and "To" based on the date the task is to run. "From" will be set to the
current date minus seven days. So this will Recalculate a week's worth of data up to the current date.
BIWEEKLY with From and To values:
This will recalc "From" and "To" based on the date the task is to run. "From" will be set to the
current date minus fourteen days. So this will Recalculate a week's worth of data up to the current
date.
MONTHLY with From and To values:
This will take the date specified as the day of the month to run and recalc from the first of that
month to the current date.
 As your database grows, it's recommended that you schedule the recalc once per day and set
any analysis reports to run based on the prior date.
 Please examine your accounts to ensure that the Scheduler is performing the recalculations
as you intended.
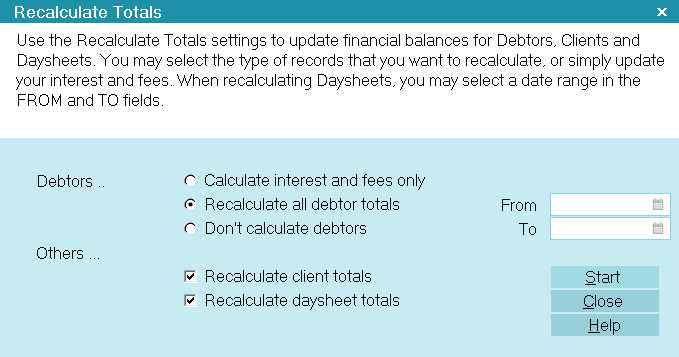
Configure Opens Recalculate Totals

Letter Service
When you configure a Letter Service task, the Scheduler takes you through the setup steps that appear
the same as when you are manually creating your output file. The singular difference is the absence of
"Prompt when there is a choice" option on the popup window. Since the Scheduler is intended to run
without an operator in attendance, there can be no prompts which require an operator's response.
 If you are scheduling both Letter Service and hard-copy letters you will still print in your
office, it is very important to make sure you Scheduler tasks place the Letter Service
job FIRST with enough time to complete before your inhouse print
job for hard-copy letters is initiated.
The Batch Letter Options screen looks just like the manual version of this screen, except that you
do not see the option to "Prompt when there is a choice". The choices must be decisioned in advance
to avoid the process grinding to a halt when the screen is waiting for an operator response and no
operator is present.
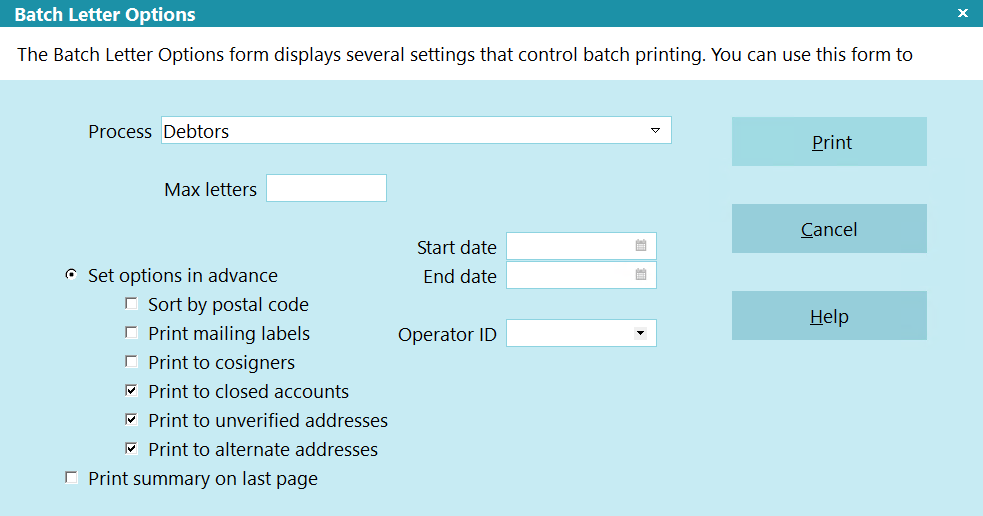
Batch Letter Options
The 3 necessary decisions surround what you want to do in the event of the following 3 items in
particular:
(a) Print to Cosigners. Check the box if you'd normally answer Yes.
(b) Print to Closed Accounts. Check the box if you'd normally answer Yes.
(c) Print to Unverified Addresses. Check the box if you'd normally allow a letter to be generated
on accounts where the Address OK on the debtor account is NOT checked ON.
If there are any other parameters on this screen that you would ordinarily modify, i.e. Date Range,
Max Letters allowed to generate, Operator ID associated with the batch, enter those details on this
screen.
For recurring tasks, the dates can be left in as is or blanked out. Collect! will always use the
last 30 days.
Click the "Print" button in the lower right corner to advance to the next setup screen.
The Letter Service screen is opened and doesn't allow you to pick any other destination. If the path
displayed for where the file will be saved is not where you'd like, you can edit this field to input
your file path location of choice. All the other options are Read Only and cannot be modified. If
just a filename is specified, the file will be outputted to the bin\global\\letters folder.
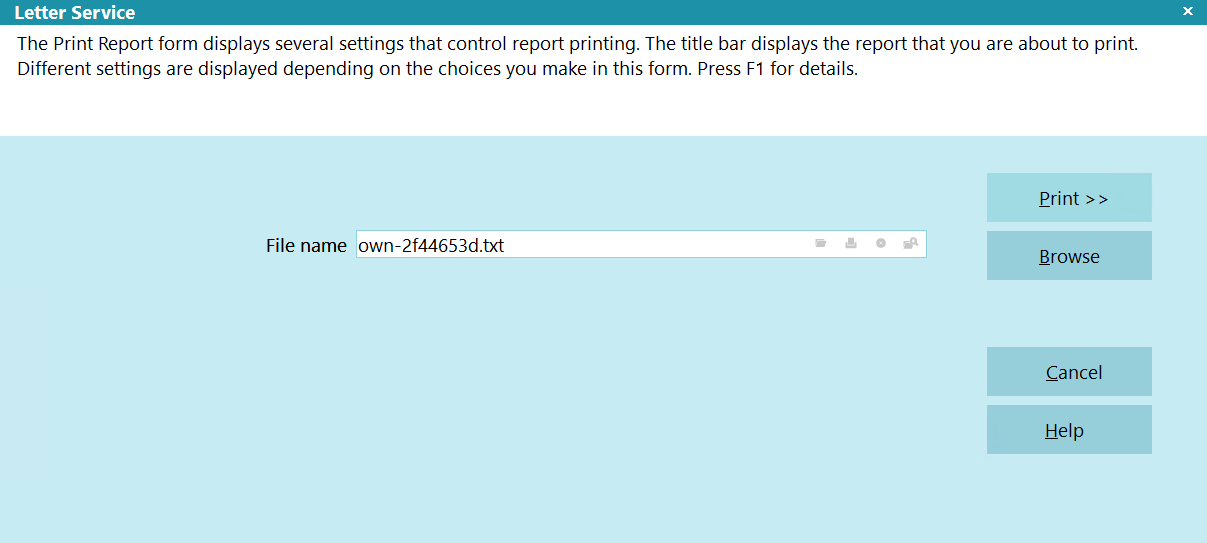
Letter Service File Options
Click the "Print" button in the lower right corner to proceed to the next setup screen.
Enter your preferences for the following options:

Print Batch Letters
Collect!'s Scheduler can be used to print your letter or email batches during off hours. When you
configure a Print Batch Letters task, the Scheduler shows you the same screens you would see when
setting the options manually for your Scheduled Batch Letters. There are a few restrictions when
setting these options for the Scheduler. We will cover the details in this topic.
 If you are also scheduling your Letter Service batch in the Scheduler, you should make sure
the "Letter service" task is scheduled to be completed before the "Print batch letters" task
starts.
The Batch Letter Options screen looks just like the manual version of this screen, except that you
do not see the option to "Prompt when there is a choice". The choices must be decisioned in advance
to avoid the process grinding to a halt when the screen is waiting for an operator response and no
operator is present.

Batch Letter Options
On the Batch Letters screen, select the destination.
- Printer: Letters that have Email as the destination in the Report Options will be emailed.
All other pending Letter Contacts will be printed to the printer.
- File: All pending Letter Contacts will be printed to a test file.
- Email: Only pending Letter Contacts with email as the destination in the Report Options
will be processed. They will be either emailed or texted, based on the report configuration
and whether the Use SMS boxes is checked on this form.
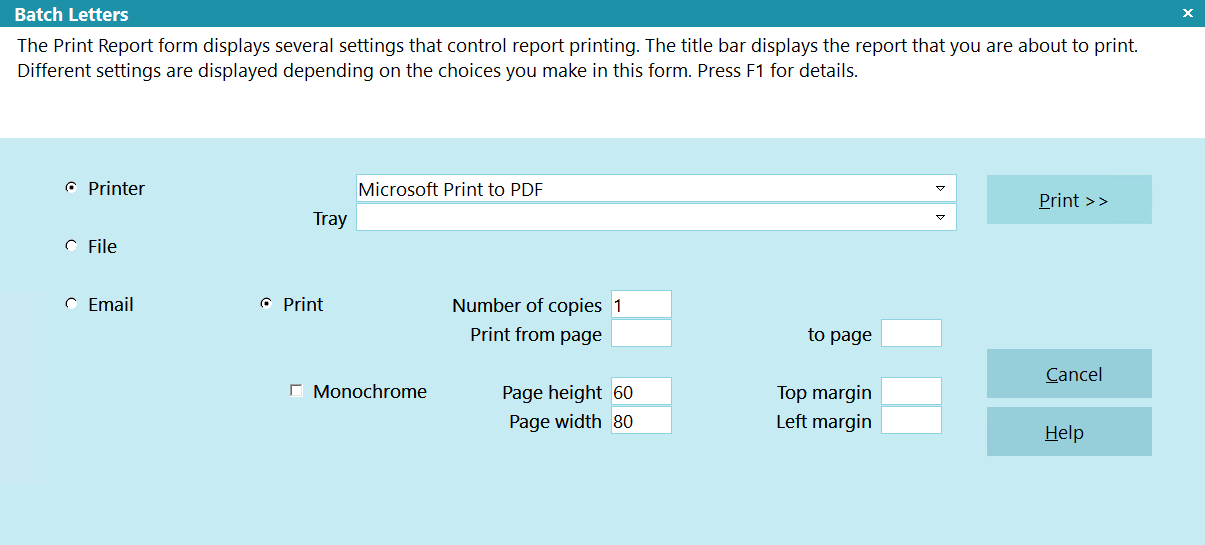
Report Destination Options
 You can print batch letters to different destinations in the same letter batch. If you have
letters that print to Email and some that print to Printer, they will go to the right
destinations when you print your letter batch. Just set the Destination to "Printer" in
your task, and Collect! will read the Destination set in the Report Options for each letter
in the batch.

Repeat Scheduler Letter Batch Task
When scheduling Letter Service, Batch Letters, or Batch Emails through the Scheduler, a repeating
Scheduler Task will automatically increment the Start and End dates as expected.
When the Batch Letter Options form is displayed during your configuration, the Start and End
dates do not matter. Whether they are filled in or not, Collect! will use the last 30 days by default.
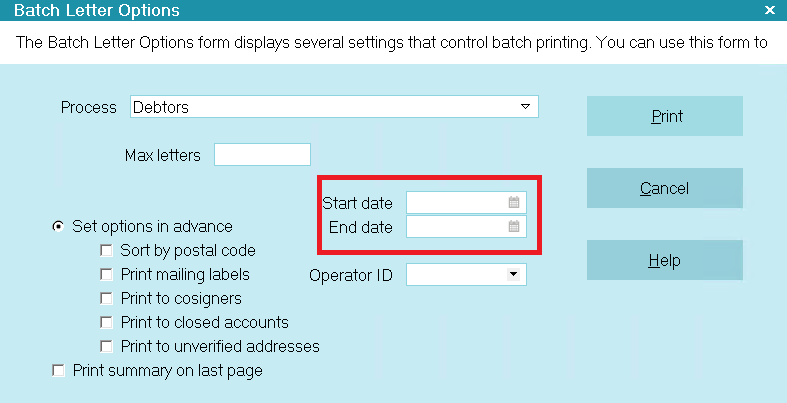
Configure Repeat Task
Configure your Repeat and Date/Time values.
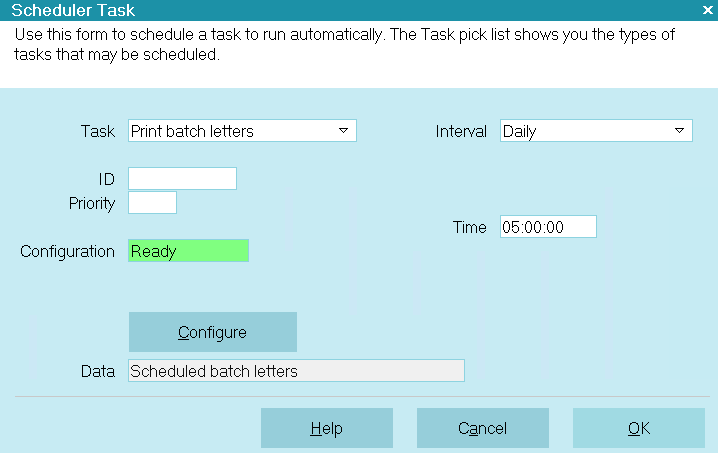
Configure Repeat Task

Process Batch Emails In Scheduler
Collect!'s Scheduler can be used to print Email batches and SMS Email batches. When you configure
a Print Batch Letters task, the Scheduler shows you the Email option. When selected, you can also
switch ON the SMS option.
 If you leave the destination as Printer, Collect! will process both printed and emailed
letters together. The benefit of selecting Email is to only process pending emails or to
process Text/SMS messages.
This feature processes Letter contacts, NOT Email contacts. When the process is complete
and the Contact is being marked done, Collect! will change the contact type from Letter to Email or
Text/SMS, depending on the configuration. This is for tracking purposes.
Create Email Message
If you want to use this feature, you would schedule a Letter contact for each account. Your Email
or SMS message would be in the Report Body of the Letter you are going to schedule. Do NOT schedule
an Email contact.
 You can use any report or letter that you would otherwise print to the printer. You can
create special reports if you want to print short text messages to SMS.
- Create a Letter containing your message.
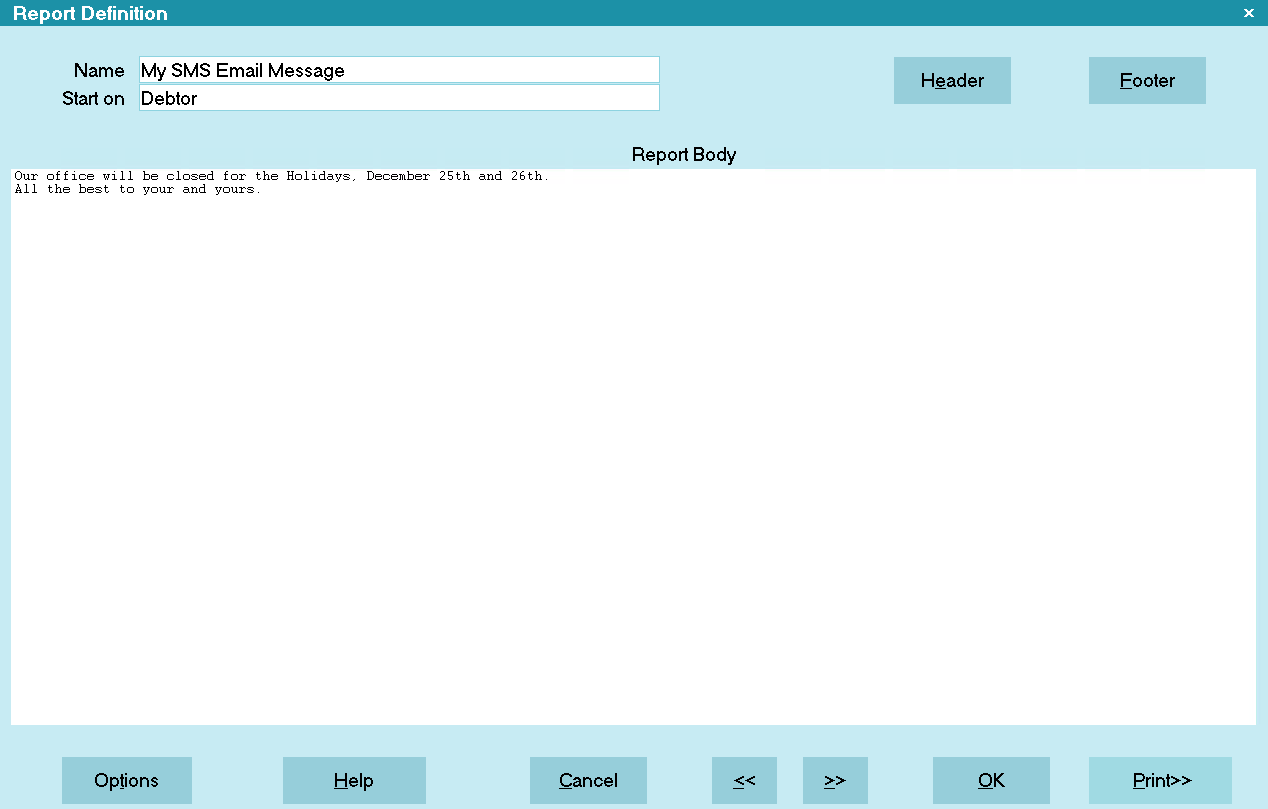
SMS Letter Report with General Message
The report system enables you to personalize your message. You can pull data from the account to
include in your message, just as you would when printing to the printer.
- Schedule a Letter contact on each account.
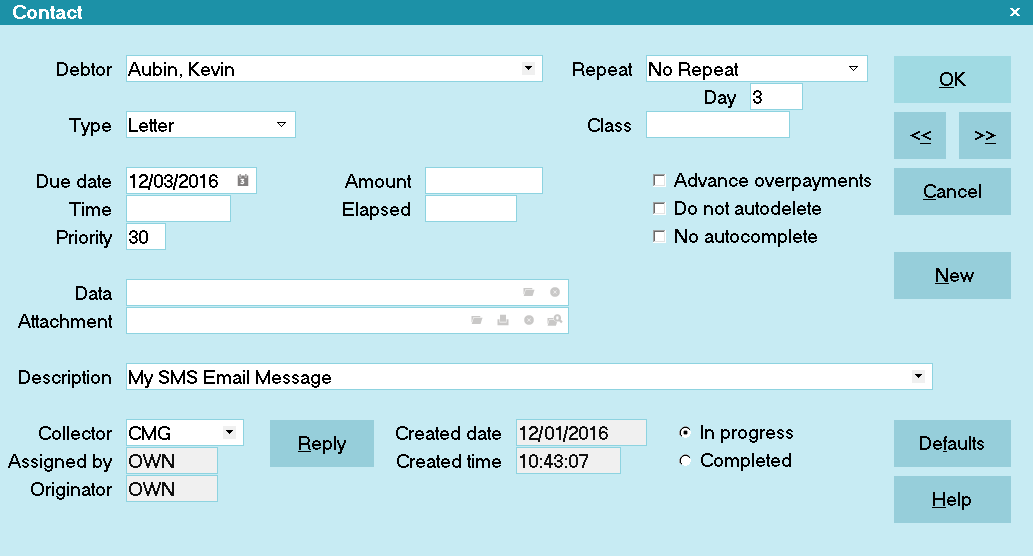
Letter Contact to be Queued in the Letter Batch
 Letter Contacts that you are going to schedule for sending in your Email batch can be
assigned to a special Collector so that you can schedule an Email batch for that particular
Operator ID; otherwise, all Letter Contacts that are linked to a Report with a Destination
of Email will be processed.
Configure Text/SMS Batch
- When you select Email you have the additional option of selecting
SMS.
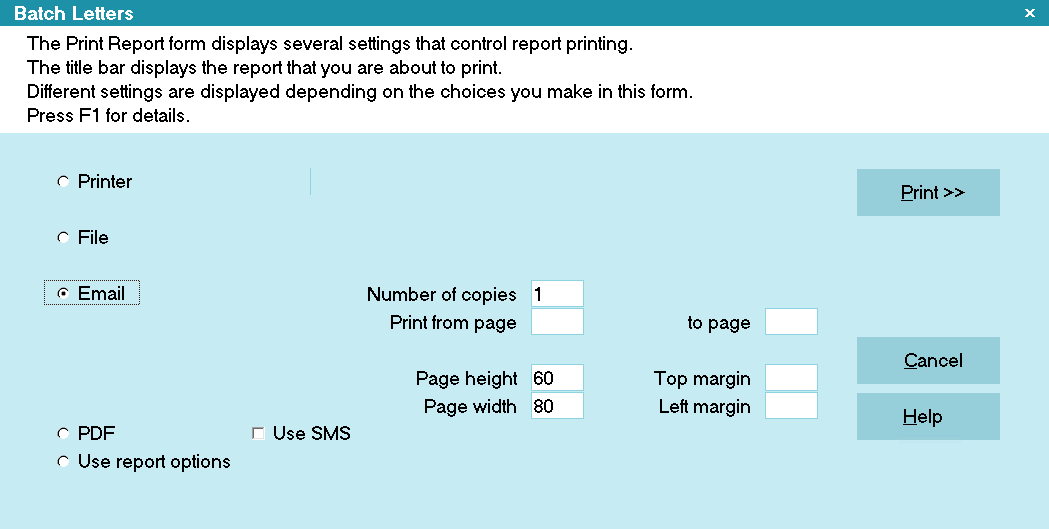
Email Destination Selected
- When you switch ON SMS the default Domain from your SMS Email
Setup is displayed. You can edit this as needed for the batch.
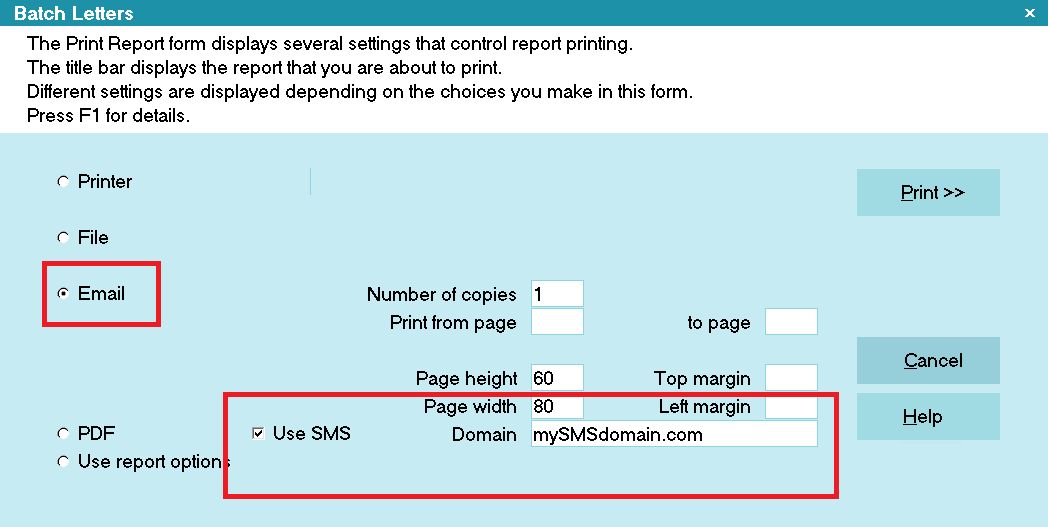
SMS Switched ON
Letter Contact and Notes
When a letter is printed to Email, the Type field on the Letter Contact will changed to "Email"
or "Text/SMS for tracking purposes. This will let your operators know that the letter was printed
to Email or Text, not to the printer.
Also, when a letter is printed to Email, the Debtor's Notes will display "Emailed:" or "Texted:" in
addition to the name of the Letter that was printed.
Email Content
The content of the Email letter will be saved to the Letter Contact. The Email contents are not
turned into a metafile. They are stored as text only. When opening the Email blob, Collect! uses
its standard Text Editor. HTML formatted emails will also open your default web browser to display
how the email was sent.
 The Data field will contain the words "Email: {File Number}." This is the Debtor or Client
Number and is the same convention used when sending an Email directly from a Debtor or Client.
The Email content will only be attached to the Letter Contact if the Email was successfully sent to
the mail server AND the Letter Contact is marked 'Done'.

Print A Report
When printing a report through the Scheduler, the CONFIGURE button first takes you to the list of
reports that you can select. Only reports that START ON "Anywhere" will show up in the Report List.
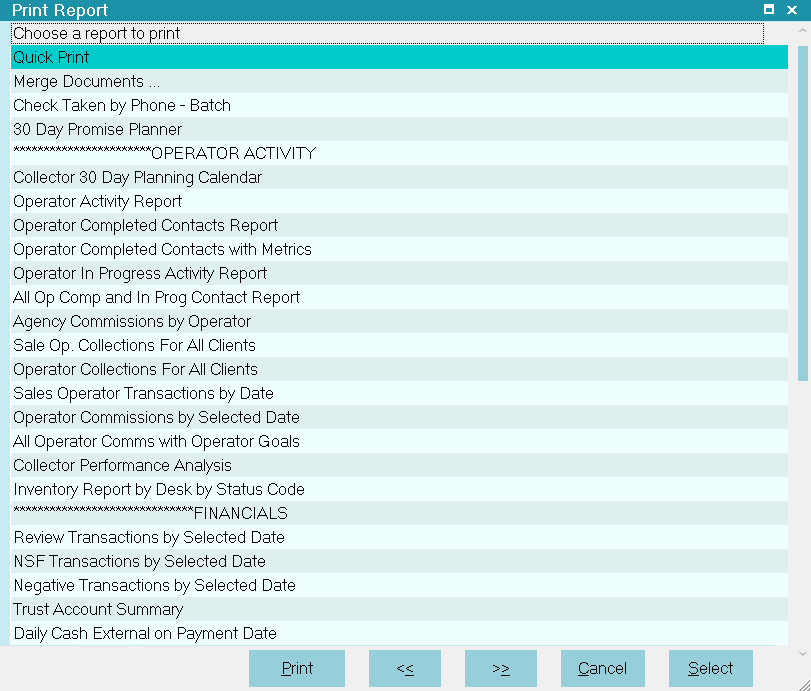
Print Report List of Reports
 The Scheduler does not prompt for a Date Range when configuring reports. If you want to
specify a Date Range, you must do this in the report itself before using the Scheduler to
schedule the report.
When you come to the Print Report form, you can change your report destination and enter other
details as needed.
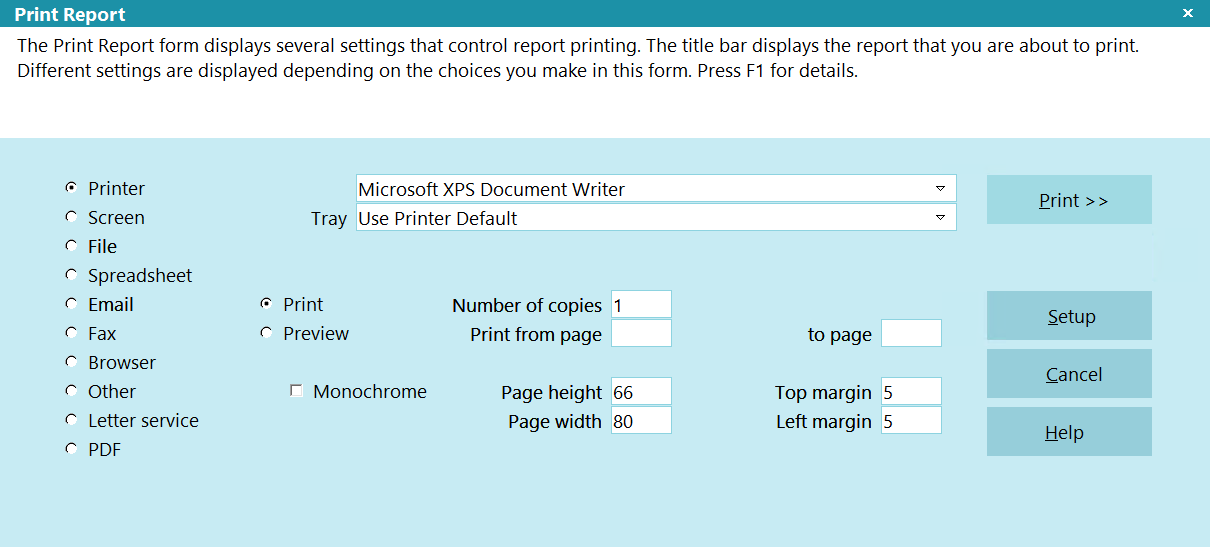
Print Report Screen
 If you wish to print a report to file with an automatically generated file name, you can
select "File" for the destination and put .csv in the "File Name" field,
for example, when you are configuring the task. You can also configure this in the
Report Options for the particular report. Collect! will pick up the settings from that form.
Please refer to Report Options in the section entitled "File Name With Date/Time Stamp."
 If you are editing an existing Print Report task, selecting the CONFIGURE button will prompt
you to select a new report. Select 'No' to view the current settings. If you select 'Yes',
Collect! will clear the configuration and display the Report Options for the newly selected
report.
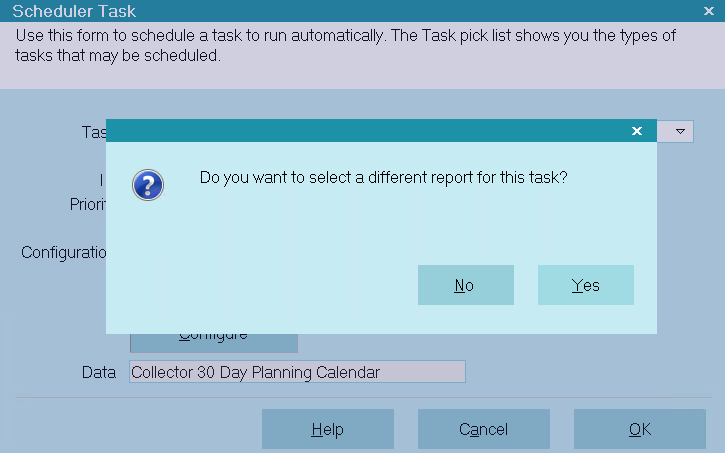
Prompt to Select a Report
 Printing to Screen in the Scheduler will not open the report on the screen but will still
execute write back calls contained in the report. Any output other than write back calls is
discarded when the Destination is Screen and the report is printed through the Scheduler.
 Print Preview is not supported in the Scheduler.

Generate Statements
When using the Scheduler to generate statements, you need to set the date range. Select CONFIGURE
to display the Date Range prompt.
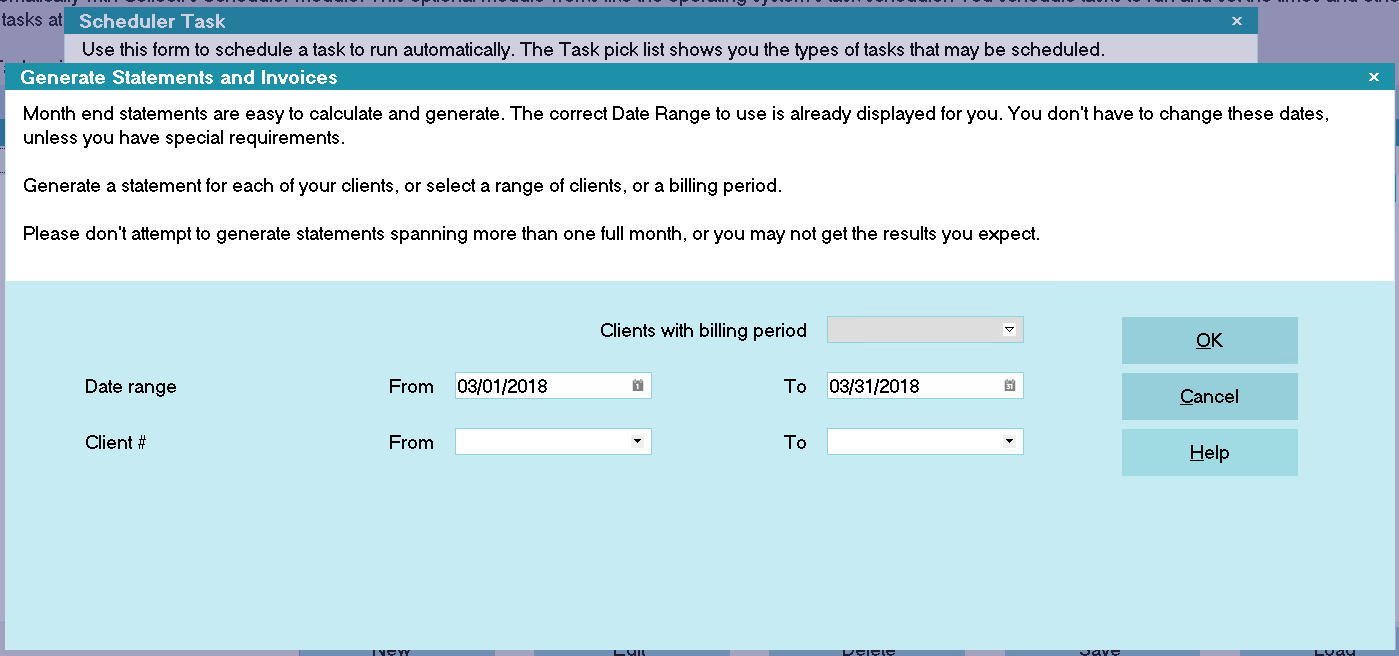
Generate Statements Settings
When you select a one time only task, the Scheduler will use the FROM and TO date range based on
what you configure.
When you select any other time interval, it will pre-compute the FROM and TO values as follows:
DAILY will set yesterday as both the FROM and TO date.
WEEKLY will set the most recent Sunday for the TO date and the Monday from last week for the
FROM date.
BIWEEKLY will set the most recent Sunday for the TO date and the Monday from 2 weeks ago for the
FROM date.
MONTHLY will set the FROM date to the first day of the previous month and the TO date as the last
day of the previous month.
 Generating the Statements will not print them. As present, there is no Scheduler Task to
Print Statements. If you email Statements, then you can create a Scheduled Task to do
an Email Batch for Clients. This requires a repeating Letter Contact on each Client.

Credit Bureau Reporting
When using the Scheduler to run your Credit Bureau reports, select CONFIGURE to set the details in
the Report to Credit Bureaus form.

Report to Credit Bureaus
 You must have your Credit Bureau Setup filled in correctly prior to using the Scheduler.

CBR - Reactivate All
This option will invoke the Metro2 Contact Reactivation process for Credit Reporting. Setting
this to run in the Scheduler reduces time for the actual Credit Bureau Reporting task.
This task will reactivate all Metro2 Contacts that can be reactivated.

CBR - Reactivate 50,000
This option will invoke the Metro2 Contact Reactivation process for Credit Reporting, but in a
batch of 50,000 Contacts. Setting this to run in the Scheduler reduces time for the actual
Credit Bureau Reporting task.
This task will reactivate only 50,000 Metro2 Contacts that can be reactivated.
 Setting this task to run daily will significantly reduce the amount of time for Credit
Bureau Reporting on larger databases.

Reconcile Payments
This process automates Payment Processing Reconciliation.
After selecting the Task, choose your Interval. Daily or Minutes is recommended. A processing ID
and Priority are optional. Select the time of day or number of minutes you wish the process to run.
This process will loop through all configured gateways and do the following:
- Download Returns
- Download Payments that were not setup in Collect!
- Submit any pending payments to the gateway

Reconcile ACH - Legacy
This process automates Payment Processing ACH Reconciliation.
After selecting the Task, choose your Interval. Daily or Minutes is recommended. A processing ID
and Priority are optional. Select the time of day or number of minutes you wish the process to run.
 The gateway processes the recurring transactions around 6:00 AM Eastern, so we recommend
scheduling the task for no earlier than 7:00 AM Eastern, if you are only doing Daily.
The "Collect\Log Files\payments\\ACH" folder should be checked daily for Processing Summary
and UnmatchedExternal reports. As well, the Application Log should be reviewed to ensure there are
no errored transactions which require manual review.

Reconcile Credit Card - Legacy
This process automates Payment Processing Credit Card Reconciliation.
After selecting the Task, choose your Interval. Daily or Minutes is recommended. A processing ID
and Priority are optional. Select the time of day or number of minutes you wish the process to run.
 The gateway processes the recurring transactions around 6:00 AM Eastern, so we recommend
scheduling the task for no earlier than 7:00 AM Eastern, if you are only doing Daily.
The "Collect\Log Files\payments\\ACH" folder should be checked daily for Processing Summary
and Unmatched reports. As well, the Application Log should be reviewed to ensure there are no
errored transactions which require manual review.

Process TCN Campaign
Schedule Calls (create and send your campaign list uploads to TCN) and Download Report (retrieve
your campaign call result download file from TCN) at times that are convenient to you using
Collect!'s Scheduler Module. All the functionality available through the Process TCN Call Campaign
option in "Tools\ Batch Processing" is available in the Scheduler as well.
Schedule Call Campaign Task
On the TCN Select Function screen, select Schedule Calls and click Next.

TCN Select Function
Enter your campaign settings, then click the Next button.
 WARNING: The following fields are not supported for repeating tasks: Filters Button, Link Task ID,
and Link Complete Percentage.
 For repeating tasks, the report that you select for the Report Name field must be written
to support the interval that you want to configure.

TCN Schedule Calls
Schedule Download Report Task
On the TCN Select Function screen, select Download Report and click Next.
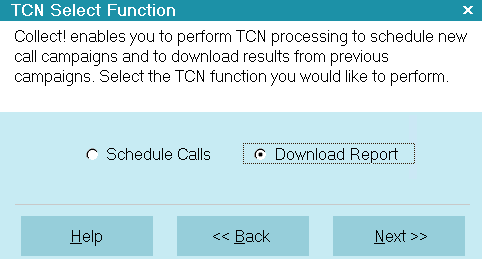
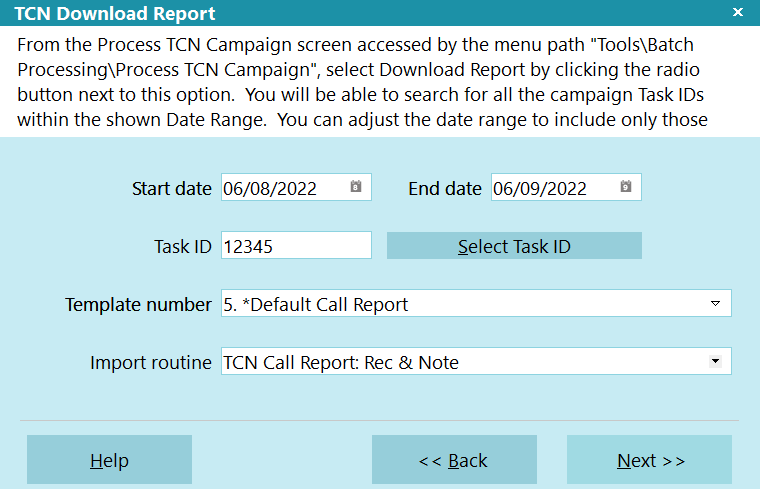
TCN Download Report
On the TCN Download Report screen, select the Template Number and Import Routine.
TCN Download Report
You have two choices for processing Tasks:
i) Select a Task ID and process only the Task you select.
ii)Select a Date Range, leave the Task ID blank, and process all tasks within the date range.
 If you setup a repeating task with the Task ID blank, the Scheduler will automatically
update the date ranges for each period. To prevent duplicates Contacts, we recommend
using the Dialer ID field on the Contact record as a Key in your Import. This will not
stop duplicate note lines from writing.
When you have entered your settings, click the Next button.
Optional 'Real-Time' Download
In the above steps, you can only schedule a download once the campaign has finished. As an alternative,
if you have a larger campaign, Collect! can download it every X minutes.
 WARNING: You can only do this with 1 campaign per day.
After you have configured the task, you can set the INTERVAL on the task to Minutes, then type in
how many minutes Collect! should repeatedly contact TCN to download the next set of results in the
MINUTES field.

Archive Accounts
The Archive Accounts task in the Scheduler enables you to archive volumes of inactive accounts
automatically during off hours, according to criteria you set. You can tag clients, select a
Closed Date range and even set a maximum time for the task to run so that it does not impede other
scheduled processes.
When you archive accounts in the Scheduler, you can set all the criteria and let Collect! handle
the details. If you have large volumes of old or inactive accounts, the maximum time can be set
and you can complete this archiving task over several evenings or the weekend.
 WARNING: Archiving in the Scheduler can not be set to repeat as the system would not know what
dates to use. Typically, sites won't archive until after the accounts are no longer
needed for year end reporting.
 Archiving procedures will run more quickly if you run the process from the machine that your
Collect! Server is running on.

Archive Accounts
You can specify a range of clients OR click the TAG CLIENTS button to tag clients in the Client List.
 When the Client List is displayed, you can use search criteria.
 When you tag Clients, the TAG CLIENTS button will be Orange. You can click the button to
see your tagged list. These are the clients who will be processed, even if you have values
in the Client Range. Collect! will always use the tagged list instead. You can clear or
update the tagged list.
Closed Date
Select a range of Closed Dates to include in this task.
 WARNING: If you do not select a range of Closed Dates, Collect! will archive accounts WITH NO
CLOSED DATES, meaning all debtors.
You can select a "Max Time" in MINUTES if you want to limit the amount of time the Scheduler
spends on this task.
 Configure the task to be performed daily to complete an Archiving process that cannot be
completed in one evening. Once the process is fully complete, you can delete the Task as
it will never run again.
Select OK to enter your archiving task into the Scheduler Task list.

Database Check
This will call the Collect\bin\checkSQL.bat file which will go through and check all the registered
databases with SQL server.

Database Snapshot
This will call the Collect\bin\backupSQL.bat file which will go through and backup the registered
databases with SQL server.
The backup is placed into the Collect\snapshot folder as a TAR file compressed inside a GAR.GZ file.

Order Of Operations
The order of operations is important, particularly if you accrue interest and print letters with a
balance. Here is the recommended order for routine tasks:
- Recalculate Totals - Debtor Interest and Fees
- Import Routine
- Update NCOA from File
- Reconcile ACH Transactions
- Reconcile Credit Card Transactions
- Batch Processing
- Letter Service - Debtor and Cosigner
- Print Batch Letters - Debtor and Cosigner
- Recalculate Totals - Clients and Daysheets
- Generate Statements
- Letter Service - Client
- Print Batch Letters - Client
- Credit Bureau Reporting
- Print a Report

Save Your Tasks
If you are running repeating tasks, you will want to save the file to be reloaded the next day.
- Click the Save button.
- Navigate to a location. Collect! defaults to the active BIN folder.
- Type in a filename.
- Click save.

Troubleshooting
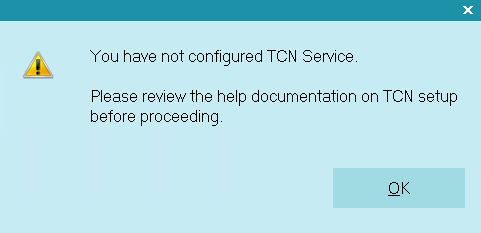
You must ensure that you have set up your login credentials in the applicable setup screens like TCN
or payment processing.
TCN Setup Needed

| 
Was this page helpful? Do you have any comments on this document? Can we make it better? If so how may we improve this page.
Please click this link to send us your comments: helpinfo@collect.org