How To Use A Shared WIP List / Pool Desks
WIP Lists can of two types:
- Contact events that are specific to a single user, or
- Contact events that are assigned to a Shared or Pool Desk ID which collectors defined as
belong to that desk's group are able to access in a simultaneous, Shared WIP List.
Here are the steps to create a Shared / Pool WIP group:
- Create a Operator ID that will store the accounts for this pool. This is often best done with
something descriptive to define what portfolio it contains, i.e. MED1 or BANK3 or NEW1 (if
pool new bus only), etc. The Operator Type can be Collector or System, Password can be
anything, User Level can be 60; no one will actually sign in with the ID.
- For each collector in the team, enter their Operator Setup screen and click into the Group
Tab. Check the "Enable operator group" switch ON and enter the Pool desk name into the first
field under Operator to the left of the Enable switch (i.e. what you named the pool desk in
the step above). A collector can have access to multiple pool desks by adding additional desk
IDs to their Operator Group Tab.
 You do not include any other user IDs in the Group Tab besides the actual Pool desk name.
The purpose of this step is to get the collector access to another WIP List, NOT every body's
individual WIP list on the team.
- Tag your list of accounts that you wish to transfer to the Pool desk and run a Batch Process
Contact Plan to Assign Accounts to Operator, where the target ID is the Shared / Pool desk ID
you created in the first step. Click No to untag the list when the process completes, because
there is another batch process to follow.
- Run a Contact Plan that will insert a Review or Phone contact event into all of the accounts
on your Pool desk ID if these are New accounts. If the desk you are building is comprised of
shelf inventory and all accounts have an In Progress contact event already on them, you may
skip this step and proceed to the next step below. Assigning accounts to a different Operator
ID updates In Progress contacts to the ID of the new desk you transferred it to.
- From a WIP List window, click Reload to access the Reload Work In Progress List and use the
drop-down arrow beside "Load contacts for Operator" to select the first Operator ID of the
collectors you identified as being authorized to work the Pooled WIP.
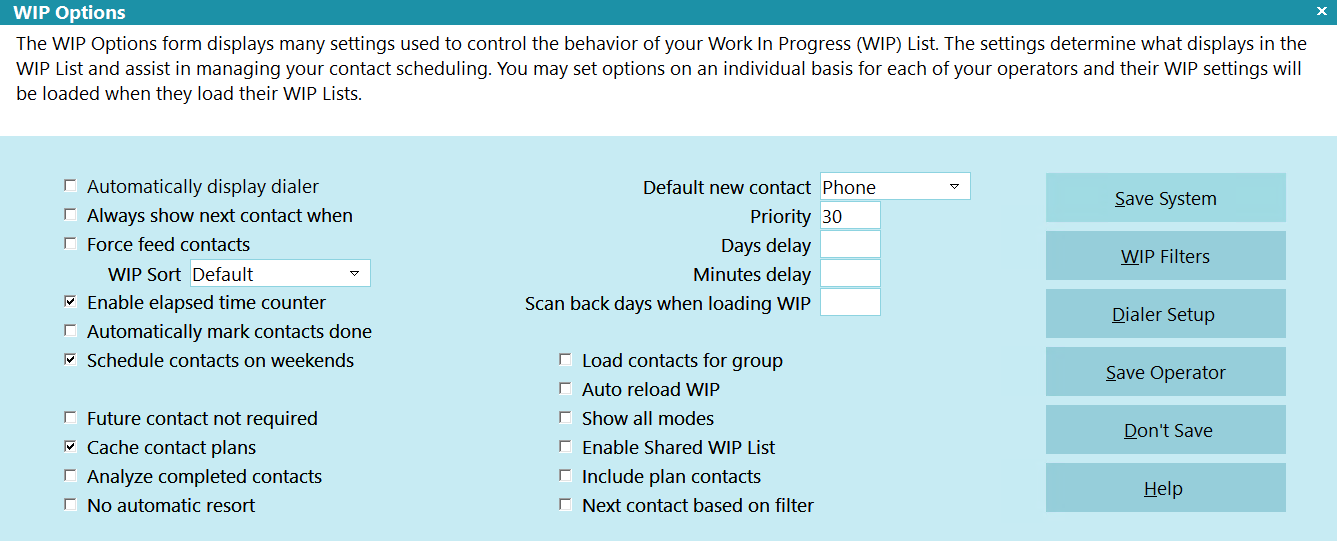
- Click the WIP Options button. Check the switch ON for "Enable Shared WIP List" located at the
bottom right of the WIP Options screen.
- Click "Save as Default" to update this collector's WIP permissions profile.
- Repeat the steps above until you have updated all the collector WIP Option profiles that are
part of this portfolio team.
- Have all the collectors just modified sign out of Collect!, then log back in for the permission
changes to take effect.
- These Operators will now have extra WIP list access, even if they are a User Level 60 (entry
level). The collector will now be able to toggle between WIP lists for all desks that they
have been authorized to work. They will not have access to any other WIP Lists.
All collectors authorized for the pool can be working the WIP List for that desk simultaneously. Time
queues will pop up to whichever collector is actively migrating to the next account when the Time
to work comes due for an account in the pool.
Collectors may see some additional pop ups while working in together on a pool desk. These are normal
system notifications that the WIP is skipping the next account visible to the collector on THEIR
screen because another collector in the WIP already went there/updated that.
 It is highly recommended that pool desk WIP Options be saved with "Always show next contact
when" checked ON. Meaning the actual desk name (i.e. MED1). The individual collector's
WIP Options do not translate to the Pool Desk options.
Once your team has loaded up the communal WIP List, the manner in which they work the accounts and
advance to the next account in the queue is exactly the same as working their own, individual ID
desks.
Group Work In Progress
As an alternative or ammendment to the above, users like managers or team leaders can sign in and
load a work in progress that merges all the contacts from the group into a single To Do List.
Here is an example of an operator setup to see the WIP for 2 other users:

Operator Group
On the WIP Options form, you can then select LOAD CONTACTS FOR GROUP and click OK.

WIP Options

To Do List Displaying All Contacts for Operator Group

| 
Was this page helpful? Do you have any comments on this document? Can we make it better? If so how may we improve this page.
Please click this link to send us your comments: helpinfo@collect.org