How To Use Contact Controls
Contact Controls allow you to implement rules to prevent over-contacting an account. You can create
controls for Calling, Texting, Emailing, and Lettering. You can set generic controls for all regions,
and then you can, optionally, set controls based on the State or Country fields.
Contact Controls apply to Debtors and Debtor Cosigners.
Contact Control Form
Click Here to View this Form.
Click Here to Close this Form.
The Contact Control window is used to setup rules for
contact management. You can specify calling, texting, printing, and
emailing rules to control how often those contact types can occur.
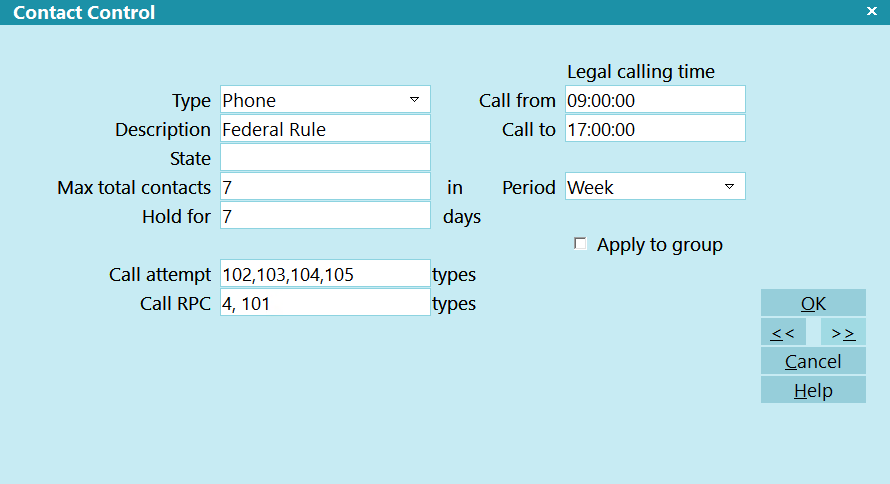
Contact Control - Phone
Type
The type of Contact that this control applies to. The
options are Letter, Phone, Email, and Text.

Description
This is a user-defined field for giving the control a
description.
State
The State that the control applies to. You must use the same
values that you put into the Debtor or Cosigner state.
Leave this field blank if you want this control to apply
to all States.
 If you use a picklist, you can put the same picklist
on this field.
If you use a picklist, you can put the same picklist
on this field.
 If you have controls that are national and some parts
that are State specific, you can create a control
for each State with only the information that applies
to that state, with the exception of MAX TOTAL CONTACTS
as that is a required field and must be filled in on all
Contact Controls.
If you have controls that are national and some parts
that are State specific, you can create a control
for each State with only the information that applies
to that state, with the exception of MAX TOTAL CONTACTS
as that is a required field and must be filled in on all
Contact Controls.
Country
The Country that the control applies to. You must use the same
values that you put into the Debtor or Cosigner country.
Leave this field blank if you want this control to apply
to all Countries.
If you use a picklist, you can put the same picklist
on this field.
Max Total Contacts
This is the maximum number of contacts that can appear in the
period before the User receives notifications about too
many Contacts.
Period
The period that this control applies to. The options
are Week or Month.
Apply To Group
When checked, this control will factor in all Contacts on
the Debtor's group when calculating the total Contacts;
otherwise, only the current record is considered.
With Cosigners, this option will try to match
Cosigners on other group members by SSN, Phones,
or Emails.
Fields Only Visible With Type Phone
Hold For
If you have calling restrictions that require you to
hold off calling a Debtor or Cosigner after you have
made a Right Party Contact, then enter here the number
of days that you must wait before you can call them again.
Call Attempt
This is a comma separate list of Call Results that you
consider to be Attempts.
The default list is below for the Call Result field
on the Contact record. If you have a custom picklist
on the Call Result field, you will need to refer to
your picklist for the values to enter in this field.
The values you are looking for are stored in the
Key field of the Pick List Entries. Please refer to the
Help document How To Use Pick Lists for more information.
Call RPC
This is a comma separate list of Call Results that you
consider to be Right Party Contacts.
The default list is below for the Call Result field
on the Contact record. If you have a custom picklist
on the Call Result field, you will need to refer to
your picklist for the values to enter in this field.
The values you are looking for are stored in the
Key field of the Pick List Entries. Please refer to the
Help document How To Use Pick Lists for more information.
Default Call Results On Contact Form
0  : None specified
1  : Left Message on Machine
2  : Left message with person
3  : Debtor not in - call back. No message.
4  : Spoke to debtor. Verified right party.
5  : Wrong number / debtor unknown.
6  : NIS
101: Manual dial: right party contact
102: Manual dial: pick up, hung up
103: Manual dial: debtor in, unavailable
104: Manual dial: debtor not in, call back
105: Manual dial: machine answer, left msg
106: Manual dial: machine answer, no message
107: Manual dial: left message with person
108: Manual dial: no answer
109: Manual dial: busy
110: Manual dial: call did not go through
111: Manual dial: wrong number/debtor unknown
112: Manual dial: not in service
113: Dialer: transfer to operator
114: Dialer: unknown call result
115: Dialer: transfer-operator, wrong number
116: Dialer: answered, hung up
117: Dialer: answered, system terminated
118: Dialer: answered, voice mail
119: Dialer: no answer
120: Dialer: busy, no machine
121: Dialer: machine, delivered
122: Dialer: machine, not delivered
123: Dialer: fax machine detected
124: Dialer: cancelled, incomplete number
125: Dialer: cancelled, compliance reasons
126: Dialer: cancelled, do not call
127: Dialer: call failed, technical reasons
128: Dialer: cancelled broadcast or blank num
Call From
The earliest time you can make a call, based on the Debtor's
or Cosigner's time zone.
For roaming phone numbers, Collect! will use the
Time Zone of the consumer record that was opened or
initiated the call (Debtor, Cosigner, or Phone),
then check against the time zone on the Address
record that matches the active address and determine
the highest and lowest possible time for the consumer.
Call To
The latest time you can make a call, based on the Debtor's
or Cosigner's time zone.
For roaming phone numbers, Collect! will use the
Time Zone of the consumer record that was opened or
initiated the call (Debtor, Cosigner, or Phone),
then check against the time zone on the Address
record that matches the active address and determine
the highest and lowest possible time for the consumer.
Fields Only Visible With Type Letter, Text, Or Email
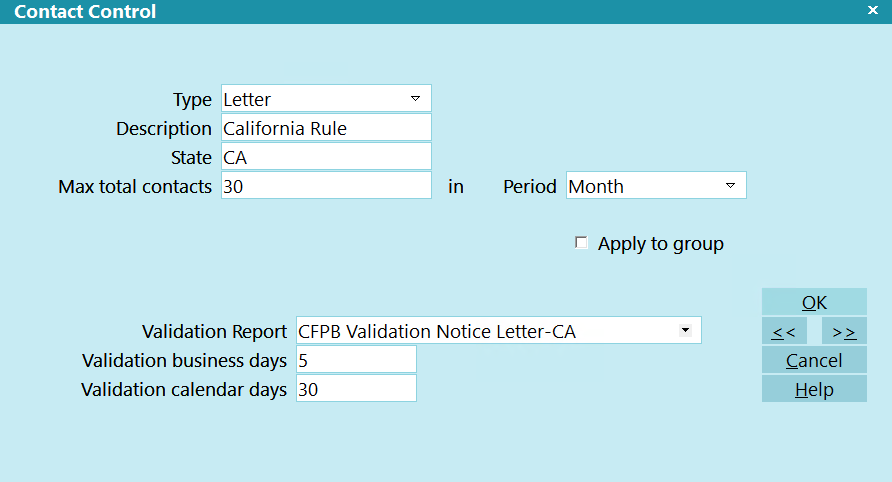
Contact Control - Letter, Text, and Email
Validation Report
If you have specified a Validation Report here or in a
Company Details record, then when a letter is sent to a Debtor
(Contact marked done via print, email, or text), Collect! will
update the Validation Date on the Debtor form with the send date
plus the number of business and calendar days specified below
or the Contact Control record.
Example, if you specify Letter 1 for the Validation Report,
5 business days, and 30 calendar days, then when Letter 1
is printed, Collect! will take the current date, add 5
days (excluding Saturday, Sunday, and holidays), then add
30 days (including weekends and holidays).
Collect! will use a near match on the name in order to
accommodate cosigner and language variants of the notice.
Please refer to the Help topic
How To Send The Validation Notice for more information.
Validation Business Days
The number of business days (excluding Saturday, Sunday, and
holidays) to use when calculating the Validation End date.
Validation Calendar Days
The number of calendar days (including weekends and holidays)
to use when calculating the Validation End date.
Fields Only Visible With Type Text
SMS Reauth
The number of days where a texting number will expire. The last
re-authorization date for texting numbers is stored on the phone
record. When that date goes beyond the number of days in this
field, users will be notified that the the number needs to be
re-authorized.
Create A Contact Control
Contact Control - Phone
- Navigate to System -> Contact Management Settings -> Contact Controls.
- Click NEW.
- Select the Contact Type that the control will apply to.
- Optional: fill in a Description. This is useful if you have multiple rules for the same
type.
- Optional: fill in the State. A Blank state will assume the rule applies to all states.
- Optional: fill in the Country. A Blank country will assume the rule applies to all
countries.
- Fill in the Maximum Number of Times an account can be contacted by this type.
- Select the Period that the maximum applies to.
- Check the Apply to Group box, if this control should factor in all group members.
For Cosigners, Collect! will check for Cosigners within the Debtor Group that either match on
SSN or match on Phone or Email.
Phone Type
- Fill in the Legal Calling Times, if applicable.
- Fill in the Hold for, if applicable.
For calling, this refers to Right Party Contact. If you make contact with the Debtor or
Cosigner, and this field is populated, then the control will warn you if you try to make
another call with the number of days specified. For example, if you enter 7, then when you
make an RPC, then you will warnings until after 7 days have passed to prevent calling too
early.
- Fill in the Call Attempt Types and the Call RPC Types.
These are a comma-separated list of the numeric pick list values on the Call Result field.
Default Call Results On Contact Form
0 : None specified
1 : Left Message on Machine
2 : Left message with person
3 : Debtor not in - call back. No message.
4 : Spoke to debtor. Verified right party.
5 : Wrong number / debtor unknown.
6 : NIS
101: Manual dial: right party contact
102: Manual dial: pick up, hung up
103: Manual dial: debtor in, unavailable
104: Manual dial: debtor not in, call back
105: Manual dial: machine answer, left msg
106: Manual dial: machine answer, no message
107: Manual dial: left message with person
108: Manual dial: no answer
109: Manual dial: busy
110: Manual dial: call did not go through
111: Manual dial: wrong number/debtor unknown
112: Manual dial: not in service
113: Dialer: transfer to operator
114: Dialer: unknown call result
115: Dialer: transfer-operator, wrong number
116: Dialer: answered, hung up
117: Dialer: answered, system terminated
118: Dialer: answered, voice mail
119: Dialer: no answer
120: Dialer: busy, no machine
121: Dialer: machine, delivered
122: Dialer: machine, not delivered
123: Dialer: fax machine detected
124: Dialer: cancelled, incomplete number
125: Dialer: cancelled, compliance reasons
126: Dialer: cancelled, do not call
127: Dialer: call failed, technical reasons
128: Dialer: cancelled broadcast or blank num
All Other Contact Types Types
If applicable, fill in the Model Validation fields.
 WARNING: These are an override of the Company Detail form. You would only fill in here if you have
different requirements on a state by-state-basis.
WARNING: These are an override of the Company Detail form. You would only fill in here if you have
different requirements on a state by-state-basis.
For texting, if applicable, fill in the SMS Reauth field. This links to a report writer command that
you can put in a report to tell you when Texting numbers are coming due for renewal. This is useful
if your region requires you to check that SMS numbers are still valid and not reassigned.
Using Contact Controls
After controls are created, Collect! will have some functionality based on the control's contact type.
Calling
When you open a Debtor or Cosigner:
- If the account is not in violation of a control, then the number of attempts and number of RPCs
will populate with the applicable counts, based on the Call Result types specified above.
- If the account is about to be in violation, the number of attempts and number of RPC fields
will change to the warning color.
- If the account is in violation of a control, then the operator will receive a popup warning to
let them know that the account is out of compliance. A note line is also written to the account
stating that the operator was notified. This is for auditing purposes.
If you have Operators who should not receive the compliance warnings, then you can go to
their operator profile and on the Operator Detail tab, select the applicable Exclude
Contact Control boxes.
- If the account is in violation of a control, and you try to use the Autodialer module to do a
Click to Dial, then you will receive a Yes/No prompt asking if you want to proceed with the
call.
- If the account has explicitly requested a call back, then you can open the applicable phone
record and Click the RPC Override button. This will prompt you for the call back date. Once
done, Collect! will create a Phone contact on the account with a flag that will disable the
contact controls until the call is made.
Lettering And Emailing
When batch letters are being printed or emailed, any accounts that are out of compliance will
automatically be skipped.
Manually printed/emailed letters will give the user a popup message indicating that the letter
is being skipped due to compliance.
Texting
At present, all texting from Collect! is done via 3rd Party tools and Collect! reports. To enable
contact control checking for SMS, we recommend adding @CCTEXTOK to your reports. See below for more
information.
Contact Controls In The Report Writer
Several Report Writer commands exist for compliance checking that needs to be done in processes that
are outside the Collect! programming. For example: texting, dialer lists to external dialers, custom
letter service exports.
Below is a list of the commands and a description for each of them. For syntax and implementation,
please refer to the Help topic How To Use The Report Writer Commands for more Information.
@CCCALLOK enables you to populate a variable with either a 0 (FALSE) or 1 (TRUE) on whether or not
the record passed in can be called.
@CCTEXTOK enables you to populate a variable with either a 0 (FALSE) or 1 (TRUE) on whether or not
the record passed in can be texted.
@CCLETTEROK enables you to populate a variable with either a 0 (FALSE) or 1 (TRUE) on whether or not
the record passed in can be lettered.
@CCEMAILOK enables you to populate a variable with either a 0 (FALSE) or 1 (TRUE) on whether or not
the record passed in can be emailed.
@CCSMS enables you to populate a variable with either a 0 (FALSE) or 1 (TRUE) on whether or not
the record passed in is compliant with the SMS Reauth value on the Contact Control record as of the
Date that was passed in. This function is not to determine if an account can be Texted, rather it is
to determine if the phone number was Authorized for texting at that point.
@CCTZCALL enables you to populate a variable with either a 0 (FALSE) or 1 (TRUE) on whether or not
the record that is active is within the Legal Calling Times.
This command is requires the Debtor or Cosigner to be Active, so it cannot be used with SQL
unless the result loop as a @de or @dc loop embedded in it. This command is useful for
Control Files where you want to add extra proceses than the prompt and note line that is
built-in to Collect!.
@CCVALDATE enables you to populate a variable with the date of the end of the Validation Period.
This command is used in the stock Model Validation notice.
@CCATTEMPTS enables you to populate a variable with the number of attempts if the as of the date
that is passed in.
@CCRPCS enables you to populate a variable with the number of RPCs if the as of the date
that is passed in.
| 
Was this page helpful? Do you have any comments on this document? Can we make it better? If so how may we improve this page.
Please click this link to send us your comments: helpinfo@collect.org