How To Create An Import Map
This document will step you through the creation of a simple
multiple record import map. It requires familiarity with
the use of Collect!'s Client, Debtor and Transaction forms.
Collect!'s import module is a very powerful tool for importing
and exporting data between Collect! and other databases.
The import process uses an import map and a file that
contains data to import. The file to import must be in a
format that the importing function can read.
For this example, we will use a *.csv file to
import data into Collect!. This is a straightforward, "comma
separated" file. This means that each piece of data (field) is
separated from the next by a comma. This makes it easy for
the parsing mechanism to determine where a field ends and
the next field begins. A consistent accurate file is necessary.
 If your file is not a *.csv file, you may be able to open it
in Excel and save it as a *.csv file. Sometimes,
this is necessary for cleaning up the data before
the import routine is started.
If your file is not a *.csv file, you may be able to open it
in Excel and save it as a *.csv file. Sometimes,
this is necessary for cleaning up the data before
the import routine is started.
Let's assume that you have a *.csv file to import. Create a
sample *.csv file as follows to use for this exercise.
CSV Sample File
In Ultra Edit or Notepad, create the following file and save it
as "sample.csv" file. Take note of the path of where you
save it as we have to locate it later. Example: save
to your Desktop if your network permissions allow or to a shared
folder accessible on your network.
"Client Name","Debtor Name","Charged","Principal Amount"," Payment Date","Payment Amount"
"Ernst Co.","Smith","01/01/2001","1000","04/01/2001","10"
"Fred's Co.","Aaron","03/01/2001","2000","05/01/2001","200"
You will notice that this is simply a text file. However, if you
open it in MS Excel, each "field" will become its own column.
This is because the comma is read as a flag to alert MS Excel
that this is a new field. This is the same thing that happens
internally in Collect! when the import function reads this file. It
knows when the fields change by looking for the next comma.
Pay special attention to the first line of this file. These are the
names of the fields in each record. Although these fields are
linear, in Collect! they actually represent several records that are
in a hierarchical (tree) structure. The first field, "Client Name", will
be imported to the Client record. The next three fields, "Debtor
Name", "Charged", and "Principal Amount" will be imported to the
Debtor record. The last two fields, "Payment Date" and "Payment
Amount" will be imported to the Transaction record.
 The field/column count is not retained across records.
In reality, the count is restarted on each new
record definition.
The field/column count is not retained across records.
In reality, the count is restarted on each new
record definition.

Record Hierarchy
In a Collect! database, records have "owners." This determines
the hierarchy of the data. For instance, Debtors are owned by
Clients. Transactions are owned by Debtors. This is very
important to consider when you are creating an import routine. It
is used in your import map design and will control how data is
imported and connected to the proper record. Owners are imported
before the records that they own. In our sample, clients are
imported before debtors and debtors are imported before
transactions.
Import Clients
In our example, the "highest" field in the hierarchy is the
Client Name, since Clients own Debtors. The rest of the
information to be imported is at the Debtor and Transaction
level.
So, let's begin our exercise by building an import map to
bring these new clients into your database.
Please perform this exercise in your
demonstration database!
1. Sign into Collect! and stop at the Main Menu. Select File from
the top menu bar and then select Import/Export from the
drop-down choices. This will display the Import/Export submenu.
2. From the Import/Export submenu, select Customize Import/Export,
then select Edit File Format. You may see a list of import map
examples that are already in your database, especially if you
are performing this exercise from the demonstration database,
as recommended.
3. Press F3 to open a new form for our import map.
4. Type CSV Sample in the field
labeled Name.
5. Select 'Comma separated'. You can press F1 for help on
the fields in this form. We will not use any of the others for
this exercise.
6. Click into the Import Record Definition subform to activate it
or press F5.
7. Choose 'Yes' to create our first Record Definition.
We are going to create a Client record definition since Clients
own Debtors. To attach imported Debtors to the right Client,
we have to import the Clients first. Then the import routine
will be able to attach the Debtors correctly, later on in
our example.
Client Record Definition
In this simple example, we are only going to import the
Client Name. In an actual import map, you may have to
import other client information as well. You should now
be looking at the Import Record Definition form.
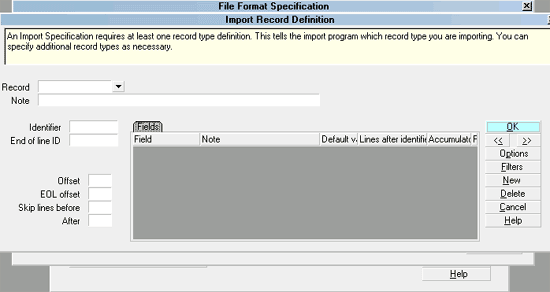
Import Record Definition form
1. Click the down arrow next to the field
labeled Record to view the pick list.
You will see the list of all types of records that you can
import and export using the import module. Remember that
at any time, you can press F1 for details about the form
or list you are viewing.
2. Choose Client from the Record Type list. Choose 'No' to
refrain from entering all the fields from the Client form into
your import map.
3. Click into the Import Field Specification subform or
press F5. Choose 'Yes' to create the specifications for the
fields that we want to enter. In our example, we only have
one field from the Client form - the Name field.
Client Name Field Specification
We are only importing the Client Name in our example, so
we only need one Field Specification.
1. Click the down arrow next to the 'Field' field.
You will see the list of all types of fields from the Client form
that you can import and export using the import module.
2. Choose Name from the Field Type list. The list of fields
depends on the type of record you are defining. Later on,
when we setup the import map for debtors, you will notice
different choices displayed in the Field Type list.
3. Switch ON Use as key to find existing.
Press F1 for help explaining the use of this important
setting.
4. Next, select Import Options. Switch ON First line
contains labels with a check mark. Select OK
to close the Import Options form.
5. Select OK or press F8 to save your settings and exit
the Field Format Specification form.
6. Select OK or press F8 to save your settings and exit
the Import Record Definition form. You should be looking
at the File Format Specification form.
Try Out The Import Map
Let's try out what we have designed so far. It is a good
idea when you are building a routine, to test it at various
stages. This will confirm that it is behaving as you expect
and you can build the next part confidently.
1. You should be looking at the
File Format Specification form. Click on the Import
button. The Import menu is displayed.
2. Click on the down arrow next to the File Format field.
The File Format Specification list is displayed. Our Csv Sample
is a new item in this list.
3. Select Csv Sample.
4. Select the Browse button next to the File Name field and
navigate to the location where you saved sample.csv.
5. Select sample.csv and select OK.
6. Press the Import button. You will see the first record that
is being imported.
Examining Records As They Are Imported
When you import records, it is very important to examine the
results that you are getting. For this reason, the import
routine pauses as each record is imported. This gives you an
opportunity to refuse the record, cancel the import or proceed.
1. You are now looking at the first record being
imported. As you can see, it is the very first line in
your CSV file. Each separate line is treated as a
complete record.
2. Notice at the bottom of the Collect! screen that you are
being prompted for a response. In white letters, you will
see 'Add Client? (Yes/No/All/Cancel)' Do not choose
anything yet!
You have four choices:
Yes: [y] accepts the record.
No: [n] refuses the record.
All: [a] runs the whole import without any
more prompts.
Cancel: [c] aborts the importing routine.
3. The record that you are looking at is the first actual line
with data in our sample.csv. The line containing field headings
was skipped because we switched ON First line
contains labels."
4. We want to accept this, so choose 'Yes' by pressing
the y key on your keyboard.
5. Press the y key on your keyboard to accept
the next record as well. You will now see a summary of the
import results.
6. Notice that two clients have been imported.
If this were a real import routine, you would probably
want to examine a few more records in this fashion before
pressing the a key to allow the import to
carry on automatically without your assistance.
Select Browse from the top menu bar and then
select 'Clients' from the drop-down choices. Locate and
delete the two records that we imported to prepare for the
next part of this exercise.
Import Debtors
Now we will create a record definition for the Debtor fields
and add it to our import routine. Be sure you have removed
the two imported clients from the list of all clients, before
you proceed. We will enter them again when we run this
part of the import.
1. At the Main Menu, select File from the
top menu bar and then select Import/Export from the drop-down
choices. This will display an Import/Export submenu.
2. From the Import/Export submenu, select
Customize Import/Export, Edit File Format.
You will see a list of import map examples that
includes our CSV Sample.
3. Select the CSV Sample item to open the import map that
we are working on.
4. Notice that Client is an item in the Import Record Definition
subform. We will add a new record definition for Debtors.
5. Press F5 to activate the Import Record Definition subform.
6. Press F3 to create a display a new blank Import Record Definition
form.
In the record hierarchy, our next level is Debtors. Debtors are
owned by Clients and we have created a Client
Import Record Definition already. In turn, Debtors own
transactions, attachments, contacts, and notes. In our simple
exercise, the information we are import mapping at this stage
is for fields on the Debtor form.
Debtor Record Definition
You should now be looking at a new Import Record Definition
form.
1. Click the down arrow next to the field
labeled Record to view the pick list.
You will see the list of all types of records that you can
import and export using the import module.
2. Select Debtor from the Record Type list. Choose 'No' to
refrain from entering all the fields from the Debtor form into
your import map.
3. Click into the Import Field Specification subform or press F5.
Choose 'Yes' to create the specifications for the fields that we
want to enter.
Debtor Field Specifications
We are importing three fields in the Debtor form - Name,
Charged and Principal. We will need a Field Specification for
each one. It is also necessary to make sure that the import
map knows that Debtor information starts in the SECOND
column of our sample.csv. To do this, we will enter a BLANK
field specification for the first field.
1. When you are looking at the new blank
Field Format Specification form, press F3. This will
save a blank Field Specification to your Import Field Specification
list to allow for the Client Name in the sample.csv file.
2. You will be looking at a new blank Field Format Specification
form. Click the down arrow next to the field labeled Field
to view the pick list. You will see the list of all types of fields
from the Debtor form that you can import and export using the
import module.
3. Select 'Name' from the Field Type list. Notice that this Field Type
list now contains all the fields that you can use from the Debtor form
whereas previously, it contained fields from the Client form.
4. Press F3 to display a blank Field Format Specification form
for the next field.
5. Click the down arrow next to the 'Field' field.
6. Choose 'Charged' from the Field Type list.
7. Press F3 to display a blank Field Format Specification form
for the next field.
8. Click the down arrow next to the 'Field' field.
9. Choose 'Principal' from the Field Type list.
If we were adding other fields from the Debtor
form, we would continue these steps until we had created
a Field Format Specification for each one of the fields as
needed.
Select OK or press F8 to save your settings and exit the
Field Format Specification form. You will now notice a list
of field specifications in the Import Field Specification list.
The first item should be a blank line to allow for the
Client Name in the sample.csv file.

Debtor Import Record Definition
Click OK or press F8 to save your settings and exit the
Import Record Definition form. You should be looking at the
File Format Specification form.
Try Out The Import Map Again
Let's try out what we have designed so far.
1. You should be looking at the File Format Specification
form. Select the Import button. The Import menu is displayed.
2. Click on the down arrow next to the File Format field.
The File Format Specification list is displayed. Our CSV Sample
is the newest item in this list.
3. Select CSV Sample.
4. Select the Browse button next to the File Name field and
navigate to the location where you saved sample.csv.
5. Select sample.csv and select OK.
6. Press the Import button. You will see the first record that
is being imported.
Please refer back to the section "Examining Records As
They Are Imported" details about this procedure.
Examining Debtor Records As They Are Imported
The import routine differs now that you have a debtor
record definition. Each time the import function encounters
a client, it will then begin to enter debtors for the client.
You will be prompted when each new record is imported.
Use the prompts to view each record as it is imported so
that you can watch the procedure. Do not choose 'All'
during this exercise.
When the routine is completed and the summary is shown,
select OK. Choose 'No' when asked to Recalculate Debtors.
Choose 'No' when asked to Sort Debtors.
Viewing The Imported Records
Collect! tags all records as they are imported. Therefore,
you can quickly view all the records that were just imported.
1. Select Browse from the top menu bar
and then select 'All Debtors' from the drop-down choices.
The list of all debtors is displayed.
2. Select Edit from the top menu bar and then
select 'View Tags' from the drop-down choices. Now
you are looking at all the records that you just imported.
Transaction Information
The final part of this import exercise deals with importing
transaction information. You will notice in our sample.csv
that the last two fields contain information from transactions.
Debtors own transactions in our record hierarchy. So we
will create an Import Record Definition for transactions as
our final exercise.
Once again, it is necessary to delete the information that
we imported so that we can start with a fresh experiment.
So please locate the debtors that were entered and delete
them. Then delete the clients that were entered.
Import Transactions
Now we will create a record definition for the Transaction fields
and add it to our import routine. Be sure to remove the clients
and debtors that we imported before you proceed. We will enter
them again when we run this part of the import.
1. At the Main Menu, select File from the top
menu bar and then select Import/Export from the drop-down
choices. This will display the Import/Export submenu.
2. From the Import/Export submenu, select
Customize Import/Export, then select Edit File Format.
You will see a list of import map examples that
includes our CSV Sample.
3. Select the CSV Sample item to open the import map that
we are working on.
4. Notice Client and Debtor in the Import Record Definition
subform. We will add a new record definition for Transactions.
5. Press F5 to activate the Import Record Definition subform.
6. Press F3 to create a display a new blank
Import Record Definition form.
In the record hierarchy, our next level is Transactions. Transactions
are owned by Debtors. The information we are import mapping at
this stage is from fields on the Transaction form.
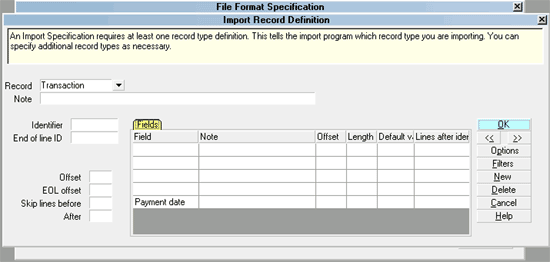
Transaction Record Definition
You should now be looking at a new Import Record Definition form.
1. Click the down arrow next to the 'Record' field.
You will see the list of all types of records that you can import
and export using the import module.
2. Choose Transaction from the Record Type list. Choose 'No' to
refrain from entering all the fields from the Transaction form
into your import map.
3. Click into the Import Field Specification subform or press F5.
Choose 'Yes' to create the specifications for the fields that we
want to enter.
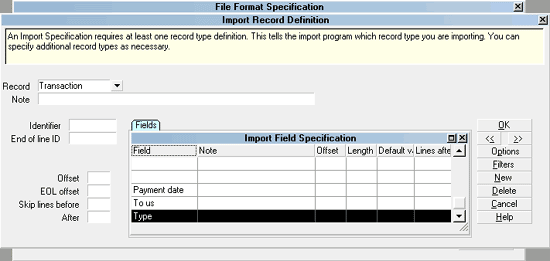
Transaction Field Specifications
In our sample file, there are two fields from the Transaction
form - Payment Date and Payment Amount. We will build
the specifications for these fields now. We will need a Field Specification
for each one. It is also necessary to make sure that the import
map knows that Transaction information starts in the FIFTH column
of our sample.csv. To do this, we will enter FOUR BLANK field
specifications to skip over the fields in the Client and Debtor form.
1. When you are looking at the new blank
Field Format Specification form, press F3. This will
save a blank Field Specification to your Import Field Specification
list to allow for the Client Name in the sample.csv file.
Press F3 three more times to allow for the Debtor fields.
2. You will be looking at a new blank Field Format Specification
form. Click the down arrow next to the 'Field' field. You will see
the list of all types of fields from the Transaction form that you
can import and export using the import module.
3. Choose 'Payment Date' from the Field Type list. Notice that
this Field Type list now contains all the fields that you can use
from the Transaction form.
4. Select the Date Options button to open the
Import Field Date Format dialog.
5. Enter the following settings for your date options:
Select MMDDYY.
Switch ON Day leading zero.
Switch ON Month leading zero.
Place a [/] in Date separator.
Press F1 for help on the fields and format
selections available on this form.
When you are finished, select the OK button to close the
form and return to the field's specification form.
6. Press F3 to display a blank Field Format Specification
form for the next field.
7. Click the down arrow next to the 'Field' field.
8. Choose 'To Us' from the Field Type list. For this exercise,
we will assume that this is an ordinary Payment to a Net account.
9. Press F3 to open a new Field Format Specification form for
a default value that we will create next.
Default Values
Up to now, to keep this exercise simple, we have only
referenced fields that come from our sample.csv and relate
to fields in Collect!. Sometimes, you will want to set default
values for other fields as you import records. For instance, you
may want to sent the Debtor Mode to Active when you import
Debtors. Right now, we have to give our transactions a
default type since this is not contained in the sample.csv
and all transactions in Collect! must have a type.
1. You should be looking at a new blank
Field Format Specification form. We are still defining our
Transaction Import Record Definition. However, we are
now going "beyond" the fields in the sample.csv to
reference fields in the Transaction form in Collect!
2. Click the down arrow next to the 'Field' field.
3. Choose 'Type' from the Field Type list. For this
exercise, we are assuming that this is an ordinary
Payment.
4. In the field labeled Default value, type
in "101" which is Payment By Check.
5. Select OK or press F8 to save your settings and exit the
Field Format Specification form. You will now notice a list
of field specifications in the Import Field Specification list.
The first four items should be blank to allow for the Client
and Debtor fields in the sample.csv file.
Transaction Import Record Definition
In the next screen shot, we have scrolled down in the list to
show the last three items, including our default value.
Default Values In Field Specifications
6. Select OK or press F8 to save your settings and exit the
Import Record Definition form. You should be looking at the
File Format Specification form. Notice that the three record
definitions are now listed in the Import Record Definition subform
in the order in which we want to import them (according to the
record hierarchy we spoke about before.)
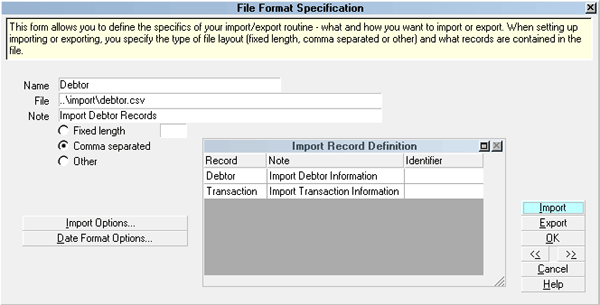
File Format Specification form
Run The Import
Now we are ready to run the completed import routine.
1. You should be looking at the File Format Specification
form. Click on the Import button. The Import menu is displayed.
2. Click on the down arrow next to the File Format field. The
File Format Specification list is displayed. Our Csv Sample is a
new item in this list.
3. Select CSV Sample.
4. Select the Browse button next to the File Name field and
navigate to the location where you saved sample.csv.
5. Select sample.csv and select OK.
6. Press the Import button. You will see the first record that is
being imported.
Please refer back to the section "Examining Records As They
Are Imported" for details about this procedure.
Examining All Records As They Are Imported
The import routine differs once again now that we have
three level of records from our record hierarchy being
imported at once.
Each time the import function encounters a client, it will
then begin to enter debtors for the client.
Each time the import function encounters a debtor, it will
then begin to enter transactions for the debtor.
You will be prompted when each new record is imported.
Use the prompts to view each record as it is imported so
that you can watch the procedure. Do not
choose 'All' during this exercise.
When the routine is completed and the summary is
shown, select OK. Choose 'No' when asked to
Recalculate Debtors. Choose 'No' when asked to Sort Debtors.
You can view the imported debtors as described above.
Import Settings Optional Switches
If you are wondering which optional switches you should
set for a field in your import map, do not set any to start
with. Only add fancy stuff after you have a functioning
framework. Start small with the first record and only expand
after that is working correctly. This is Logic 101, and you
must prove each step in the equation as you build it.
For instance, for the settings "must be filled" and "fail
cancels field", accept the defaults unless you really
must choose these settings.
As for "preserve existing" and "append with spaces" and
other settings in the field specifications, don't add these
without a basic working frame in place. Personally, I wouldn't
set any append flag on a city field for example. Do you really
want two city names, one after the other?
Summary
You have just completed your first import! Although we
imported a simplified file, you have successfully completed
all the major steps to an actual import routine. As you
can see, taking this step by step in the correct order, you
can quickly and accurately bring volumes of data into
your database.
Remember to start simple and test your results
along the way.
Always test your import map on a sample database
or a copy of your masterdb.
Never run your import on a live database until you are
sure it is performing correctly in every area
Backup your database before importing records
into it
See Also
- Import/Export Topics
|
Was this page helpful? Do you have any comments on this document? Can we make it better? If so how may we improve this page.
Please click this link to send us your comments: helpinfo@collect.org