How To Upgrade Collect!
This topic discusses upgrading prior releases of Collect! to the latest release.
To download updates, please login to the Collect! Member Center and download the installer file. If you are not currently a
Member and would like to inquire about upgrading options, please contact us.
It is recommended that you have a recent backup of your Collect! system prior to any upgrade procedure.
Version 12
If you are running version 12, then the Version 12 to Version 12 update is simply a patch.
These instructions apply to 12.1 or later.
On Your Server:
1. Ensure you have an operator in your database at User Level 99 and you know their password (user 99 exists by default)
2. Ensure all users are logged out of Collect!
3. Make sure that there are no open files (see below).
4. Run the collect_12.x.x.x.exe on your server or workstation that you are patching.
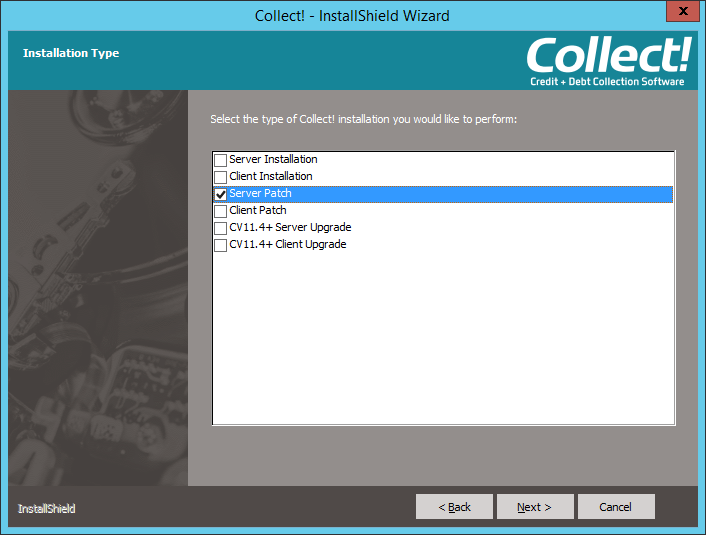
5. On the Installation Type screen, select the applicable patch (Server/ Client) that you are running and follow the
prompts to direct it to your Collect! installation (for example, C:\Collect). Do not run a server patch on a
client install, and vice versa.
Installation Type
6. On your SERVER, start Collect!, click SUBMIT on the splash screen to get to the " Welcome to Collect!" screen.
7. Select START to the update process.
8. Click EXIT on the Signon Form. Do NOT sign into a database, yet.
9. Repeat steps 7 and 8 for all remaining databases.
10. Check the sections below starting here for any troubleshooting
that needs to be done.
Upgrading from 12.4 or lower?
12.5 contains 3 significant changes:
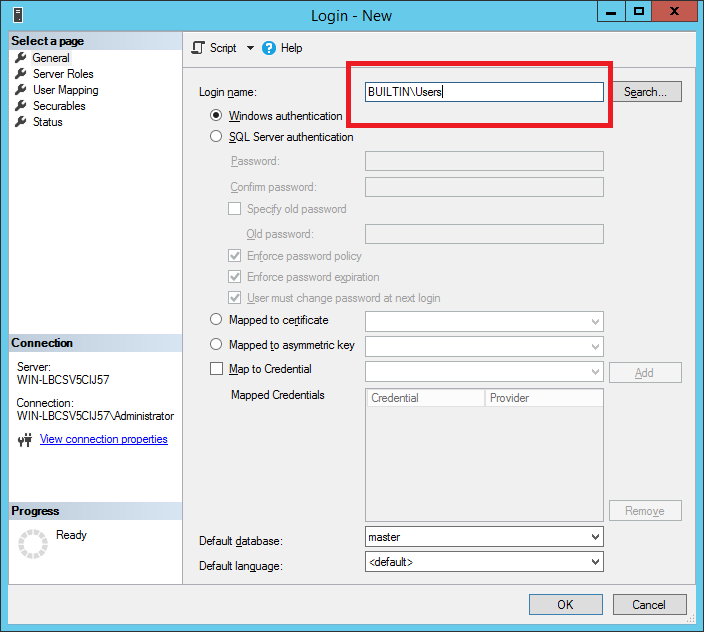
1. The Database Connection is now managed at a domain level, so in order to connect to the server, you need to make sure
that SQL server has the account for 'BUILTIN\Users' added and the server role set to sysadmin. Optionally, you can setup
your own accounts and database security.
SQL Builtin\Users Account
2. The Log Files, including CBR have been moved out of the bin folder and into the Collect\Log Files folder.
3. Notes are no longer stored as binary text. They are now stored as individual records. If you have more than 100,000
clients and debtors combined when upgrading from 12.4, you will be prompted as to whether or not you want to convert the notes.
Converting the notes is a timely process, so you can elect to say NO. If you do select no, Collect! will automatically convert
the notes from Blobs to Note Line Records as you work debtors. When you apply your next patch, Collect! will automatically
convert the remaining notes without prompting. If you are using web host and want to update to the latest version of
web host, you will need to convert your notes before updating web host.
For all of the above reasons, you need to take a FULL backup of the Collect! folder and databases before applying the patch.
You also need to ensure that SQL server is configured properly so your users can sign in.

Troubleshooting A Version 12 Patch
Operating System Held on to Open Files
Applying an upgrade patch may fail if your Server's Operating System is holding onto sessions and files.
Please ensure that all sessions and files are closed. To ensure that all sessions and files are close, Reboot your actual
server before continuing with patch instructions. Or, if you can:
1. Right-click My Computer and select Manage or rights-click the Start button and select Computer Management.
2. Select Shared Folders and open it.
3. Select Open Files and review for any files open in Collect. Collect!\bin folder. (Windows 2008 server is: Administrative
Tools Share and Storage Management Actions Manage Open Files.)
4. Highlight the files, then right-click and select Close Open File.
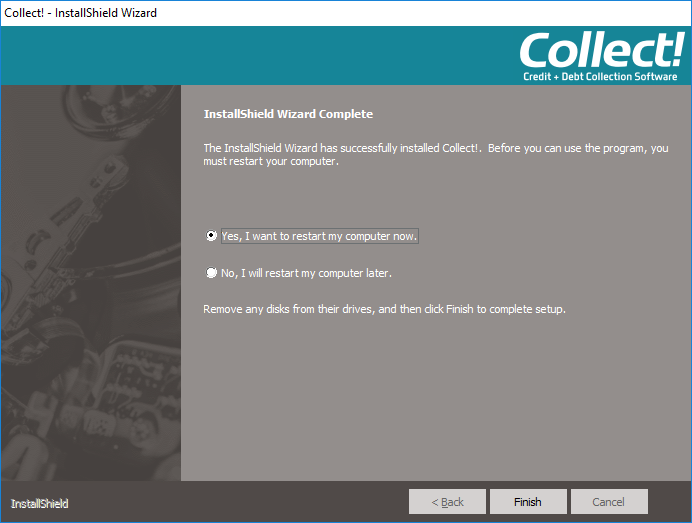
In some cases, if files were in use, the installer will prompt you to reboot your server.
Reboot Your Server After Applying the Patch
Collect! Companion Server Didn't Shut Down Properly
If the patch gives an error indicating that you have to abort, this is also a sign of files are in use. Please refer to the
above instructions. This message may also indicate that the Collect! Companion Service didn't shut down properly during the
patch. Here are the instructions to manually shut it down.
1. Navigate to the server's Services via the Control Panel or the Task Manager.
2. Right-click the 'Collect! Companion Server' and select Stop.
3. Apply the patch.
4. Right-click the 'Collect! Companion Server' and select Start.
Click here for other troubleshooting topics.

Upgrading From Version 11 Or Lower
The below instructions are related to upgrading Collect! from a prior release. Major Collect! upgrades are a paid upgrade.
Please contact sales@collect.org for pricing.

Preparing Your Raima Databases For Upgrading
This section is specific to upgrading any version of Collect! running the Raima database (Version 11 and lower).
Perform these steps on your Server!
 Before you attempt a major upgrade to a current shipping version, you need to confirm whether the hardware you want
to run it on is sufficient to perform well with the higher resource requiring software.
https://www.collect.org/solutions/
Getting Your Databases Ready
There are a few important tasks to complete in preparing for the upgrade. The first three can be completed in any order before
proceeding to the final step. Do not skip any step.
First, run a full internal maintenance on all your existing databases, ensuring that all options are switched ON.
To do this:
1. Sign into your database as an Operator with user level 99.
2. Select File from the top menu bar and then select Maintenance from the drop-down choices.
3. When the Database Maintenance screen is displayed, select the CONFIGURE button and ensure that all options are switched ON
with a check mark.
4. Select the RUN FUNCTION button to run the Maintenance.
5. Ensure that the process completes with no errors.
6. Due to financial changes that you might see, you must do a full RECALC of your database on the same day that you do
your upgrade. This ensures that all financials are up to date.
7. Backup your entire Collect! folder that your current version is stored in, all folders and sub-folders..
Saving onto another drive with a different name (i.e. Collect_Old) or onto an proven, safe external device is recommended.
This will dramatically speed up the time for rollback should there be any reason to restore your last working version,
i.e. power outage during your upgrade.
 WARNING: Do NOT use an incremental type backup as your pre-upgrade rollback safety net.
Incremental backups only write files which have changed since the last time you backed up your files. It can require access to
months worth of backups to restore a system fully when this is the method of backup used. In addition to being extremely time
consuming (down time for your office), there are often missing backups causing loss of data and file integrity.
8. Collect! parses your transaction types when updating your accounts. Please examine your list of transaction types prior to
the upgrade and correct any transaction types that have duplicate code numbers. During the upgrade, Collect! will keep only the
first instance of any transaction type and delete any others that share the same code number. This may produce unexpected results
Collect! uses default transaction types for updating your financials. These transaction types are created automatically for you
during the upgrade if they are not already in your database.
If you are already using any of the default transaction types in your database for other purposes, Collect! will renumber the
transaction type and any transactions that use the code.
9. Plan your upgrade so that you have enough time to (a) complete it along with all the preliminary steps AND (b) enough time
to restore from your backup in the event there is a reason to need to rollback.
If you are unsure of doing any of above-noted steps, please do not attempt to upgrade. Please ask your local
technician to help you through the process, or coordinate with our office to assist. Technical Services can quote you a price
to assist with the process as well as undertake to do the process for you. Pricing is determined by degree of upgrade, how
current/fast is your hardware, how much of the upgrade are we doing, in what hours are we doing it. Please be advised that
major manual upgrades must be done by appointment, not on demand, due to the preliminary steps, stages and time to complete.
Upgrading Multiple Databases
If you have more than one working database to upgrade, please prepare each database as described in the steps above. Make sure
the necessary transaction types are in the database. Do a thorough maintenance on each database. On the day you intend to
perform the upgrade, recalc all totals for each database, and then backup the database and store the copy safely.
For version 10 and higher, Collect! will automatically upgrade all registered databases. For Version 8, Collect! will only
prompt you to upgrade the Master, Demo, and Pros databases. If you have others, please contact us for assistance.

Installing Ms SQL Server On The Server
You will need to obtain the installation media from microsoft.com. MS SQL Server Express supports up to 10GB of data for free.
If your database is larger than that, you will need to contact an MS reseller to obtain a license. For the purposes of Collect!,
the Standard edition will do. You will need the following installation media:
- Database Server (MS SQL Express)
- SQL Server Management Studio
For detailed instructions, please refer to the Help Topic How to Install Microsoft SQL Server

Version 11
Version 11.4 and higher
The version 11.4+ Upgrade process is a Patch, then export and import to SQL server. Please refer to the sections above called
Preparing Your Raima Databases for Upgrading and Installing MS SQL Server on the Server before proceeding.
On Your Server:
1. Ensure you have an operator in your database at User Level 99 and you know their password (user 99 exists by default)
2. Ensure all users are logged out of Collect!
3. Make sure that there are no open files (see below).
4. Rename the CV11 folder to 'CV12' or 'Collect' (optional, but recommended)
5. Run the collect_12.x.x.x.exe on your server or workstation that you are upgrading.
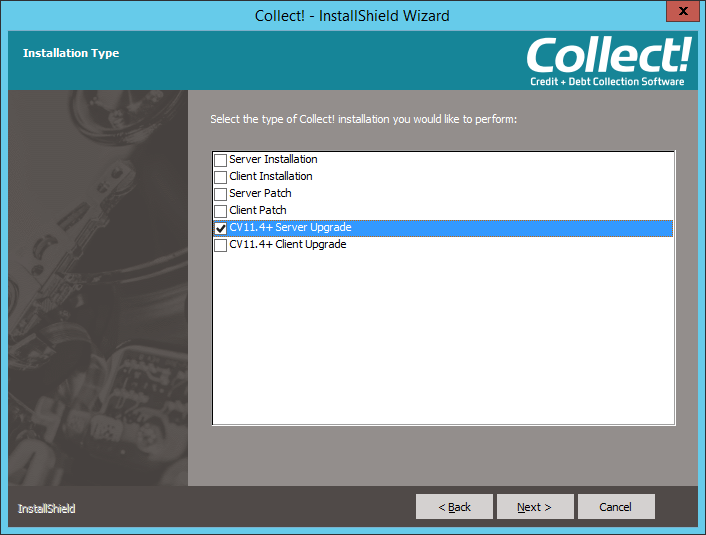
6. On the Installation Type screen, select the applicable patch (11.4+ Server Upgrade/11.4+ Client Upgrade) that you
are running and follow the prompts to direct it to your Collect! installation (for example, C:\Collect). Do not run a
server patch on a client install, and vice versa.
Installation Type
7. On the MSSQL Server Information screen, enter the IP Address, Port Number, and Instance Name of the server.
8. Start the Version 12 RDS by opening C:\Collect\bin\rds.exe. You may have to run this program as an administrator.
9. Create a Shortcut for Collect! (Collect\bin\cv12.exe) that contains '/rds' in the target (Collect\bin\cv12.exe /rds).
10. Start Collect! using the shortcut that you just created, click SUBMIT on the splash screen to get to the
" Welcome to Collect!" screen.
11. Select START to start the update process on your primary database.
12. Click EXIT on the Signon Form. Do NOT sign into a database, yet.
13. Repeat steps 11 and 12 for all remaining databases.
14. Proceed to Converting the Database SQL Server.
Version 11.0 to 11.3
Please refer to the sections above called Preparing Your Raima Databases for Upgrading and Installing MS SQL Server
on the Server before proceeding.
11.0, 11.1, and 11.2 require a patch to 11.2.17 before proceeding to the upgrade process. The patch and instructions can be
found here
11.3 requires that you be on 11.3.12 before proceeding. Please contact us for the patch file.
Alternatively, you can upgrade to 11.6 first using the instructions
found here then proceed to the
Version 11.4 and higher section above.
Once done, proceed to the Upgrade Process instructions.

Version 10
Please refer to the sections above called Preparing Your Raima Databases for Upgrading and Installing MS SQL Server
on the Server before proceeding.
Proceed to the Upgrade Process instructions.
Once done, review the section below entitled: Areas to Note When
Upgrading Version 8 Or Version 10.

Version 8
Please refer to the sections above called Preparing Your Raima Databases for Upgrading and Installing MS SQL Server
on the Server before proceeding.
Version 8.0.22 to 8.1
1. On the Credit Bureau Setup screen, ensure that "Use Metro2 Format" is selected.
2. Upgrade to the latest version of 8.2 as per the instructions
found here.
3. Proceed to the Upgrade Process instructions.
After the upgrade completes, you can sign into and run the Client Address update utility found under Tools\ Utilities\Client
Address Update. Address 3 in version 8 has been split out into City/State/Zip in the latest release. If you stored your
addresses in common format, then this utility can convert the addresses out properly and update your reports.
Once done, review the section below entitled: Areas to Note When
Upgrading Version 8 Or Version 10.
Version 8.2
1. On the Credit Bureau Setup screen, ensure that "Use Metro2 Format" is selected.
2. Apply the latest patch from the Member Center
for 8.2.
3. Proceed to the Upgrade Process instructions.
After the upgrade completes, you can sign into and run the Client Address update utility found under Tools\Utilities\Client
Address Update. Address 3 in version 8 has been split out into City/State/Zip in the latest release. If you stored your
addresses in common format, then this utility can convert the addresses out properly and update your reports.
Once done, review the section below entitled: Areas to Note When
Upgrading Version 8 Or Version 10.

Upgrade Process
Test your upgrade before going live. We will not issue a license code until you have done your diligence and tested
the upgrade. Click here for a checklist of what should be tested.
1. Make sure your Collect! RDS Server is shut down. To ensure that no files are being held by the operating system, reboot your
server.
2. Rename the old Collect! folder to Collect_upgrade (or CV8_upgrade/CV11_upgrade).
3. Install the latest Collect! computer. By default, Collect! will install to a cv12 directory. New shortcuts on your desktop
will be named "cv12". Please refer to the Help topic How to Install Collect! for more information.
4. CUT the Collect_old folder and paste it into the new Collect!\bin folder. Then rename the Collect_old folder to 'upgrade'.
You should have a directory similar to C:\CV12\bin\upgrade containing your old installation.
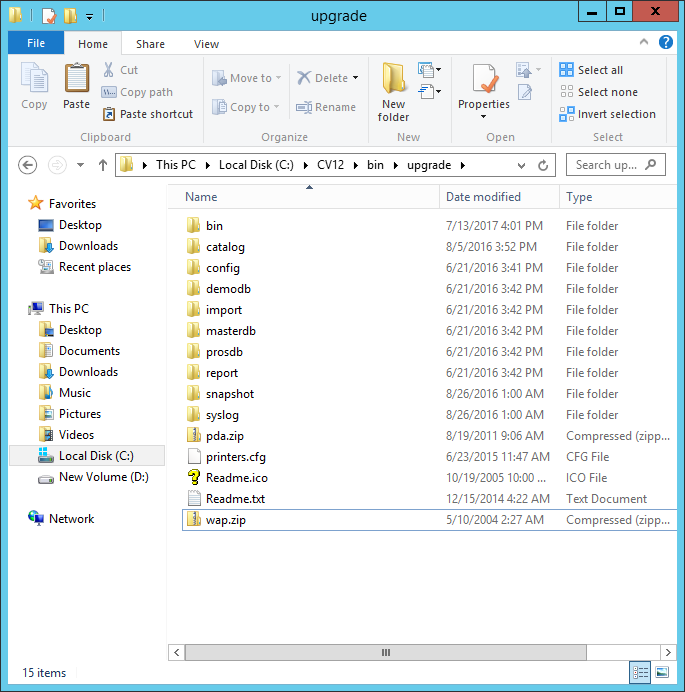
Upgrade Folder Contents for Upgrading
5. Start the Version 12 RDS by opening C:\CV12\bin\rds.exe. You may have to run this program as an administrator.
6. Create a Shortcut for Collect! (Collect\bin\cv12.exe) that contains '/rds' in the target (Collect\bin\cv12.exe /rds).
7. Start Collect! by opening the shortcut and sign in with an operator with user level 99. After you enter
your Company Name, Collect! will prompt you when it sees that you have a Collect! folder on your computer.
 You will have to create a shortcut to cv12.exe (or use the desktop one) and add " /rds" to the target, with the space,
but without the quotes.
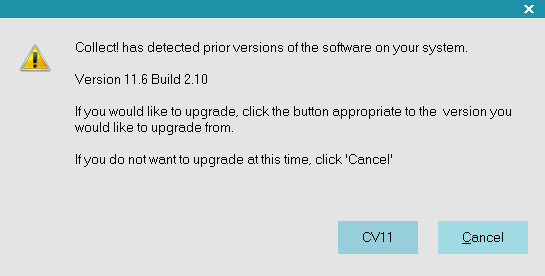
Prompt to Begin Automated Upgrade
8. Select the CV8/CV11 button to begin the upgrade process. For version 8, you will get a prompt to upgrade a specific database,
or all databases. If you have other databases besides MASTER, DEMO, and PROS, contact us for assistance. For version 10 and
higher, the upgrade process will do all databases. Collect! will proceed to copy and upgrade MASTER, DEMO, PROS. If you are
upgrading from 11.4 or higher, you will not see this screen.
 Depending on the size of your prior Collect! folder, this step may take a long time. Be patient, Collect! is copying al
l
of the files and folders from your old Collect! installation.
9. Sign into all databases to rebuild the lists.
10. Navigate to the Collect!\_migback\bin\global folder and copy the icons folder, then navigate to the Collect!\bin\global
folder and paste the icons folder.
11. Delete the Collect!\_migback folder.
12. Proceed to Converting the Database SQL Server.
Version 11 Migrate Utility
As the upgrade process proceeds, you will notice a lot of activity going on in the utility windows as Collect! copies and
"migrates" your database. Migrating is a procedure whereby the Version 11 databases are "reprogrammed" to work with the new
database engine.
Version 8 Export Utility
As the schema has significantly changed since version 8, the process of upgrading the database is to export the data, then
import it into the newer Raima database engine. You will notice an export window keeping a tally of the record counts that
have been exported as it proceeds.

Converting The Database SQL Server
1. Sign into each database with a user level 99 to export the database.
2. Under the File Menu, go to Import/Export, then Export Database.
3. In the options, select SQL Server. If you have any alternate Import or Report libraries, you can select this. You only need
to do it once, not for each database that you export.
4. Once you have exported all the databases, close Collect! and shutdown the Collect! RDS server.
5. Navigate to the Collect\sqlupgrade folder and run 'import.bat.' If it fails, run 'make.ps1' (PowerShell)
or 'make.bat' (Command Line).
 WARNING: If your database contains high ASCII characters (characters that don't fall into the standard US English alphabet),
you will need to modify the import.mssql file in the sqlupgrade folder to support UTF-8 characters. UTF-8 is only
supported in SQL Server 2016 or higher. When exporting the database, fill in the Codepage with the correct codepage
of the server. If you are unsure, then leave it blank and Collect! will output the system default.
6. The make.ps1/make.bat file will pre-fill with the selections that you entered when you installed Collect!.
Enter your SA password and type in YES (case sensitive) to proceed with the import.
7. When finished, contact use for a license. You are finished.
8. Check the sections below starting here for any troubleshooting that needs to be done.
 When you are finished, DELETE the export folders from the MASTERDB, DEMODB, and PROSDB folder. The files in the export
folder contains plain text copies of your data.

Troubleshooting
The below topics apply primarily to upgrading from version 11 or lower, but some may apply to version 12 updates.
Web Host
By default, the upgrade does not upgrade your web host to the latest version of web host. This is to preserve your
customizations. If you wish to upgrade to the latest web host, please refer to the Help topic
How to Upgrade Web Host for more information.
The latest release of Collect! uses form-based authentication instead of the older basic authentication. This requires a small
change to your login page. Please see the Help topic How to Upgrade Web Host for more information.
If you have your own SSL Certificates, the upgrade will bring them over when it upgrades your Web Host.
User IDs and Passwords
User IDs and Passwords will be migrated to the new Collect! databases. If the upgrade cannot decipher an Operator's Password
for any reason, for instance, if the Password is missing or is in asterisks, then the upgrade resets the password to lower case
User ID and switches ON "Must change password next login."
 Any passwords that were changed by the upgrade will be noted in the "_upgradelog.txt" file located in the
"bin\upgrade" sub-folder.
If an Operator cannot sign in with their old password, please check the upgrade log. The Operator should sign in with their
User ID in lower case as the Password and they will be prompted to enter a new Password.
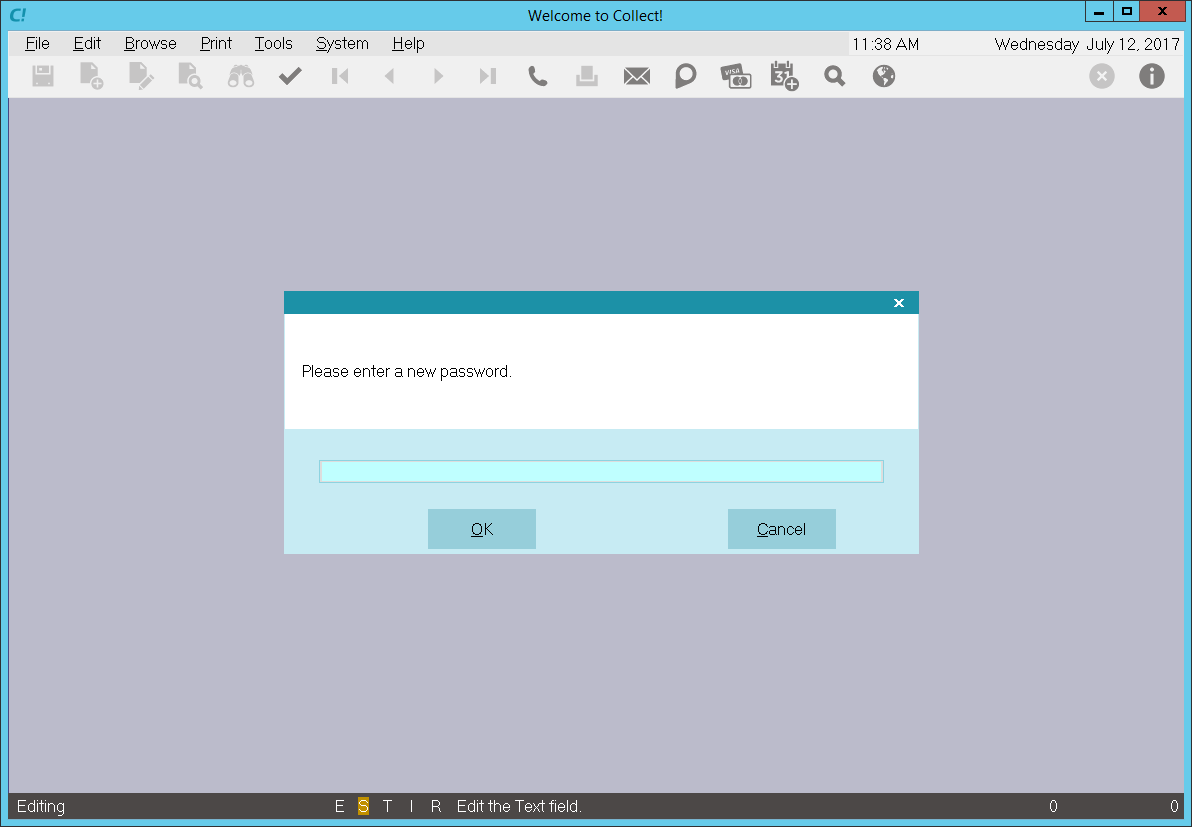
Prompt to Enter a new Password
 Selecting the CANCEL button will return you to the Welcome to Collect! screen.
Password Settings
The password system is now case-sensitive.You may get an "Invalid password' message if you are not entering the correct case
for your password.
All Operators must have a valid Password. If the upgrade is not able to decipher the Operator's Password for any reason, for
instance, if the Password is missing or is in asterisks, then the upgrade resets the password to lower case User ID and
switches ON "Must change password next login."
 Any passwords that were changed by the upgrade will be noted in the "_upgradelog.txt" file located in the
"bin\upgrade folder".
If an Operator cannot sign in with their old password, please check the upgradelog. The Operator should sign in with
their User ID in lower case as the Password and they will be prompted to enter a new Password.

Prompt to Enter a new Password
 Selecting the CANCEL button will return you to the Welcome to Collect! screen.
All Operators with valid Passwords will have the same Password in the new upgraded Collect!. However, the password system is
now case-sensitive.
Upgrade Folders
Collect! stores your original bin, catalog, syslog and config files in the new Collect!\bin\upgrade folder. You can delete
these, but please do not remove the "upgrade" folder itself or Collect! will prompt to upgrade again the next time you sign
into Collect! at the Server. In other words, Collect! looks for an "upgrade" folder in the new Collect!\bin folder. If it finds
one, it hides the upgrade prompts.
During the upgrade, Collect! backs up the existing MASTERDB, DEMODB, and PROSDB folders into the Collect!\_migback folder,
along with the bin, catalog and other files. You can delete this folder. It contains the databases shipped by default with
Collect!, not your data.
Judgment Accounts
Collect! now allows only one 195 Judgment Interest transaction on a Judgment account. If you have posted several 195 interest
transactions, only the most recent will be used for the interest calculations. To remedy this, it is necessary to change the
Transaction Type of any additional judgment interest transactions posted after the Judgment Date.
It is necessary to use a different type because the 195 is a special reserved transaction type for the original Judgment
Interest posted along with the Judgment Principal.

Areas To Test With Every Major Upgrade
Your upgrade should be tested thoroughly, especially in the following general areas, before proceeding to use
your upgraded database. We have a checklist that we require to be filled in before we will issue a license. Please contact us
to obtain copy.
Reports and Letters
Collect! updates report codes during the upgrade, including address field codes, and creates the cosigner loop in letters
requiring this.
Run test printouts on ALL the reports you used in your previous version of Collect! to confirm that they are still working
properly and printing the way you expect.
It may be necessary to rebuild the Printable Information so that reports and letters pull information from the correct fields.
Access Rights and Levels
You and your operators will see many new fields and forms in your new version. Sign in at various User Levels and confirm that
they still function as before. You may want to tighten up access security rights to some of these new fields or forms.
 By default, Collect! restricts access to new forms and menu items so that only Owner and Administrator levels can
access them (User Level 1, 10 and 99). There are some areas that cannot be set this way, such as sub-tabs and you
will need to set them.
Contact Plans
Run all of the Contact Plans you were using in your previous version to make sure they function as they did before.
Import Routines
If you used any import routines in your previous version, they will have to be carefully examined in the new version. Do a
Quick Print with all details in your previous version and then use this printout to check your import specifications in the new
version.
 In Collect!'s Application Log, in the UPGRADE category, you can find the list of import modifications naming fields no
longer in Collect!.
Fields that no longer exist in the database, or that have been renamed, will appear as a blank line in your import map. This
must be corrected before you use the import.

Date Format In Notes When Upgrading From 11.5 Or Older
This section primarily applies if your date format is set to DD/MM/YYYY. In 11.5 and older, the date in the notes is stored
as you see it (01/01/2018), but in 11.6 and higher, it is stored in a standard yyyymmdd format (20180101). When you visit
a debtor and write a note line, Collect! automatically converts the dates to this format. In order for this to work,
Collect! needs to know what the current date format is. In the Collect!\bin folder, look for a file called dateformat.dat.
If the file does not exist, do nothing. Collect! should automatically create the file based on the date settings. To verify
these settings, sign into Collect!, go to System -> Preferences -> Options, Sounds, and Colors -> Date Format.
If the file does exist, open it with a text editor and ensure that the date format is correct for your notes
(EX: ddmmyy).

Areas To Note When Upgrading Version 8 Or Version 10
Upgrading introduces new functionality to your database. Several areas where you may notice changes are detailed below. The
biggest point is to thoroughly test the functionality of your upgraded database before going live. During this testing phase,
use your old version of Collect! to keep your business running smoothly.
Confirm that your Collect! system is free of any errors. If errors are found, email
support@collect.org or phone Comtech Systems for assistance.
Major enhancements to Financials were introduced in versions CV8.2.2 and CV10.2.2 with regard to payment breakdown.
This affects interest-bearing accounts. As a result of the changes, you may find a few accounts with differences in Owing
amounts after an upgrade, ONLY IF you are upgrading from versions PRIOR to CV8.2.2 OR CV10.2.2. Most changes will be trivial.
In non-trivial changes, you may be advised to post an adjustment. Please refer to the Discrepancy Contacts section
below.
Financial Transaction Types
When you sign into Collect! for the first time to complete your upgrade, it searches through all transactions types. If it
finds any duplicates, it keeps only the first one found and deletes any transaction type that share the same code. (This may
cause unexpected results.)
Then Collect! looks for the transaction types that it needs to update your financials (194,195,196,197,399,499, and 599).
If any of these required types is not there, Collect! creates it. Please see Transaction Type for more information.
If one of these types is being used, but has settings that do not match the requirements, Collect! picks a new number for the
transaction type, in the same series, and renumbers all transactions using that type code, adjusting them to match the newly
assigned Code. Any transaction that is renumbered in this way will have UPG prepended to the Description
field for easy identification.
The 196 Transaction Type created for the debtor's Original Principal is given a Paid Date and Posted Date matching the earliest
date on the Debtor form to ensure consistency with old interest calculations and judgments. If the earliest date on the Debtor
form is the Judgment Date, the day before the judgment is used to prevent stacking.
Zero dollar judgments are posted and a line is written to the error log.
Discrepancy Contacts
Collect! Versions 8.2 and 10.2 introduced the Payment Breakdown functionality. When upgrading from a version prior to versions
CV8.2.2 OR CV10.2.2, Collect! recalculates each transaction on every active account due to changes in financials.
If there is any difference in the Owing after this recalculation, a discrepancy contact is created. A contact is
created for each discrepancy.
A built-in a checking program runs during the upgrade. This writes a discrepancy contact to any account with one of the
differences listed below. This contact is assigned to the operator you are signed in as when you run your upgrade and will
appear in your WIP List. The Originator and Assigned By fields are filled with the operator signed in for the upgrade.
A brief area code is displayed in the Description field of the discrepancy contact to help you determine the reason for the
discrepancy. These codes are listed below. Contacts for upgrade discrepancies under $0.10 are marked completed.
After the upgrade, open your Work In Progress List to view the accounts where the debtor's Owing changed during the upgrade.
Your WIP List may contain several contacts like the one below.
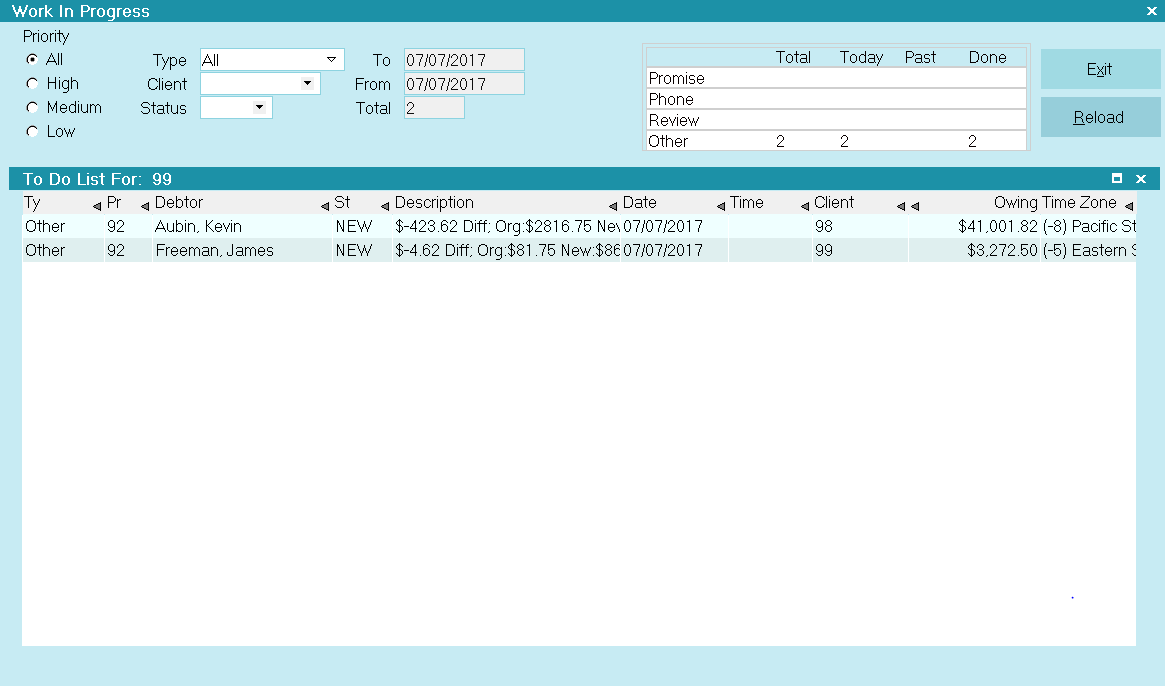
Discrepancy Contacts in WIP List
When you open these contacts, the Description field contains details of the Owing amounts before and after the upgrade and
the brief area code, if applicable.
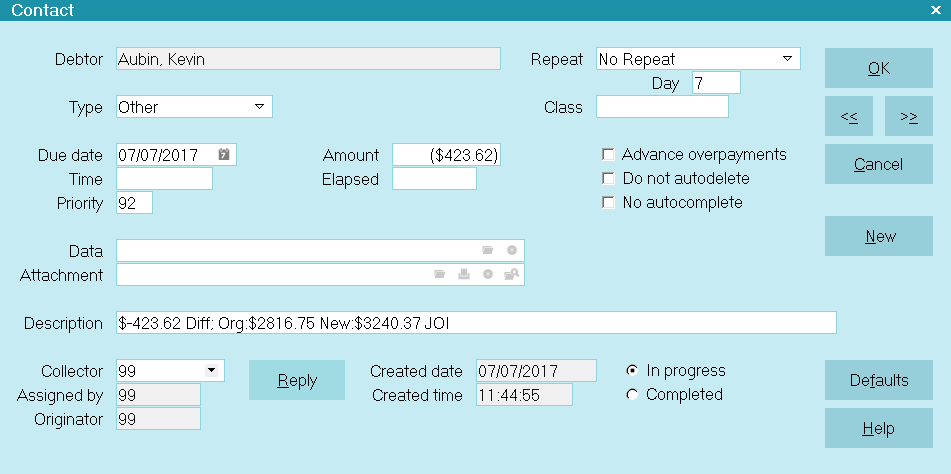
Discrepancy Contact Details
 You can use the Manage Upgrade Contacts utility available through the top menu bar, Tools, Utilities, to handle these
contacts. Please refer to the document of the same name before running the utility as there are a few settings
that must exist in your database for the utility to run successfully.
The areas below may have affected the debtor's Owing for the accounts you see in the WIP List.
1. Different Original Principal or Judgment Principal
IAL - Original Principal corrected
JAL - Judgment Principal corrected
These tend to be caused by changes in the way Collect! stacks judgment and principal transactions in versions CV8.2.2 and newer.
2. Principal Transactions posted after the Calculate interest from date.
IPD - Principal Posted Date occurred after the Calculate interest from date.
Multiple 196 Original Principal transactions are allowed with each being posted to the Principal amount on the day the
transaction is posted. If this date is after the Calculate interest from date, there will be no accrued interest prior to the
date of each Original Principal transaction. When there are multiple 196 transactions, the interest calculation for each begins
with its posted date. Since these are no longer summed together for calculating from the Calculate interest from date, as in
previous versions, this may result in a decrease of the debtor's Owing.
3. NSF Posting.
No code currently for this change.
Previously, NSF transactions had to be posted with the same payment date as the original transaction. Now the transaction list
is scrutinized more rigorously to match the NSF transaction to the most recently posted transaction with the same amount. This
change may increase the Owing amount by the amount of incorrectly posted NSFs.
4. Judgments and Calculate Interest from Date.
JUD - Calculate interest from date occurs prior to the Judgment Date.
The Judgment Date did not automatically overwrite the Calculate interest from date, making it possible to have a judgment
account with interest calculating prior to the Judgment Date. The interest calculation date is now automatically adjusted to
the Judgment Date when the interest calculation date is found to be prior to the Judgment. This may reduce the Owing amount.
5. Judgments and Original Interest.
JOI - Judgment has an Original Interest amount.
If the Original Interest field happens to have a value in it after a judgment is applied, this interest is no longer added to
the Owing. This change may reduce the Owing amount by the amount of the Original Interest.
6. Posting Payment transactions without an associated Interest Payment transaction.
No code currently for this change.
It is no longer necessary to explicitly post interest transactions for non-breakdown payment transaction types.Previously, these
payment transactions reduced the principal amount directly. With 8.2, the breakdown rule is applied automatically, paying fees,
then interest and finally principal. The changed calculations may increase the Owing amount.
7. Late Fee Grace Days.
No code currently for this change.
Before 8.2.2, late fees were applied a day earlier. This minor change may decrease the Owing by the late fee amount for this
one day difference.
8. Breakdown transactions can now force order of payment assignment. Previously, breakdown calculations were hard-coded to pay
fees, interest and then principal. This is an option you can now control by setting the breakdown order in the Transaction Type
form. This change may alter the Owing amount.
IB - interest account with breakdown corrected. This is used when a transaction is found, belonging to a debtor who has
interest turned on, that uses the Payment Breakdown option and has been corrected.
IBB - is used whenever a debtor's interest amount has been corrected by the upgrade, but the Principal and Judgment amounts
remain the same. This would indicate that the payment breakdown settings have been altered to correct bad interest from a
faulty payment breakdown.
9. Total accrued interest posted when closing an account.
When you close an account with interest being calculated, Collect! will post a Total Accrued Interest Transaction, Type 499, to
the account to store the total amount of interest accrued. Collect! requires the 499 Transaction Type with the correct
settings. You can copy Transaction Type 499 from your Demo database to your Master. To create this Transaction Type yourself,
please use the settings shown in the image below.
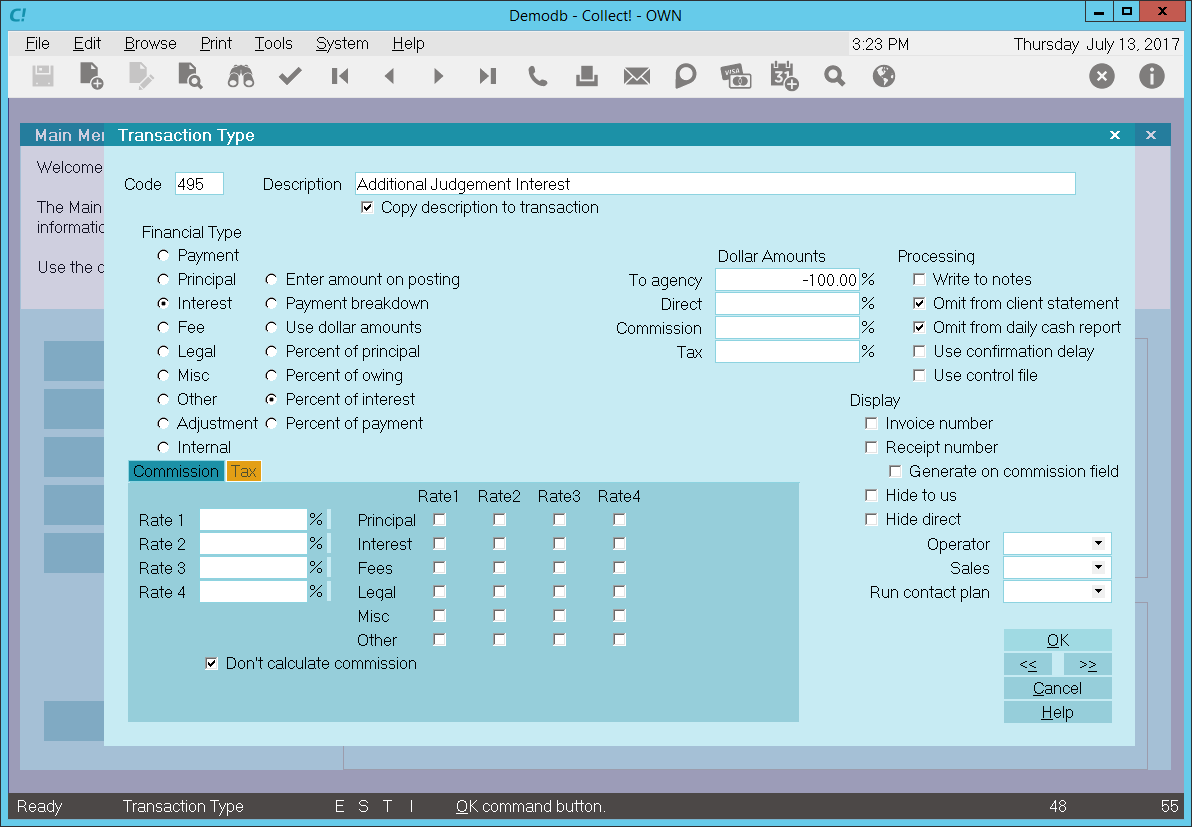
Transaction Type 499
For assistance managing these contacts, please refer to the Help topic Manage Upgrade Contacts for more information.

| 
Was this page helpful? Do you have any comments on this document? Can we make it better? If so how may we improve this page.
Please click this link to send us your comments: helpinfo@collect.org