How To Take Electronic Payments
This page is the guide for processing electronic (ACH and card) payments in Collect! via the
integrated Payment Processing module.
 Before beginning, Payment Processing must be setup first. Please refer to the Help document
How to Setup Electronic Payment Processing for more information.
Before beginning, Payment Processing must be setup first. Please refer to the Help document
How to Setup Electronic Payment Processing for more information.
Payment Processing Form
Click Here to View this Form.
Click Here to Close this Form.
The Payment Processing Form is a form where you can add or
remove payment plans. It can be accessed via the "Pymt Form"
button on the Debtor form or the "Payment Form" button on the
Client form.
This module supports both payments to Debtors and to
Clients. Debtors can have payment arrangements, but
Clients can only make single payments.

Payment Processing Form
Existing Payment Plan
This area shows any existing payment plans on the account.
 You can schedule multiple payment plans on each account.
For example, monthly on the 5th of the month, and monthly
on the 20th of the month.
You can schedule multiple payment plans on each account.
For example, monthly on the 5th of the month, and monthly
on the 20th of the month.
Next Payment Date
This is the next schedule payment date for this payment plan.

Description
This is the description from the first post-dated transaction.
Amount
This is the amount of the next payment for this payment plan.
Delete
Click this button to delete this payment plan.
Deleting a payment plan will also delete all the
associated EFT Notification Contacts. Reviews and
Promises will be re-dated for today.
Submit Payment Plan
This allows you to create a new payment plan.
Payment Processor
This displays a list of configured Payment Processing Gateway
that matches the accounts Currency. If the account's currency
is set to O/S Default, then the Currency defined on the
Company Detail form is used.
Payment Details
This displays a list of Payment Account Information records
links to the account that match the Payment Type defined
on the selected Payment Processing Gateway form.
If none exist, you can click "Add New Account" to create one.
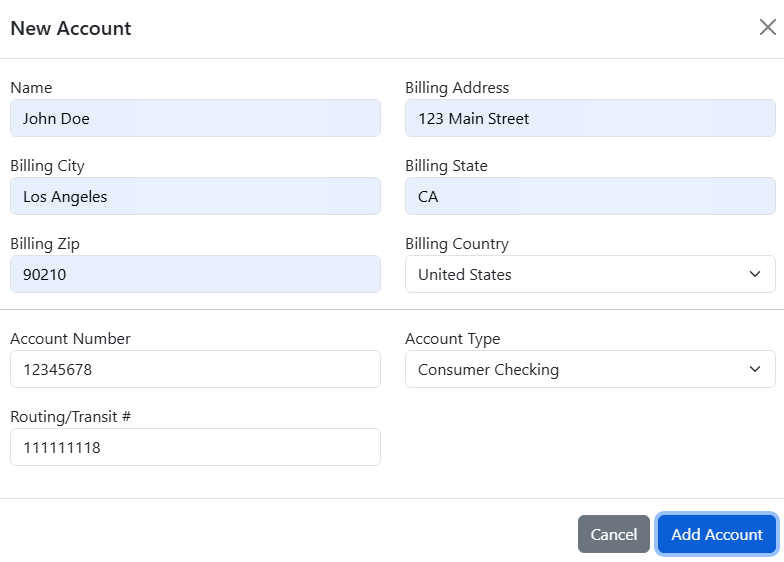
Add a New Payment Account
Sec Code
This option only appears if the selected Payment
Processor is a "check" type.
Select the applicable SEC code for processing the check payment.
PPD should be used for payment plans and CCD must
be used if the banking information is for a Business
Checking account.
First Payment Date
Select the first date of the payment plan.
The date cannot be more than 1 month into the future,
and it cannot be in the past.
Frequency
Select the payment frequency for the payment plan.
Custom is not supported at this time.
Number Of Payments
This option only appears if the selected Frequency
is not "No Repeat."
Enter the number of payments to process.
If you enter the Payment Amount and Frequency, and
check the Apply Plan to Group, if applicable,
then the system will display how many payments
it will take to pay off the balance in the
"Payments to Pay Off Balance" field.
Payment Amount
Enter the amount of the payment. If the Frequency is not
set to No Repeat, then this will be the recurring payment
amount.
Convenience Fee
This will display the calculated fee.
If a fee exists, and has a corresponding script,
then a dialog box will appear with a script to
read to the payee. After you click OK, you can
click "View Script" if you want to view it again.

Fee Script
Waive Fee
Check this box if you are waiving fees for some reason.
Amount Owing
This displays the account's balance. If you check the
"Apply Plan to Group" box, then this will display the
group's Active balance.
The active group balance will include accounts that
are suspended. If you do not want suspended accounts
to be included, then you must check the "Exclude
From Group Totals" box on the Group Member Setup form.
Payments To Pay Off Balance
This displays the number of payments to pay off the account.
It simply divides the Amount Owing by the Payment Amount.
Apply To Group
This option only appears if this is a Debtor payment,
the Debtor belongs to a Group, and the selected
Payment Processor has the "Use Active Grp Owing
For Recur" checked.
Check this box to use the Group's Active Owing to be applied
to this payment plan.
 WARNING: Payments to groups are currently paid by Listed Date,
from oldest to newest, EXCEPT for the account that has
the payment plan. To avoid the EFT Letters and Promise
contacts from being deleted or marked done early due
to a Paid in Full Contact Plan, the account with the
payment plan is paid LAST. This is done rather than
moving the EFT Notices to another group member because
other group members may not have the correct or current
Address, Email, or Texting number.
WARNING: Payments to groups are currently paid by Listed Date,
from oldest to newest, EXCEPT for the account that has
the payment plan. To avoid the EFT Letters and Promise
contacts from being deleted or marked done early due
to a Paid in Full Contact Plan, the account with the
payment plan is paid LAST. This is done rather than
moving the EFT Notices to another group member because
other group members may not have the correct or current
Address, Email, or Texting number.
Notifications
The below options only appear if the applicable
type is enabled on the EFT Notices Setup form.
Letter
Check this to create the Notification Contacts for Lettering.
Email
Check this to create the Notification Contacts for Emailing.
Text
Check this to create the Notification Contacts for Texting.
Receipts
The below options only appear if the applicable
fields are populated on the Payment Processing Gateway
form.
Letter
Enter a letter report to be used to send a printed letter
to the Debtor.
The module will just create a Letter Contact on the
account. You will need to run your batch letters to
print the letter or submit to the Letter Service.
Email
Enter an email report to be used to send an email to the Debtor.
The module will just create a Letter Contact on the
account. You will need to run your batch letters to
email the letter.
Text
Enter an text report to be used to send a text to the Debtor.
The module will just create a Letter Contact on the
account. You will need to run your batch letters to
text the letter.
Submit
Clicking submit will submit the payment plan to Collect!.
If the post was successful, you can go back to Collect! to
view the created post-dated Transactions and the Contacts.
If a payment is scheduled for today, it will process immediately.
Taking A Payment
A payment can be processed on both a Debtor and a Client.
- To access the payment form, click the "Pymt Form" button (Payment Form on Clients) in the
bottom right section, below the OK button.
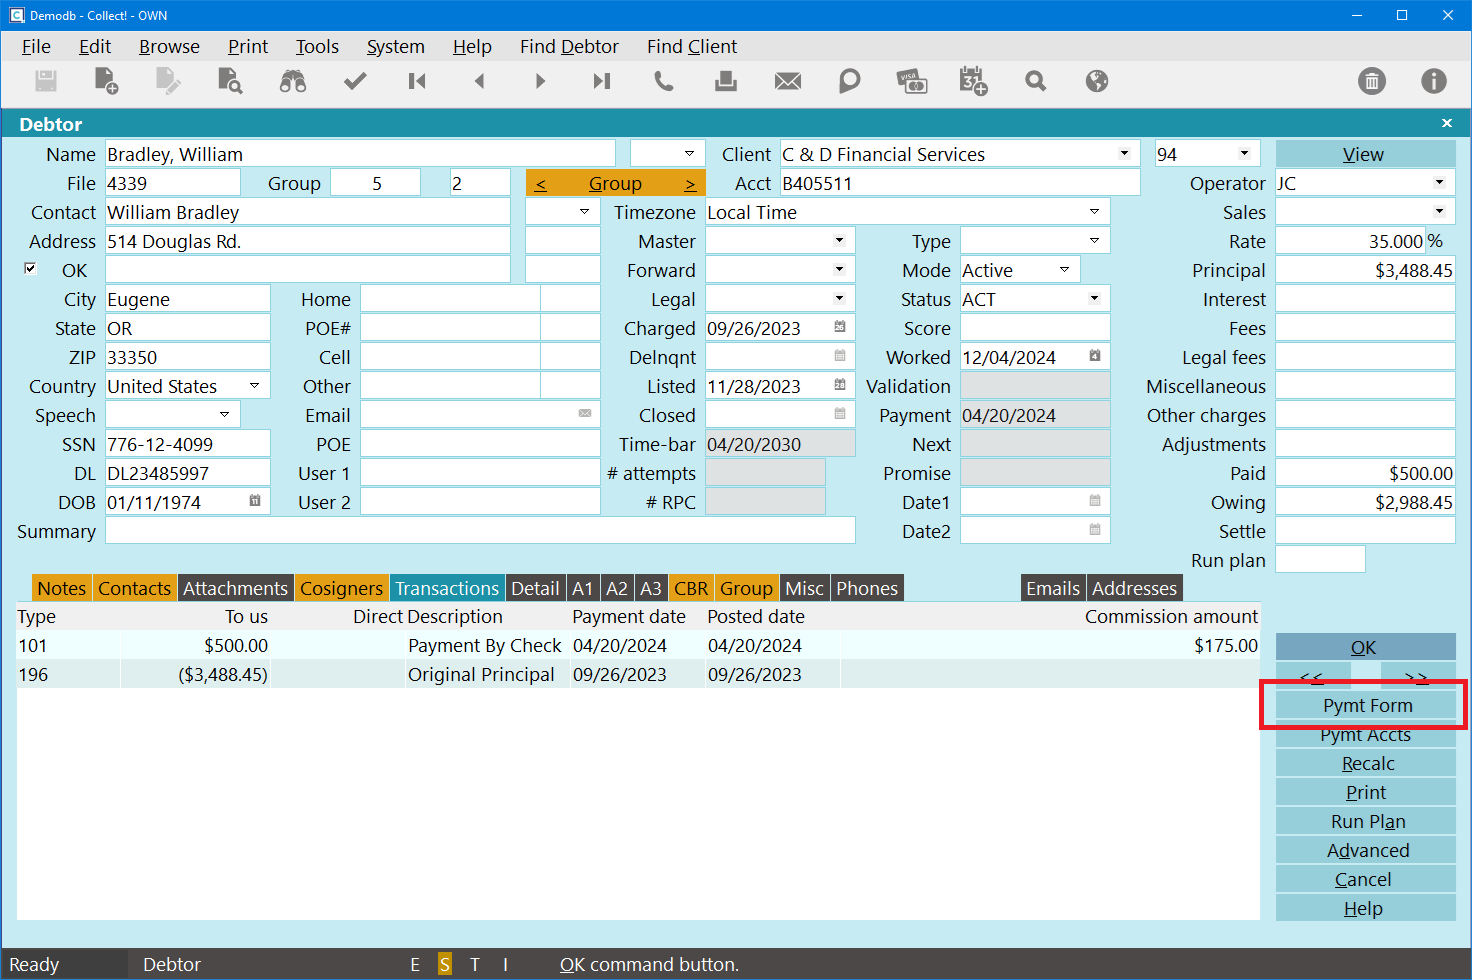
Debtor Form - Payment Form Button
- Select a Payment Processor.
- Select a Payment Method. If one does not exist, click "Add New Account" to create one,
then select it from the list.

Add a New Payment Account
- Enter the Payment Date.
- Leave the Frequency as "No Repeat" for a single payment. See Setting Up a Payment Plan
below for recurring payments.
- Enter the Payment Amount.
- In some cases, you may be presented with a script to read back to the Debtor about the
convenience fee. If you are presented with this script, read it back to the Debtor
and click OK. You can click View Script, above the fee, to see it again.
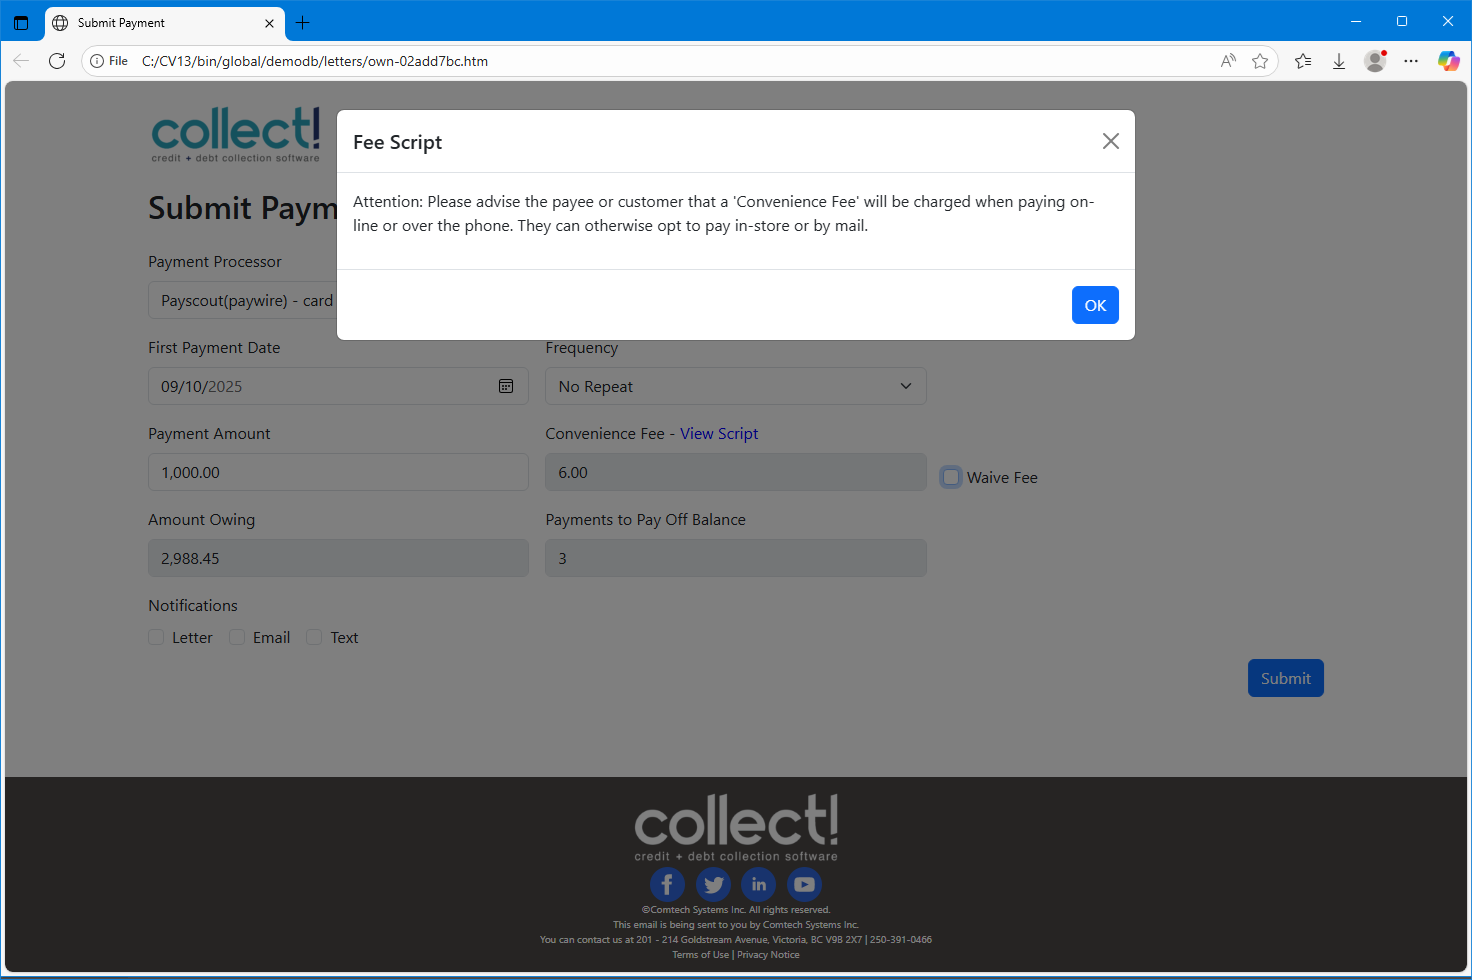
Convenience Fee Script
- If you have a gateway that support fee waiving, you can check the Waive Fee box to waive
fees for this payment.
- If this payment is to apply to the whole Debtor Group, instead of just the single account,
check the "Apply Plan to Group" box. This box only appears if the feature is enabled on
the Gateway.

Payment Form - Single Payment
- Once the details have all been entered, click the Submit button to submit the payment.
If the payment encounters an error, the system will create a post-dated transaction
and retry it when the system next reconciles.
Setting Up A Payment Plan
Setting up a payment plan is almost the same as the Taking a Payment section above. The main
differences are the Payment Frequency and Notifications.
- Open the Payment form.
- Select a Payment Processor.
- Select a Payment Method.
- Enter the Date for the First Payment.
- Select the Payment Frequency.
- Enter the Payment Amount.
- If applicable, read the Convenience Fee script to the Debtor.
- If applicable, check the Waive Fee box to waive fees for this payment plan.
- If applicable, check the "Apply Plan to Group" box.
- Enter the Number of Payments to process.
- If notification letters are configured, and the Debtor would like to receive a reminder
notice before the payment is due, select the Debtor's communication preference.
- Once the details have all been entered, click the Submit button to submit the payment.
You can create multiple payment plans on the same account. For example, a monthly plan
on the 5th of the month and a monthly plan on the 20th of the month.

Payment Form - Payment Plan
After the payment plan is setup, you will get the following screen.

Payment Form - After a Plan is Created
In Collect, you will see the post-date Transactions.
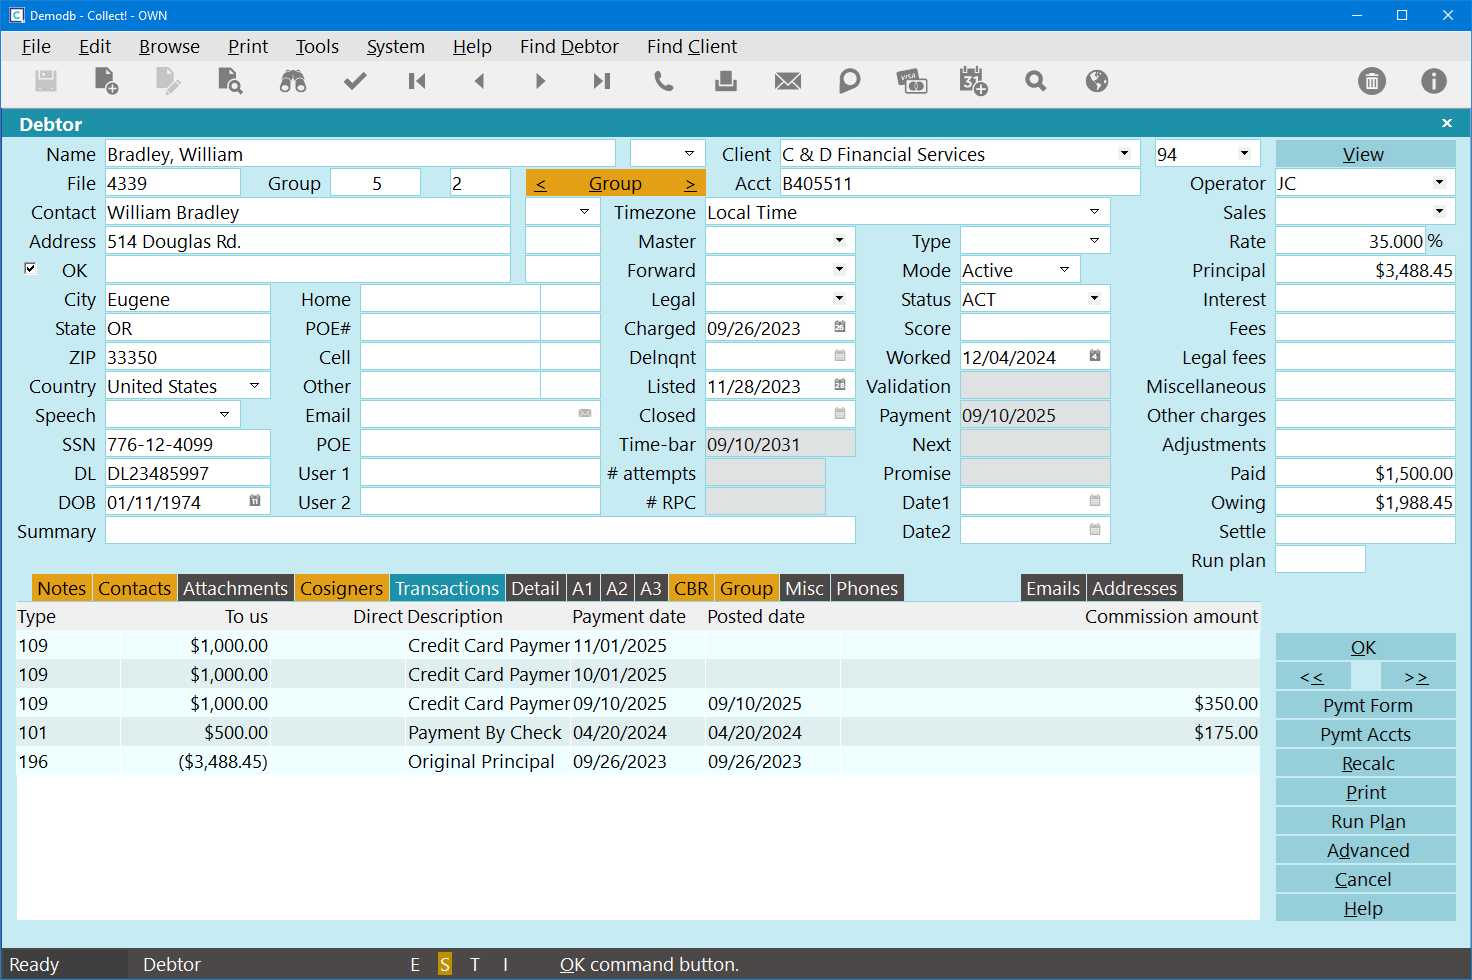
Post-Dated Transactions
In Collect, you will see the Contacts for the payment plan.
Payment Plan Contacts
Payments To Groups
This feature is not currently available for Client Groups/Hierarchies.
When checking the Apply to Group box on the payment form, the system will apply the payment (plan)
to the group, where the mode is not closed. It will base the owing on the Active Owing field on
the Group tab.
If you have suspended accounts that you would like to exclude from group payments, then
check the "Exclude from Group Totals" box on the Group Member Setup form.
Payments to groups are currently paid by Listed Date, from oldest to newest, EXCEPT for the account
that has the payment plan. To avoid the EFT Letters and Promise contacts from being deleted or marked
done early due to a Paid in Full Contact Plan, the account with the payment plan is paid LAST. This
is done rather than moving the EFT Notices to another group member because other group members may
not have the correct or current Address, Email, or Texting number.
- Open the Payment Form.
- Fill in the details.
- Check the Apply to Group box.

Payment Plan Form - Group Payment
- Click OK to submit.
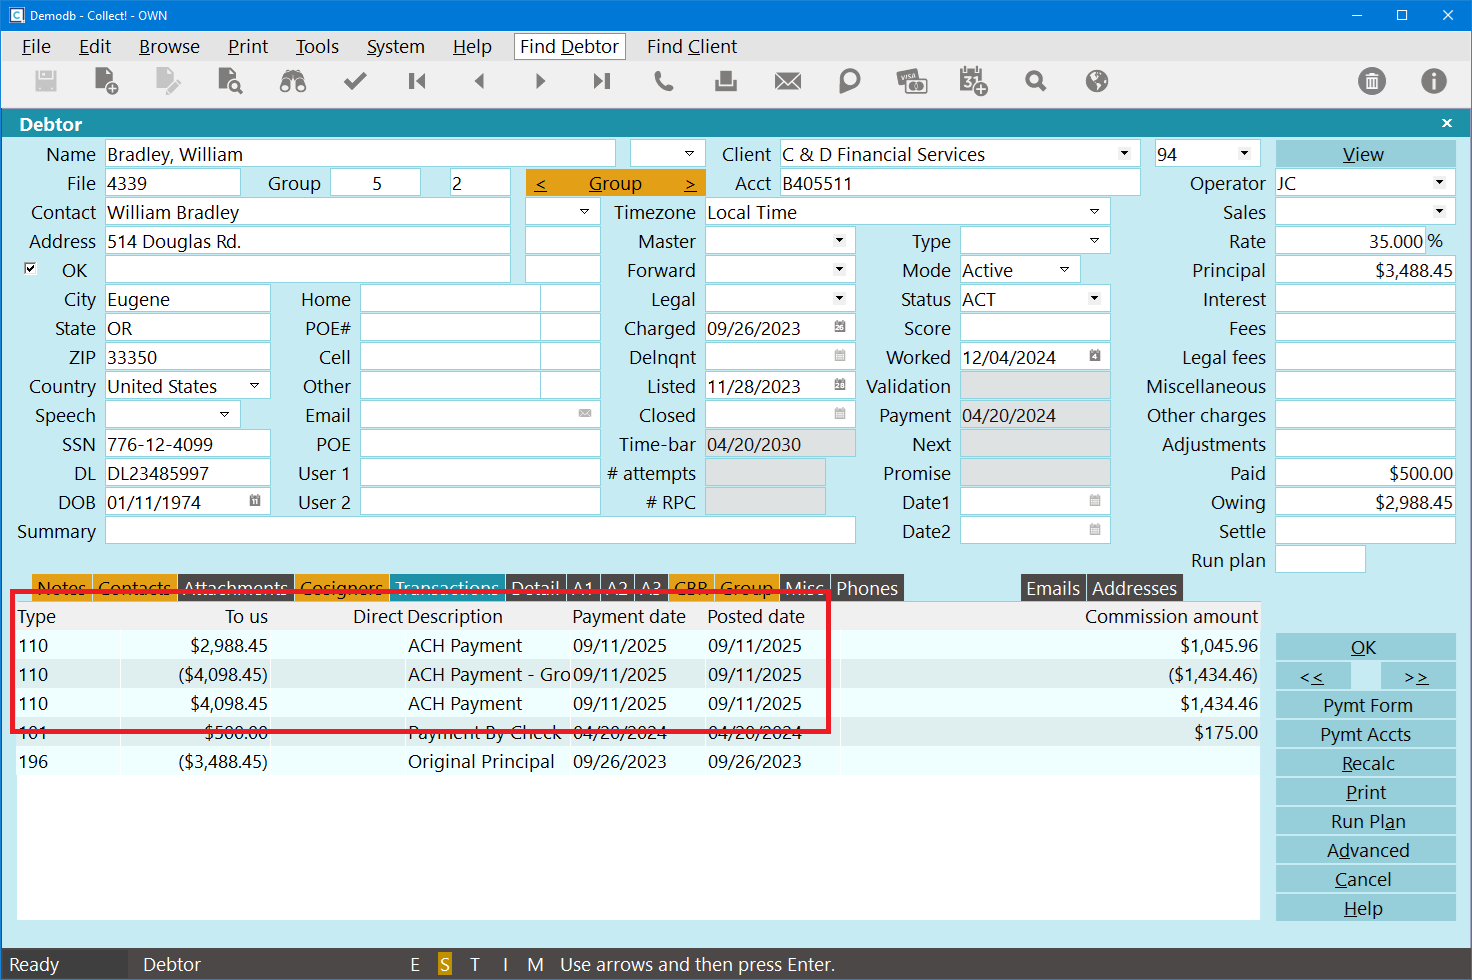
Group Payment Transaction List
When a payment is posted to a group, the system will post the full payment amount to the debtor,
then it will post a reversal. The original transaction will have the Omit from Client Statement box
checked, but not the Omit from Daily Cash Report. The reversal will have both boxes checked, and will
append "- Group Reversal" to the Description field.
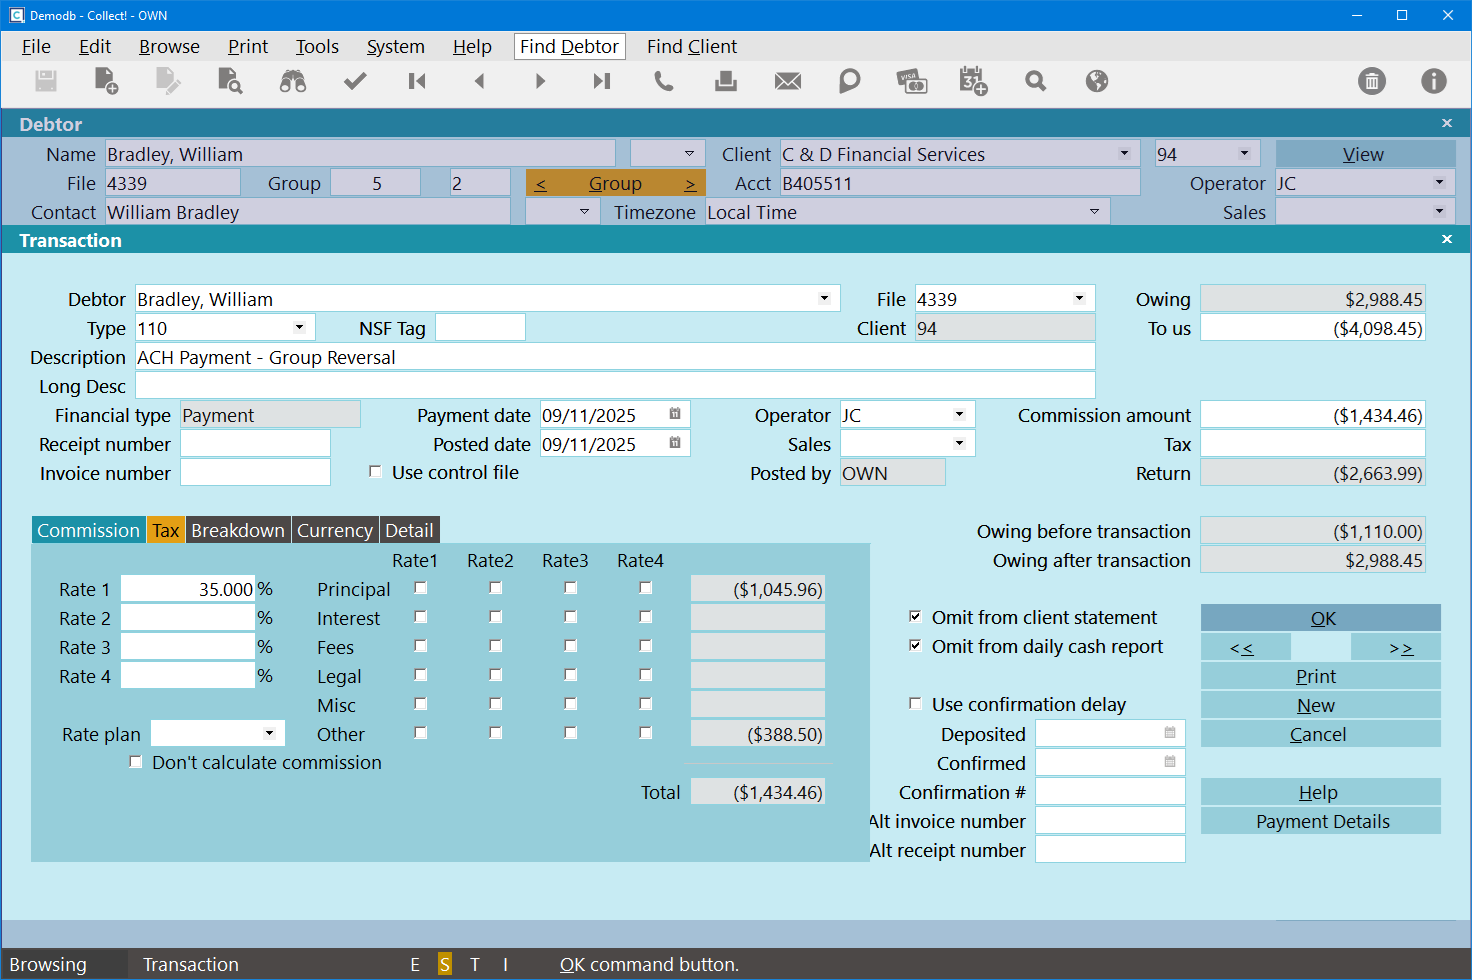
Group Payment Reversal
The system will then post the payments to the applicable group members. These payments will have
the Omit from Daily Cash Report box check, but not the Omit from Client Statement box.
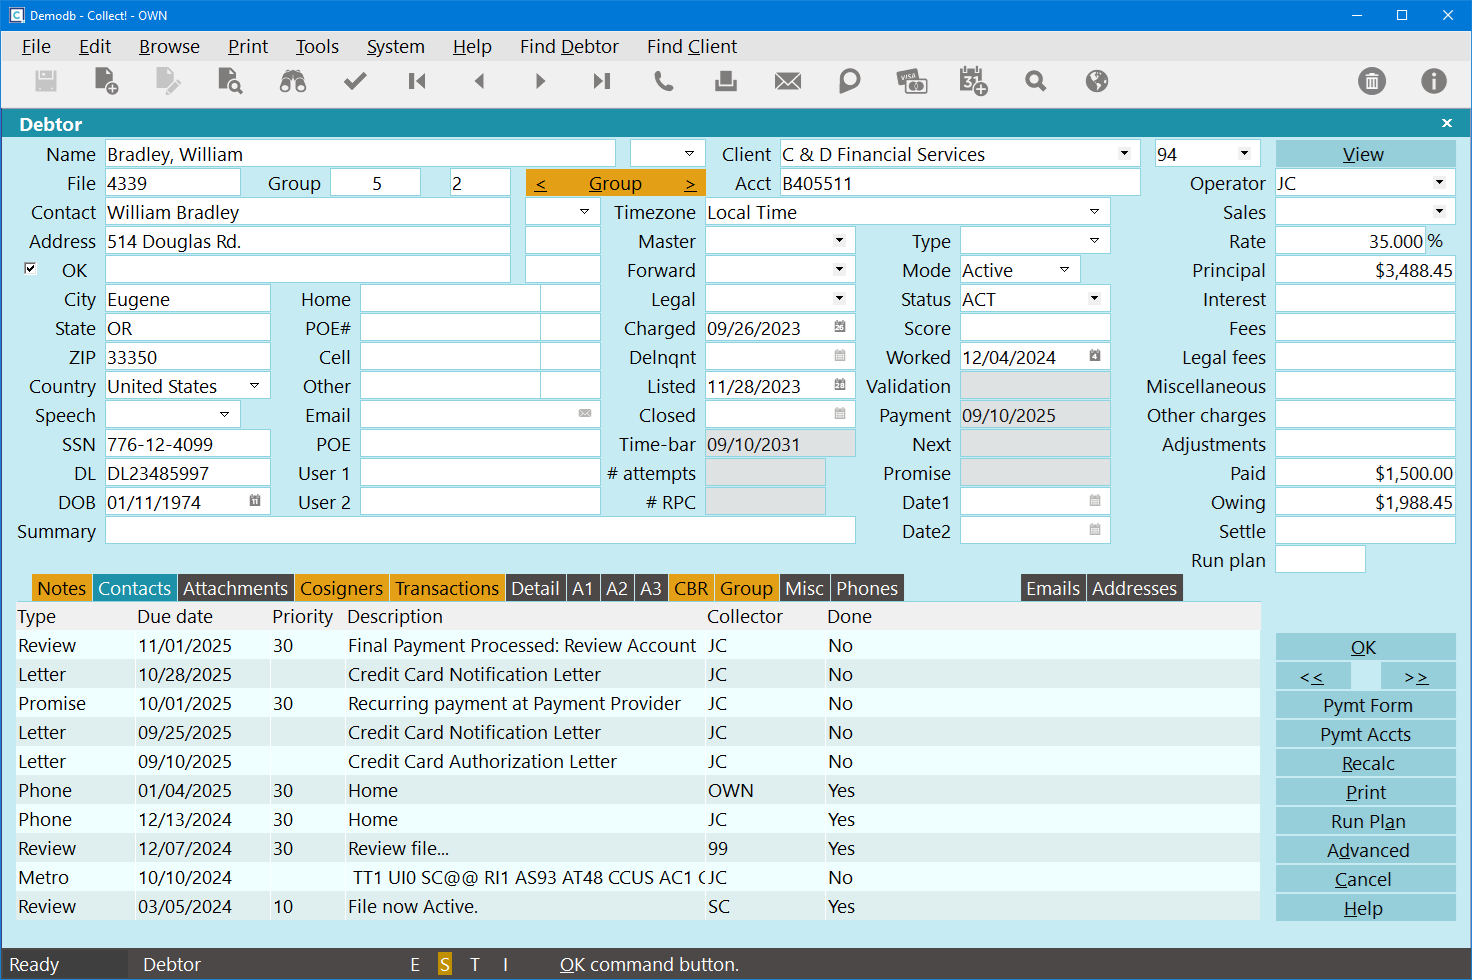
Deleting A Payment Plan Or Post-Dated Payment
Payment Form - Review Payment Plan
- Open the Payment Form.
- Click the Delete button next to the plan that you want to delete.
- On the Delete Payment Plan box, click Delete to confirm.
Viewing Stored Payment Information
- To view the stored payment information, click on the "Pymt Accts" button (Payment Accounts
on the Client form).
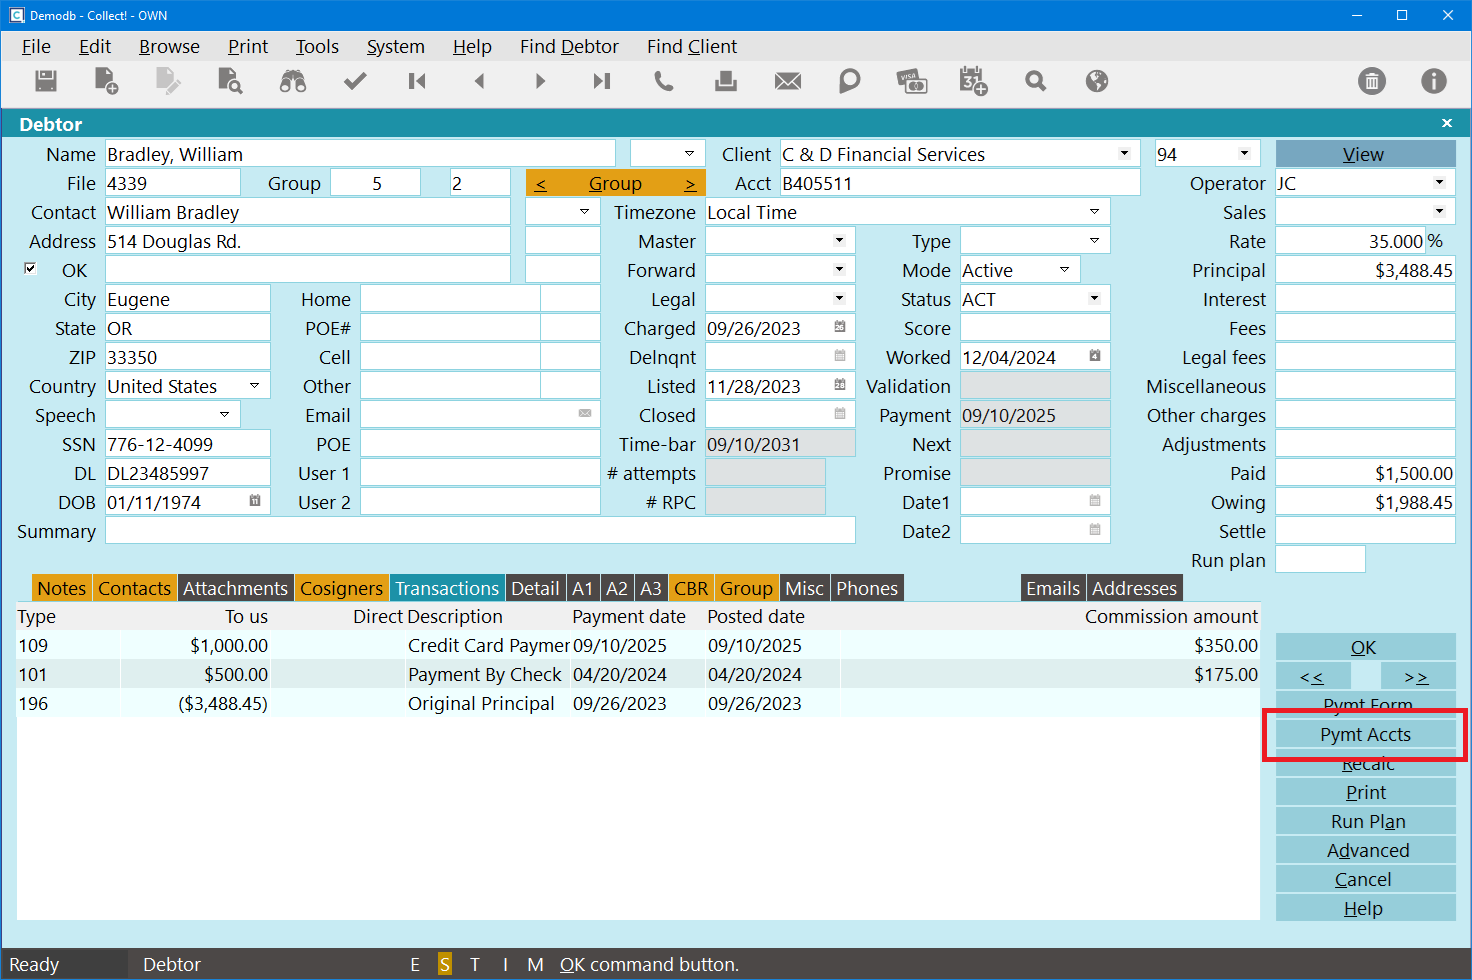
Debtor Form - Payment Accounts Button
- Select one from the list to view the Payment Account Information form.
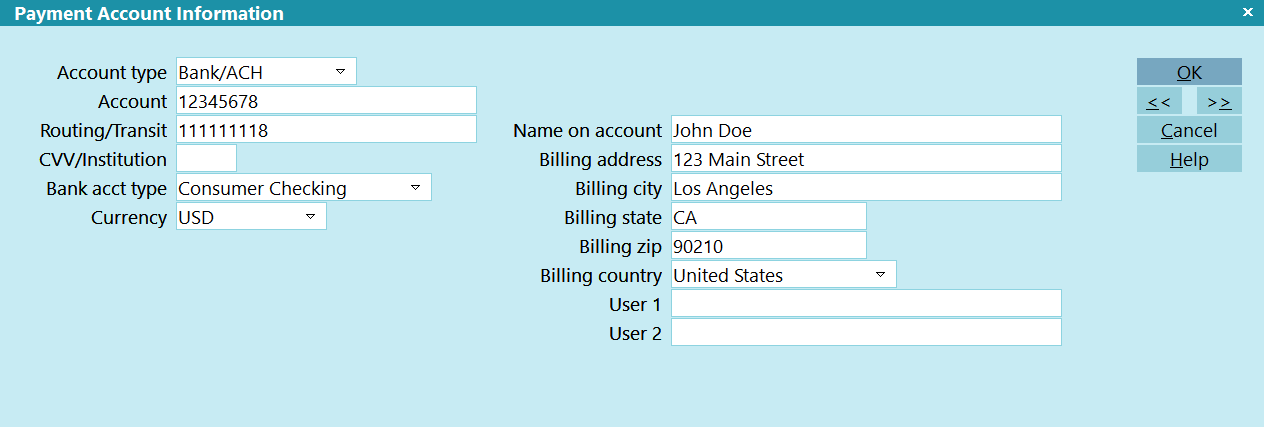
Payment Account Information: Check/Bank/ACH
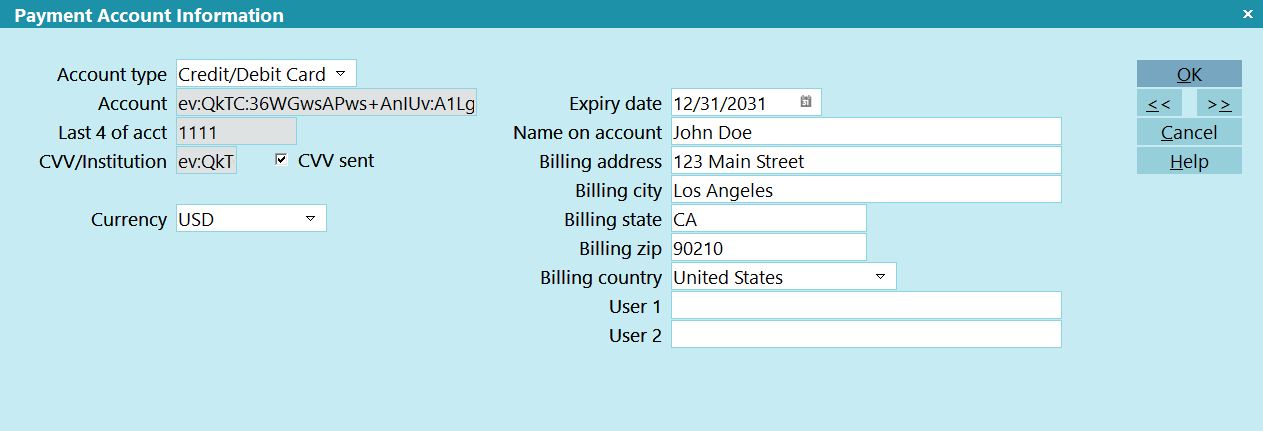
Payment Account Information: Credit/Debit Card
Editing Stored Payment Information
As card data is encrypted, you cannot edit it within the Collect! application. ACH/check data
can be edited in the Collect! application using the forms above, and so can card expiry dates, but
full card editing should be done via the below instructions. Billing name and address can also be
updated within the Collect! application.
- Click the Payment Form button on the Debtor.
- Select either a card or check Payment Processor.
- Select the Payment Account that you want to edit.
- Click the Edit Account link above the Payment Account field.
- Update the applicable fields.
- Click Edit Account to save.
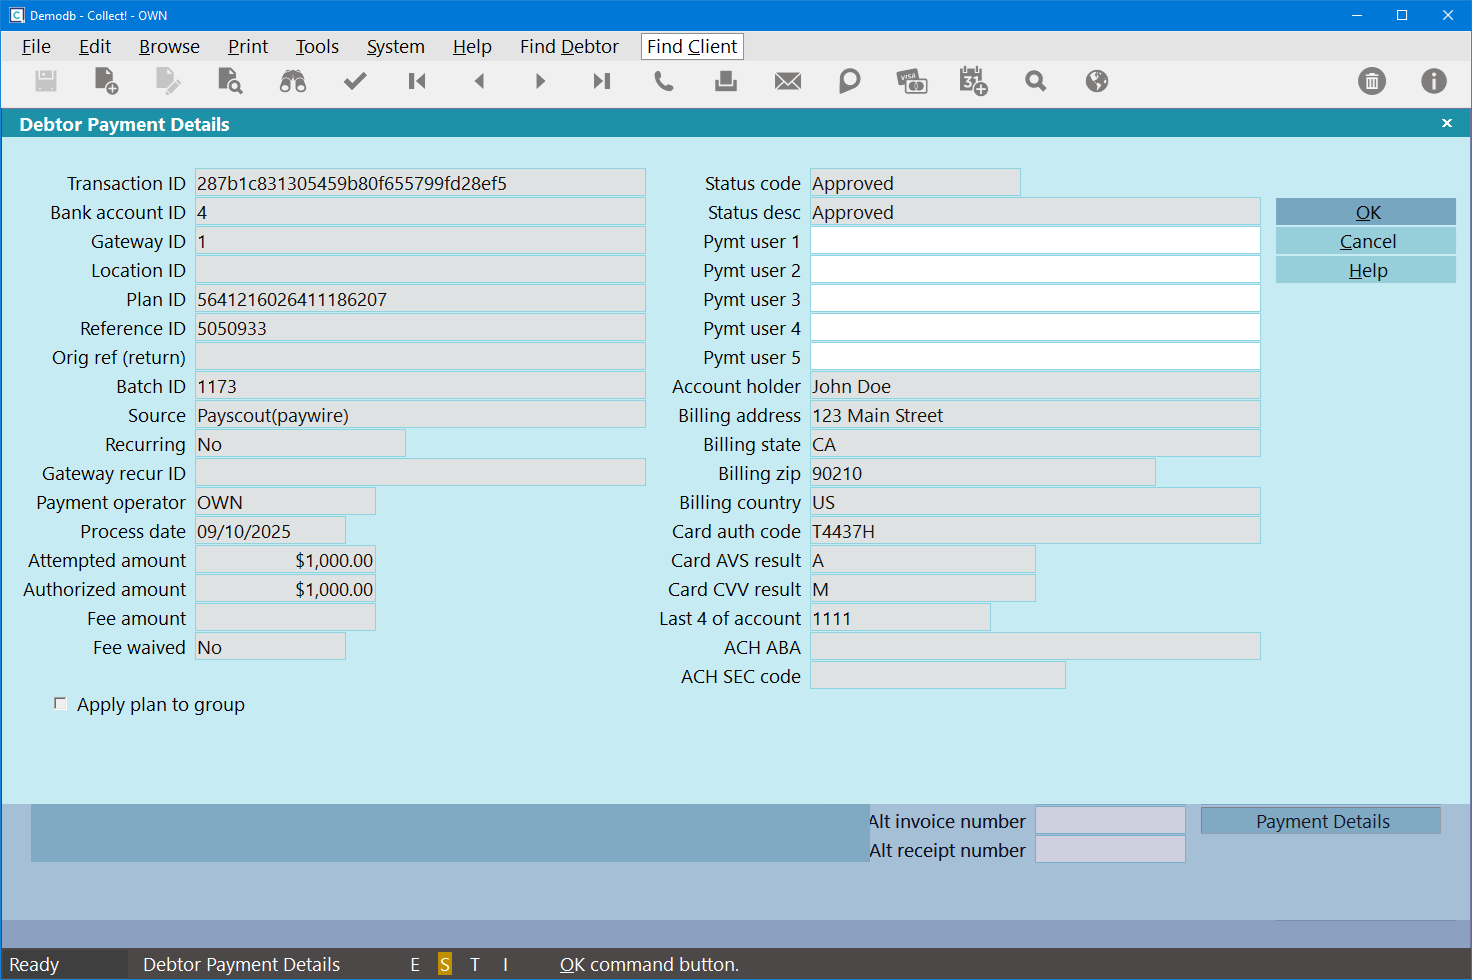
Transaction Details
When post-dated payments are created for payment plans, minimal information is stored on the
Transaction. After the payment is processed, the transaction is processed, including any
Contact Plans and recalculations, then the remaining details from the gateway are populated
in the Debtor Payment Details form.
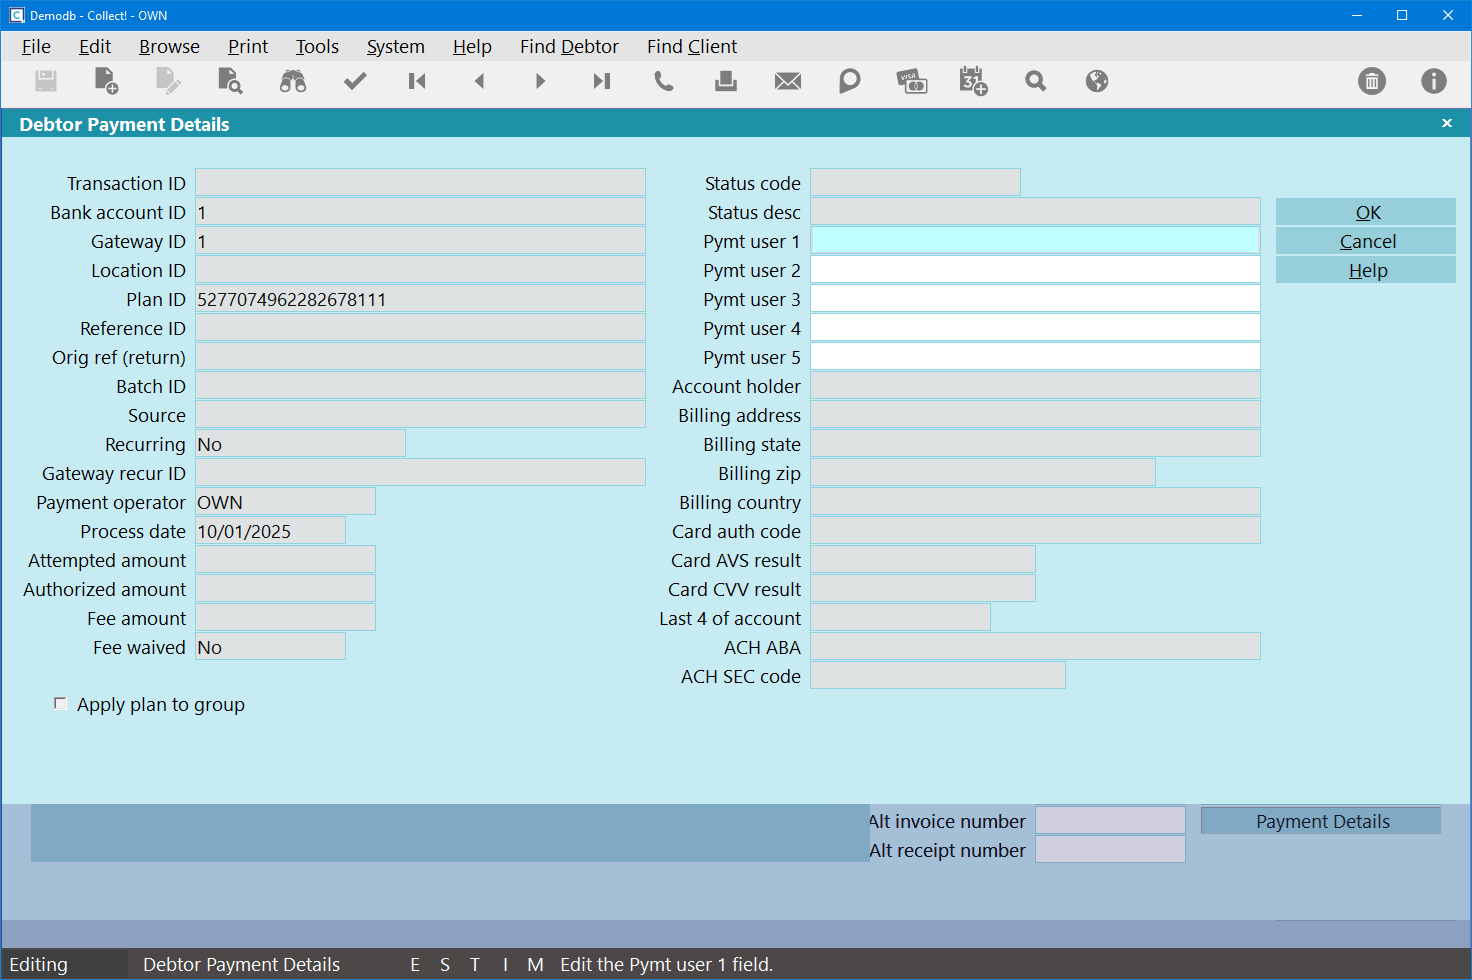
Unposted Payment
- To access the payment details, open a Debtor Transaction or Client payment.
- Click the Payment Details button.

Transaction - Payment Details Button
Explanation of Fields
Payment Details
Click Here to View this Form.
Click Here to Close this Form.
The Debtor Payment Details screen displays the payment
processing details of the transaction. This form is only
available on transactions that were processed via the
payment processing module.
To access this window, click the "Payment Details" button in
the lower right corner of the Transaction form.
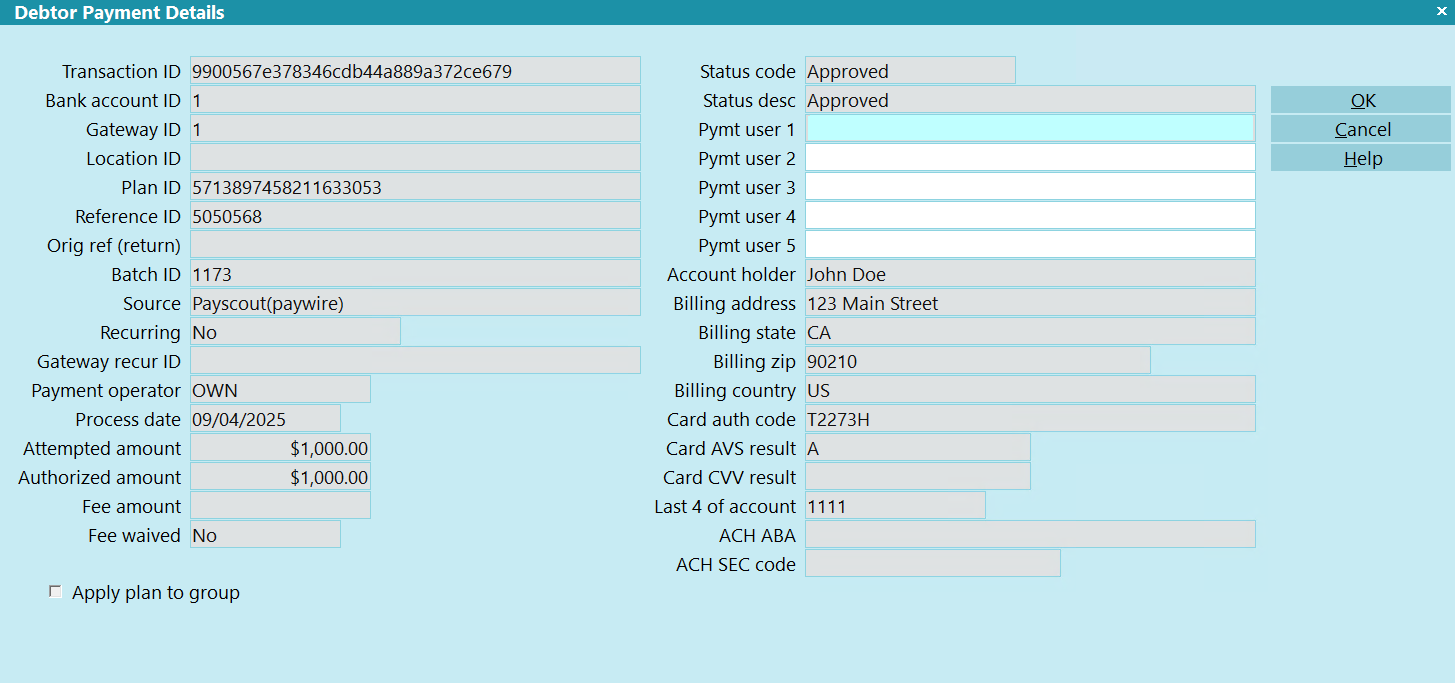
Debtor Payment Details
Transaction ID
Unique ID generated by Collect! driver for this payment.
Bank Account ID
The row ID of the Payment Account Information record used
for this payment.
Gateway ID
The row ID of the Payment Processing Gateway record used
for this payment.
Location ID
If available, return by the gateway.
Plan ID
Unique ID generated by Collect! software for all payment(s)
in this payment plan.
Reference ID
Unique ID generated by the gateway.
For returns, some gateways simply use the original
Reference ID, so our driver will append the word
"return" to the end to make it unique.
ORIG REF (RETURN)
For returns, this will contain the original Reference ID
for the corresponding payment.
Batch ID
If available, return by the gateway.
Source
The name of the payment provider/gateway that processed
the payment.
Recurring
Displays whether this was a single payment or if it was part
of a recurring plan. If part of a recurring plan, it will
indicate if it was the first payment or a subsequent one.
Gateway Recur ID
If, for some reason, a payment arrangement was configured
directly on the gateway, this should contain the gateway's
plan ID.
Payment Operator
The operator ID of the operator who setup the payment(s).
Process Date
The date that the payment was processed on the gateway.
Attempted Amount
The amount that was submitted to the gateway for processing.
Authorized Amount
The amount that the gateway returned as approved.
Fee Amount
The fee amount for this payment.
Fee Waived
Indicates of the fee was waived.
Apply Plan To Group
Indicates if this payment is part of a plan that was, or
will be, posted to a group.
Status Code
The status of the payment. Possible codes are:
- Approved
- Declined
- Rejected
- Voided
- Error
- Settled
- Charged Back
- Refunded
- Funded
- Deduction
- Correction
- Returned
- Interupted
- Pending
Status Desc
A more detailed description of the status returned by the gateway.
Pymt User 1
User-defined field.
Pymt User 2
User-defined field.
Pymt User 3
User-defined field.
Pymt User 4
User-defined field.
Pymt User 5
User-defined field.
Account Holder
Full name of the account holder on the Payment Account Information.
Billing Address
Full address of the payment information.
Billing State
State of the payment information.
Billing ZIP
Zip of the payment information.
Billing Country
Country of the payment information.
Card Auth Code
If available, return by the gateway.
Card AVS Result
If available, return by the gateway.
Card Cvv Result
If available, return by the gateway.
Last 4 Of Account
Last 4 digits of the payment card.
ACH Aba
ABA number for the payment check.
ACH Sec Code
The SEC Code entered via the Payment Processing Form.
Changing Payment Information
Banking information can be updated via the Collect! user interface.
Card Information
- Click on the Payment Form button in the bottom right of the Debtor form.
- Select the Card gateway from the gateway list.
- Open the applicable card record.
- Enter the new information.
- Click EDIT ACCOUNT to save.
ACH/Check/Bank Information
- Click on the Payment Accounts button in the bottom right of the Debtor form.
- Open the applicable ACH/Check record.
- Update the applicable information.
- Click OK to save.
Reconciliation
There are 3 ways to reconcile payments
- One gateway at a time, manually.
- All gateways in your system, manually.
- All gateways in your system, automatically via the Task Scheduler.
Individual Gateways
- Navigate to System\Preferences\ Payment Processing Setup.
- Select a Gateway.
- Click the Reconcile button.
All Gateways
- On the Main Menu, click the Daily Administration button.
- Click the Payments and Charges button.
- Click Reconcile Payments.
Please refer to the Help document How to Configure Scheduler Tasks for information
on automating the reconciliation.
Troubleshooting
After you click the Payment Form, the form has a 15 minute time limit before you have to close and reopen.
If you get errors, the post-dated Transaction should be created and retried during reconciliation.
Errors during reconciliation may occur if you having internet connectivity issues, or if one of the
upstream service providers is unavailable.
| 
Was this page helpful? Do you have any comments on this document? Can we make it better? If so how may we improve this page.
Please click this link to send us your comments: helpinfo@collect.org