Quick User's Guide
Welcome
Welcome to Collect! Version 11. With Collect!, all tasks
you perform for collections will be easier and faster,
and what you've always wanted to do is now possible.
This Quick User's Guide introduces you to Collect! and gets you
up and running quickly. It shows you how to do the most common
tasks, provides you with tips, and points you to some of the
powerful and exciting new features in Collect!.
If you want to explore Collect! in more depth or learn about some
of the more technical aspects of Collect!, the final topic in this
section, "Where to Find the Information You Need," points you to
other sources of information.

Benefits Of Using Collect!
- Improved cash flow
- Reduced operating costs
- Added Revenues
- Increased Efficiency
- High speed and performance
- Increased client goodwill
- Instant information access
- Improved organization
- Excellent return on investment
- Effective management tools

What's In Collect!?
Collect! Version 11 offers many new, exciting features
in addition to improvements to many features you
may be familiar with from earlier versions of Collect!.
This section mentions just a few of these features.

Setting Up Collect!
It's easy to set up Collect!.
TO INSTALL COLLECT!
- Double-click on the executable file you downloaded from the
Collect! web site.
- The Collect! installation will start automatically.
- Follow the instructions on your screen.
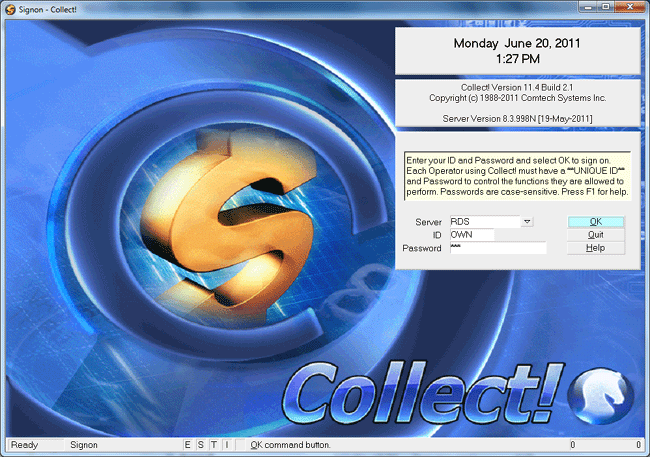
Collect! Splash Screen
Setup prompts you to choose the location for your
installation. You can select Complete
to install the the default location, C:\CV11.
Or you can select a different installation folder by
selecting Custom.
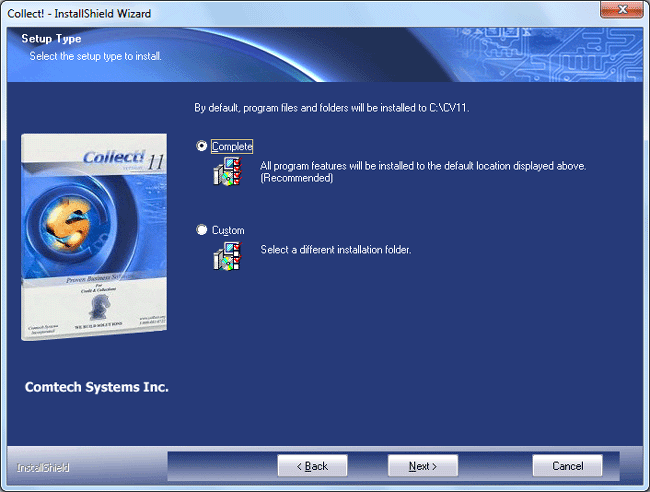
Select Installation Folder.
 Step by step setup - Before
using Collect! on a network or in your business, check the
online help, specifically " Network Setup" and " Setup Checklist"
available from the Index option in the Help menu.

Starting And Quitting Collect!
TO START COLLECT!
1. Select START and then select Programs.
2. Select Collect! and then select the CV11 icon.
OR
Double-click on the CV11 icon installed to your
desktop.
TO QUIT COLLECT!
To exit form Collect!, hold down the ALT key and
press F4 (ALT+F4) or select Exit from the File menu
or click the X in the upper right corner of your Collect!
screen.

Of Keyboards, Mice And Menus
You can control Collect! with your keyboard and your
mouse. Use the keyboard's arrow keys or click your
mouse to choose something on the screen.
YOUR KEYBOARD
The keyboard has normal typewriter keys, special keys
for cursor movements, and function keys. For a description
of the keys Collect! responds to, press the ALT key and
press H to display the Help menu. Then
use the arrow keys to move to the Keyboard Tips option
and press ENTER.
THE MOUSE
- To select an item, click the LEFT button.
- To pop up a list, double-click the LEFT button.
- To escape from a form or menu, press the RIGHT button
MENUS, PICK LISTS AND POPUP FORMS
Wherever you are, Collect! gives you choices. This may be a
pull-down menu of commands from the top menu bar, lists
that pop up when you click on a field, or switches you can
click on and off. When you open a menu or form, it overlays
any existing forms you have open. When you close the
menu or form, you see the form that was behind it.

Where To Find The Information You Need
Help is the primary source of information about Collect!.
You can find common items in the Help menu, and a
complete index with the Index option. You do need an
internet browser installed on your system to access the Help files.
The Help section is comprised of user friendly HTML files
and includes handy links to related topics for your
ease of use.
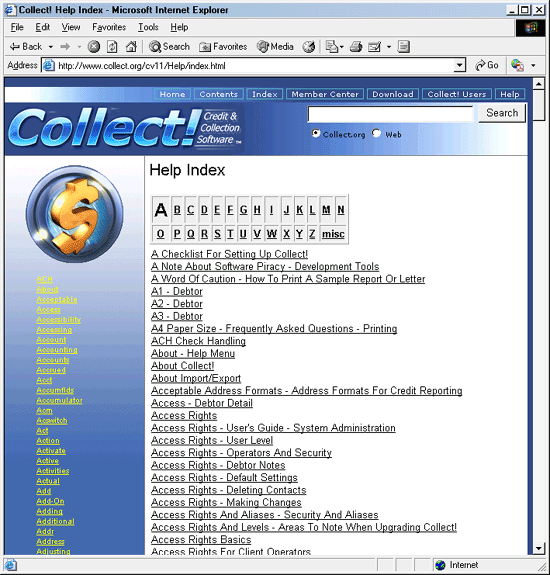
Help Index
HELP ON A SPECIFIC ITEM
Help is always available in Collect!. When you press F1,
a help screen is displayed which describes to field, dialog or
menu you are on. Additional links in the topic may be selected
to view related information.
HOW TO
This section of the Help system walks you through specific
tasks. These help items are available at any time from the
Help pull-down menu.
VIA THE INTERNET
For the latest online information about Collect!, check our
web page at www.collect.org
or email sales@collect.org

The Basics

Opening A Collect! Database
Collect! installs a Demonstration database, a Master
database and a Client Prospecting database. The
Master database is empty for entering your own clients
and debtors, while the Demonstration database contains
a small number of clients and debtors to be used while
checking out the system or trying new ideas. The
Client Prospecting database contains a small number
of clients (divisions) and debtors (prospects) with many
field labels aliased. It is intended to be used for sales
and marketing functions.
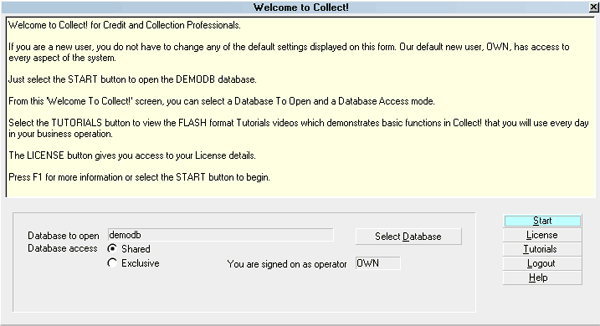
Welcome To Collect!
PASSING SECURITY
Collect! uses a multi-level security system with password
protection to control access to Collect!. When first installed,
Collect! has a small set of user IDs and passwords. The
Demonstration database defaults to user ID and password
of OWN.
 To access the security system, select System from
the top menu bar, select Rights and
then select Operators. These choices are
available after you have signed on to a database. Each user
is assigned an ID code, a password and a level. You have
complete control over which user levels have access to
different parts of the system. You may control access for
Read/Write, Read Only or No Access for dialogs, menus
and fields.
THE MAIN MENU
The Main Menu shows your sign on ID, the database you
opened and operations that Collect! supports, organized into
groups of functions typically performed.
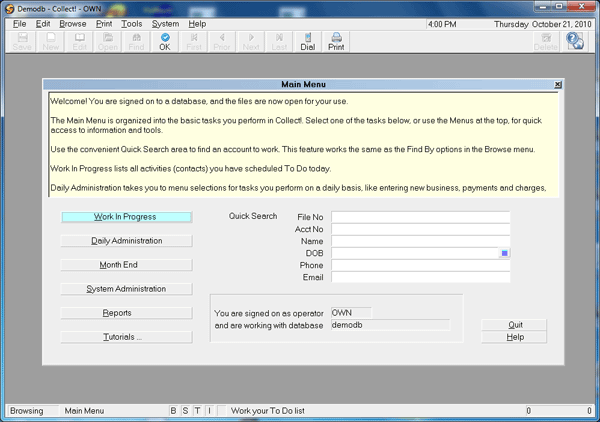
Main Menu
QUICK SEARCH enables you to quickly search for accounts
in your database. This functions exactly like the Find By options
available in the Browse menu, but with fewer clicks.
WORK IN PROGRESS loads your contact schedule and displays
the results. From here you make phone calls, review accounts,
enter notes, check promises and schedule future contacts.
DAILY ADMINISTRATION creates new clients and debtors, records
payments and charges to debtor accounts, records
payments from clients, prints letter batches and controls
other batch processes.
MONTH END generates month-end statements and invoices,
prints statements to clients and summary reports of
payables and receivables.
SYSTEM ADMINISTRATION accesses database maintenance
functions and all system setup options.
REPORTS prints some of the system's more commonly used
management reports.
TUTORIALS takes you to a demonstration of basic functions
and features in Collect!.

Entering New Business
New business includes creation of new client and
debtor records. This section describes how to create new
client and debtor records in Collect!.
TO ENTER A NEW CLIENT
1. From the Main Menu, choose Daily Administration, pick
New Business and then choose Clients.
2. When the Client list is displayed, press F3 or click NEW
to create a new client record.
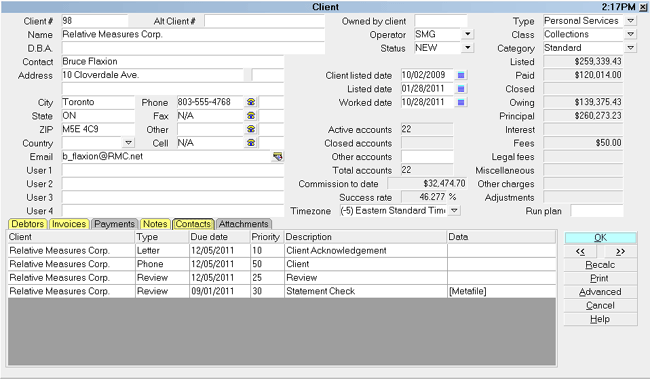
Client form
- Fill in the Client dialog, pressing the Tab key between fields.
- Be sure to check the ADVANCED button to set important options
for this client, including Gross or Net remit, default commission rate
and more.
 The totals displayed on this dialog are calculated
automatically by Collect! and you cannot manually change
them. To update the information, select the RECALC button.
All totals are derived from the debtor records attached to
this client.
For help press F1.
ENTERING NEW DEBTORS
The Debtor form contains the details of each debtor, including
amounts owing, interest accrued and other pertinent information.
Additional information can be stored in the detail forms
accessed from the various buttons and fields on this form.
TO ENTER A NEW DEBTOR
1. From the Main Menu, choose Daily Administration, pick
New Business and then choose Debtors.
2. From the Debtor list, press F3 or click NEW to create a
new debtor record.
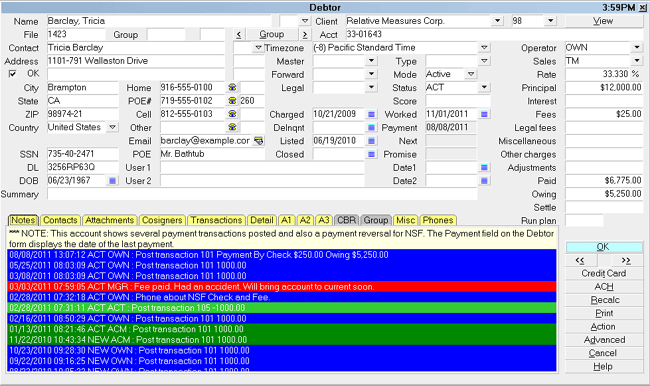
Debtor form
To complete the Debtor form
- Enter information into the fields.
- Tab moves you to the next field, and Shift Tab moves
to the previous field.
- Press F2 to pick from available lists to improve your
accuracy. Collect! prompts you at the bottom right when
pick lists are available.
- When you reach the Action field, type either NEW or
NSF and press Enter. For more information on contact plans,
see "Contact Management" in the next chapter,"Beyond
the Basics."
 Collect! automatically checks for matching debtors,
and displays a list for you to pick from if it's appropriate. To
copy information into new debtors and group debtors together,
click OK in the list.
PRINTING NEW BUSINESS REPORTS
After entering new debtors and clients, you can
print relevant reports and letters.
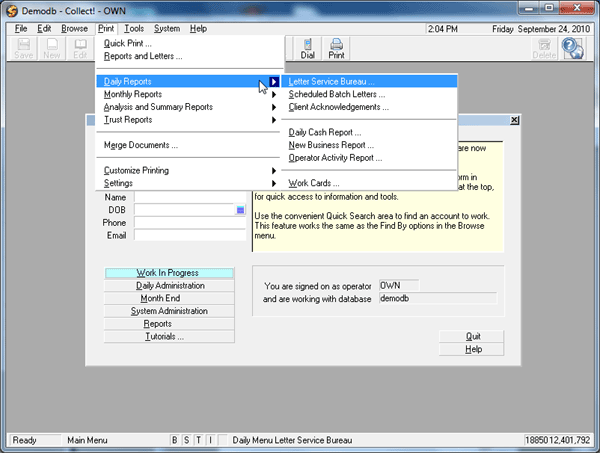
Daily Reports Menu
- To print a summary report of all new business entered
in the day, or over a date range, choose Daily
Administration from the Main Menu, then New Business
and then Print Report. You can also use the Print menu
and choose Daily Reports, then New Business Report.
- To print letters of acknowledgment to all clients with new
debtors listed today, or over a date range, choose Daily
Administration from the Main Menu, then New Business and
then Client Acknowledgments. You can also use the Print
menu and choose Daily Reports, then Client
Acknowledgment.
- To print debtor cards for today, or over a date range,
choose Daily Administration from the Main Menu, then New
Business and then the Debtor Work Cards option.
You can also use the Print menu and choose Daily
Reports and then pick Work Cards.
 When you print a report, Collect! displays default
date sets. You may modify the date range to suit your needs
by highlighting the From field, pressing F2 and selecting the
start date range you wish to use from the calendar. Follow the
same procedure to select your end date.

Quickly Finding Your Way Around
You can quickly find records when any list is displayed,
as Collect! automatically begins the search when you type.
The Status bar reads Browsing or Selecting while completing
your search.
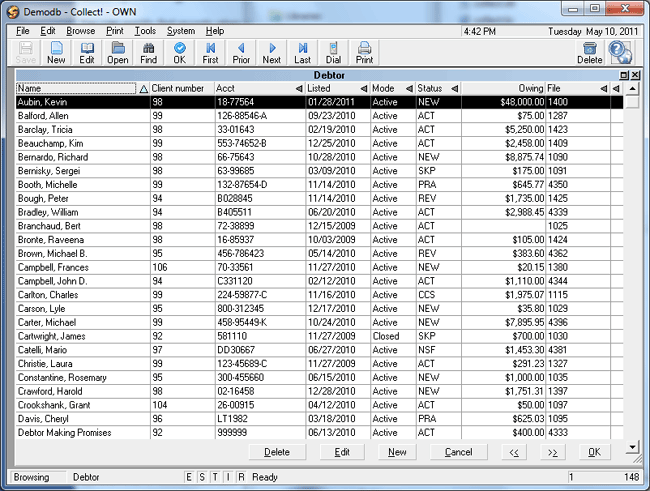
Debtor List
SEARCHING ANY LIST
Just start typing and Collect! searches the current list to find
what you typed. When a list is first displayed, your cursor is
located in the first column of the top row. In the example above,
you would type B to display debtors starting with a B. Type BE to
find debtors starting with BE.
SEARCHING IN MORE DETAILS
In the example list above, if you want to search by File Number,
you'd just press Tab until your cursor is on the File column and
then type the File Number to find the debtor. To search on any
field, use the Tab and Shift+Tab keys to move your cursor to the
desired column and then just type what you're looking for.
ADVANCED SEARCHING
Press F6 to set search criteria on one or more fields. Only those
records matching your search criteria are listed.

Posting Payments And Charges
This section describes financial management for:
DEBTOR PAYMENTS AND CHARGES
To record debtor payments and charges in Collect!, we use
the Transaction dialog.
POSTING WITH THE TRANSACTION DIALOG
The Transaction dialog gives great control over individual
transactions.
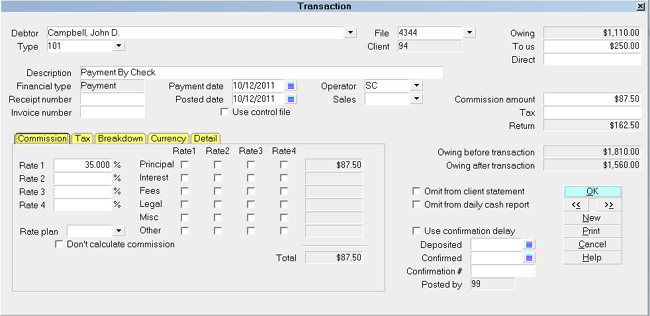
Transaction form
Select Browse from the top menu bar, choose All Debtors and
click on a debtor. Select the TRANSACTIONS tab in the Debtor form.
- Press F3 for a new form or select the NEW button.
- Press F2 to choose a transaction type.
- Press F2 to choose the debtor whose account you want to adjust.
- Fill in additional fields as needed.
- Press ENTER when your cursor is flashing on the OK button
to save the changes to the account. The debtor and client
totals will be automatically recalculated.
 Debits or fees charged to the debtor are posted as a
negative amount. Fees to clients are posted by leaving the To Us
and Direct blank and posting the fee in the Commission field.

Printing The Daily Cash Report
To print a summary of the transactions posted, choose
the Print Daily Cash Report option in the Payments and Charges Menu
or pull down the Print menu and choose Daily Reports and
pick Daily Cash Report.

Creating Client Statements
After posting payments from debtors, you periodically send
statements to your clients. Collect! turns month end activities
into a very simple process.
TO GENERATE CLIENT STATEMENTS
1. From the Main Menu, choose Month End and select
Generate Statements. By default statements are calculated
from the first day of the month to the last day of the month.
2. If the date range is acceptable, click OK, otherwise change
the dates and then click OK.
 The statements are dated the first of the next month,
to ensure all payments and transactions up to midnight of the last
day are included. For example, if you generate statements for
February, the statements are dated March 1st.
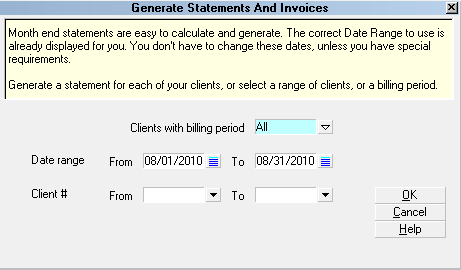
Date Range Dialog
TO PRINT STATEMENTS AND OTHER FINANCIAL REPORTS
1. Open the Print menu.
2. Choose Monthly Reports.
3. Pick Statements.
OR
1. From the Main Menu, choose Month End.
2. Pick Print Statements.
 You can also choose the Receivables and
Payables reports for a quick summary of the month's
financial results.
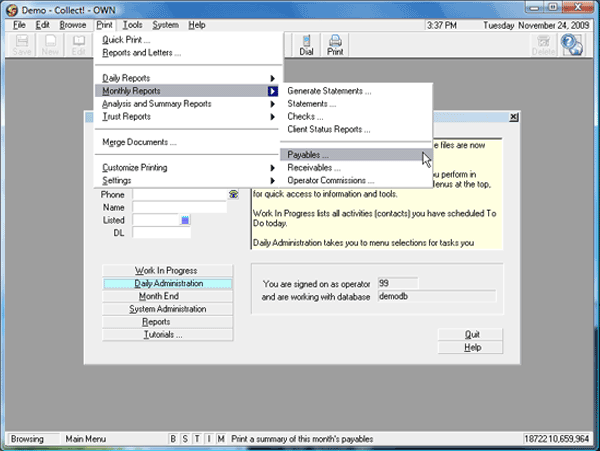
Print Monthly Reports

Posting Client Payments
Client payments are made based on the total amount owing displayed
on the statement you have sent them.
TO POST CLIENT PAYMENTS RECEIVED
1. From the Main Menu, choose Daily Administration, then
Payments and Charges and then choose Client Payments and Charges.
2. Press F3 to create a new client payment record.
3. Fill in the form as necessary.

Client Payment Screen
If you need help, press F1.
- Enter payments received from the clients, using F3 or NEW
to create new client payment records.
- Press the OK button to exit the Payments form.
Collect! assumes you have paid any money you owe your
client. Therefore, you do not need to post checks you send
to your clients.
To print a summary of the payments posted, choose the
Print Daily Cash Report option and fill in the desired date range.

Beyond The Basics
Now that you've learned the basics, use this chapter to explore
other ways Collect! simplifies managing contacts, creating and
using simple or sophisticated contact plans, printing batch
letters and running other batch operations.

Contact Planning
The debtor you entered earlier requires letters to be sent,
telephone calls to be made, promises of payments recorded
and other functions performed in order to effectively manage
the account. Collect! automates account processing and contact
management with an expert agent program that can route
accounts according to action due, based on any rules you establish.
Contact plans are templates of activities scheduled to occur at
specific time intervals and under specific conditions. They can
include letters to be printed in your daily letter batches, phone
calls made to debtors or clients, file routing and review activities,
notes written to the debtor files and many other functions. Contact
plans can also schedule other contact plans to be run at future
dates or if certain other events occur.
TO REVIEW AND EDIT CONTACT PLANS
1. Select System from the top menu bar, then choose
Contact Management Settings, Contact Plans.
2. Select View from the side menu.
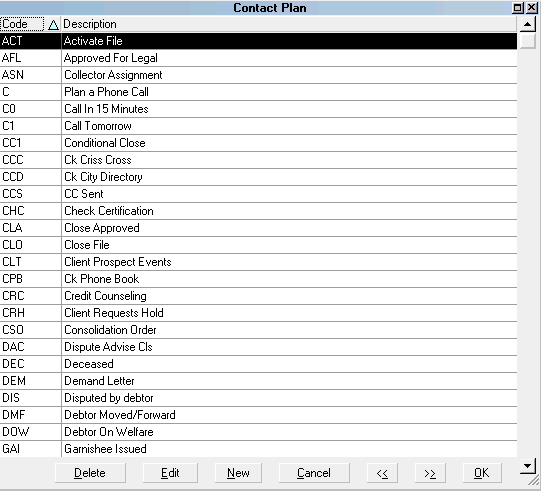
Editing Contact Plans
The Contact Plan list is displayed as shown. Click on
the first plan in the list to open the Contact Plan form.
The following form is displayed.
 You can also combine a predictive dialer with
the contact management in the Collect! system for
high-volume phone calling. Press Alt+H to pull down
the Help menu, choose Index and look in the P section
for "Predictive Dialer" for instructions.
THE CONTACT PLAN
The NEW contact plan template is used when
assigning new business. It schedules a Letter series
for batch printing, a Phone contact for the operator's
work queue and sets the account status to NEW.
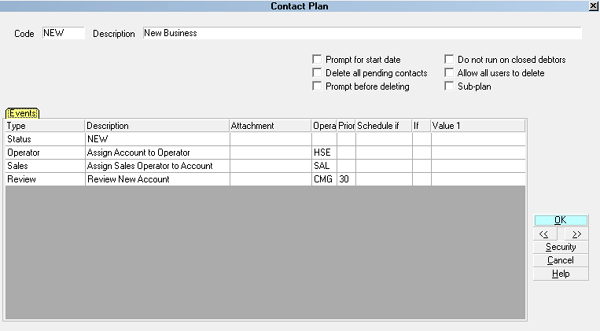
Contact Plan Dialog
Each contact plan has one or more events. Each event in
the plan can have a number of options. To open the events in
the contact plan, press F5.
You can create your own contact plans or edit the existing
ones. Review the contact plans in Collect!, and press F1
for more information.
Each event in a plan schedules something on a specific date.
For example, you might schedule a Letter for today's print
batch and another Letter in 7 days and then a Review of the
file in 14 days by a specific operator. This and much
more is available with contact planning.
You can have Collect! make decisions for you. Events can be
scheduled conditionally. For example, you may want to assign
an account to an operator if the balance is above $500, send a
letter if the balance is between $50 and $500, and if the balance
is below $50, close the account. You can build sophisticated
contact plans to save clerical and collector time.
Later on, we'll see how we can combine the contact management
functions of Collect! with batch processing to give you a powerful
system that can process thousands of accounts per hour for you
quickly, automatically and reliably.
APPLYING A CONTACT PLAN TO A DEBTOR
When you apply a contact plan to a debtor, contacts are
scheduled, notes may be written, and a number of other
operations are automatically performed for you.
TO INVOKE A CONTACT PLAN
1.Select Browse from the top menu bar and
choose Active Debtors. Click on a debtor to open
the Debtor form.
2. Click the ACTION button to display the list of
contact plans.
3. Select the plan you want to run.
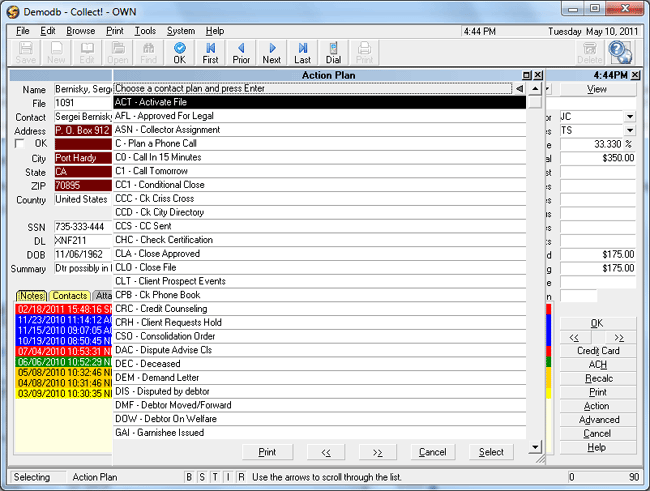
Running A Contact Plan
When a contact plan is run, the events in the plan
are either immediately implemented or a contact is
scheduled to occur in the future. Immediate events can
include changing the debtor's Status, writing Notes to the
debtor, or changing the debtor's Mode from active to
closed.
Contacts scheduled for later may appear in your WIP
list for your manual control, but some contacts can
also be handled entirely automatically by Collect!.
These include letters scheduled for batch printing,
status changes, account activation and closing,
invoking other contact plans and a number of
other operations.
 Select Tools from the top menu bar and
choose Batch Processing to run contact plans on
many accounts in a batch. Batch processing can
actually process thousands of accounts per hour,
so consider this option if you have large amounts of
data to process.

Managing Work In Progress
When you apply contact plans to debtors, contacts are
scheduled for dates in the future. Collect! offers an easy and
comprehensive way to display and work the pending
contacts.
TO DISPLAY YOUR WORK IN PROGRESS
1. Select Work In Progress in the Main Menu.
2. A form appears, displaying your 'To Do' list and
completed work.
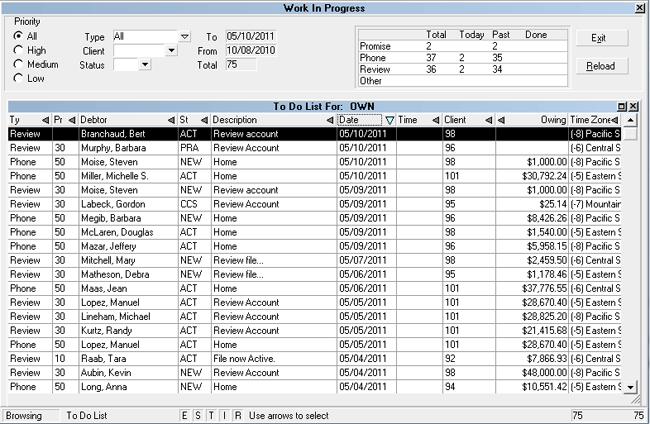
Work In Progress form
Collect! searches the database and displays scheduled
contacts in the To Do List. You can choose which types of
contacts are shown in the list, assign contact priority
and a number of other factors to give you flexible control
over how your work is done. The display shows contacts
for the ID you signed on with.
 Select the RELOAD button to load contacts for
different IDs, or contacts for a specific client, or to refresh
the display. You can select other options with Reload, too.
The WIP List is accessible to view, but it cannot be
manually updated. The WIP List can only be updated
by working the account through the Debtor screen or
with Batch operations from the Tools menu.

Working Accounts
From your WIP List, press Enter to open a contact. The
debtor associated with the contact is displayed and you
can edit the information, write notes, print letters or perform
other actions.
If the contact type is Phone, the Dial Phone dialog box
displays.
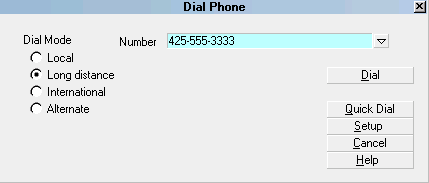
Dialing A Debtor Phone Number
Once you dial the number, the Dial Phone dialog
box disappears and you can edit as described above.
 If you don't use the auto dialer, select WIP Options
from the Reload Work In Progress List screen and switch OFF
Automatically Display Dialer by removing the check mark.
You can also invoke another contact plan by clicking the
ACTION button. For example, if you dial the phone number
and there is no answer, you could invoke the contact
plan 1 called "Tel Res N/A". The "Telephone Residence No
Answer" plan writes a note and schedules another call,
prompting you for the date and time of the next call attempt.
The note includes the current date and time, the debtor's
status, and your user ID. This is just one example of how
contact plans can be used to minimize your typing and
keep your work organized and efficient.
When you select the debtor's CONTACTS tab, the
contacts scheduled for the debtor are displayed in a list.
The contact you selected in your WIP List is highlighted.
Note that when you work an account in this way, the
debtor's Worked date is set to today's date. If someone
else looks at the account today, they'll see the Worked
date in red.

Printing Ad Hoc Letters And Reports
The Print menu is available from almost anywhere in Collect.
The report system in Collect! is context sensitive. This means
when you are browsing client records and choose to print a
report or letter, only those reports that apply to clients will be
shown for you to choose from.
To open the Print menu, press ALT+P..
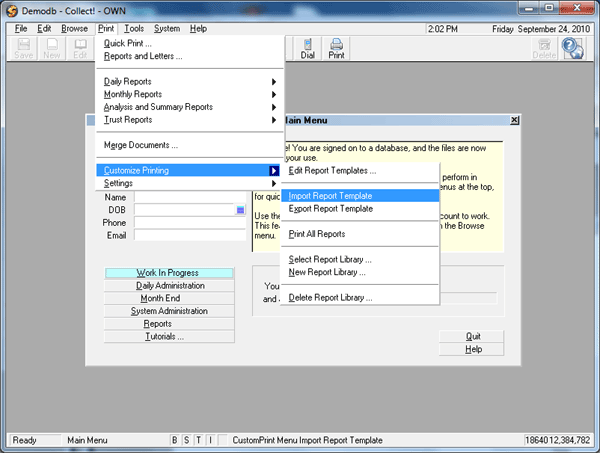
Print Menu
QUICK PRINT
You can print anything you see on the screen by opening
the Print menu, and then selecting the Quick Print option.
Experiment with this command in both forms and lists.
You can send reports to a printer, the screen, or to a file
for later processing with other software on your computer.
REPORTS AND LETTERS
You can use the Print menu, Reports Letters option to
display a list of reports.
This list changes as you move around the Collect! system,
since some reports which are relevant to where you are in
the system, can only be printed from certain locations.
For example, debtor letters and notices will only appear in the
list when the Debtor dialog is open. Similarly, client reports
can usually only be printed when you are on a Client dialog.
*** TIP : Reporting from Collect! is flexible, fast and powerful.
You can send your output to a printer, but you can also create
reports to send output to any spreadsheet, including
Microsoft Excel or any other software system. Check the list
of available print destinations when printing a letter or report.
PRINTING LETTERS AND NOTICES
To print a letter:
1. Select the PRINT button on the Debtor dialog.
2. Highlight a letter from the list and choose SELECT.
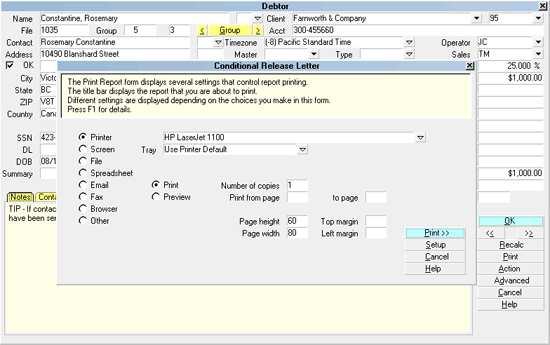
Print Report
EDITING A LETTER BEFORE PRINTING
You can edit a letter before printing, thanks to the screen
editor in Collect!.
To edit a letter:
1. Select "Screen" as the Destination on the Print dialog.
2. Edit the letter as needed.
3. Press F5 to print the letter.
Collect! automatically writes a note, stores the letter in
your database and records the letter in the debtor's
contact list. You can edit and print the letter at any
later time by selecting the letter in the debtor's contact
list.
TROUBLESHOOTING PRINTING PROBLEMS
If you have trouble printing in Collect!, select the
SETUP button in the Print dialog. You can also
print the Printer Test report to help troubleshoot the
problem. The Printer Test checks the capabilities of
your printer. For more information, see "Print" in the
Help Index.

Printing Batch Letters
When a letter is scheduled for printing by a contact plan,
it is placed in the letter batch for the day. At the end of
the day, or periodically throughout the day, the letter
batches can be printed.
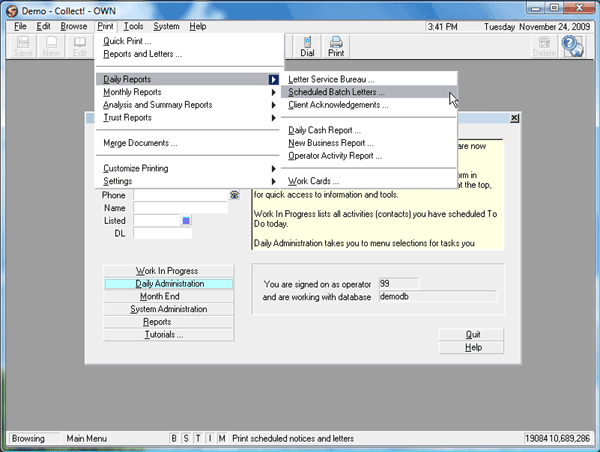
Printing Batch Letters
To print batch letters:
1. Select Print from the top menu bar.
2. Choose Daily Reports.
3. Pick Scheduled Batch Letters from the
Daily Reports submenu.
OR
1. From the Main Menu, choose Daily Administration.
2. Choose Daily Batch Processes.
3. Pick Scheduled Batch Letters.
After the letters have been printed, you will be
asked to "Mark this letter batch completed". If printing
was successful, choose "Yes" and each letter contact
will be marked as done, and the time and date of printing
is recorded in the contact record for each debtor. If
for some reason printing was not successful, choose
"No" and the letters will not be marked completed. Once
the problem is corrected, another print batch can be run.
 To save time and money, you can send your batch
letters to a Letter Service Bureau for printing.
Press Alt+H to pull down the Help menu, choose Index
and look in the L section for Letter Service
for instructions.

Credit Reporting
Credit reporting is a two-step process. First you mark the
accounts you want reported, and then you create file to
send to the credit bureau.
TO PREPARE AN ACCOUNT FOR CREDIT REPORTING
1. Open a Debtor form.
2. Select the CBR tab.
3. Switch ON 'Report to credit bureau'.
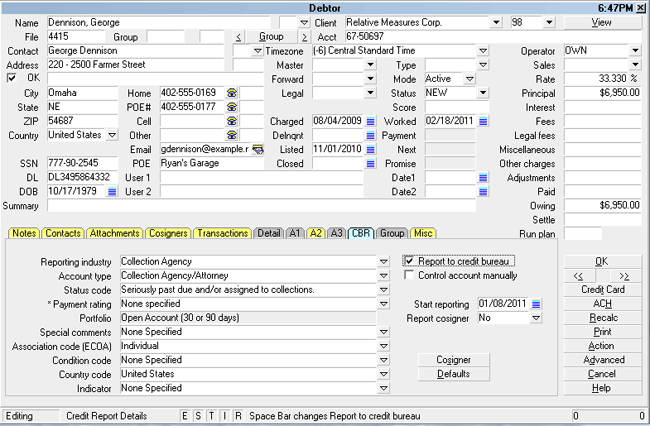
Credit Report Details tab
To enable credit reporting on an account, select the CBR tab
on the Debtor form. Fill in the dialog that displays and choose
OK to save the credit reporting details.
TO REPORT TO CREDIT BUREAUS
1. Select Tools from the top menu bar.
2. Choose Credit Reporting.
 You will need to communicate with your credit
bureau representatives to establish your company's credit
reporting codes.

Account Matching And Grouping
Accounts can be grouped together automatically and
manually, and can optionally share information so that
when you make a change in one account the change
also appears in other accounts in the group.
Account matching is the process of automatically identifying
existing accounts that have a value matching the one entered
in a new debtor. When a matching account is found, Collect!
prompts, asking you to copy information from that account to
the new account and to group the new account together
with the existing account.
Account groups are sets of accounts joined together. Typically,
the groups are formed as new accounts are entered, but you
can also group accounts manually. Use the Tools menu,
Utilities, Group Account option to group accounts.
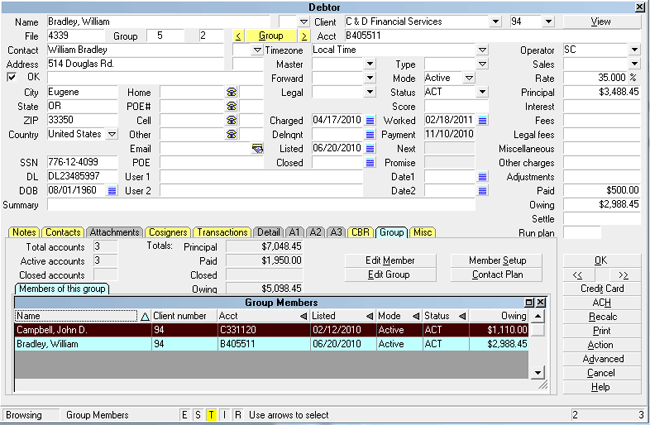
Matching Accounts
When you are on any member of a group, you have instant
access to other members of the group, plus a summary of all
accounts in the group.
Each member of a group can be set up to optionally share
information with other members of the group, or to keep its
data entirely separate. Group members can also share a
Worked date, depending on how you set up the account
matching options described below.
ACCOUNT MATCHING SETUP
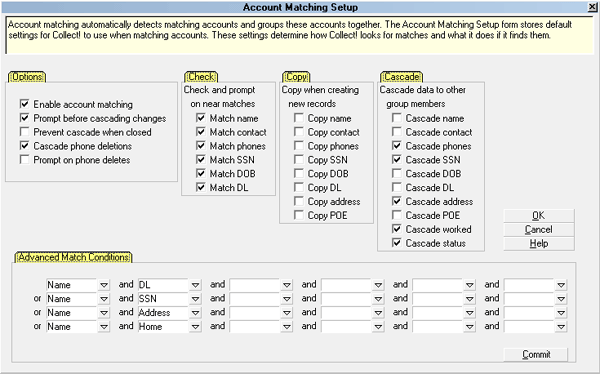
Account Matching Setup
| Turn on this switch | To enable this function |
|---|
| Enable account matching |
This is a master control to turn on and off the
automatic account matching functions when entering new debtors. |
| Prompt before copying |
Adds an extra prompt before cascading changes
across to other group members after
you've made changes to a debtor that's a member of a group. |
| Check and prompt on close matches |
When you enter data into a checked field, Collect!
searches the database for a matching record or a close match. You can
choose from the matching list to group the new and old
records together. |
| Copy when creating new debtors |
When you group debtors, you can control which
fields are copied from the existing debtor to the new debtor. Check
the fields that you want copied. This can greatly speed up
data entry for previously listed debtors. |
| Cascade data to other group members |
When you make a change to selected information
on a debtor that is a member of a group, you can tell Collect! to
automatically update other members of the group. Check the
fields that you want to be automatically updated. You can
change this for individual members. |

The Possibilities
So far we've looked at basic uses of Collect!, but there is much
more power and flexibility in the system.
Below is a list of items covered in the following section. Each topic
is described in greater detail below.
- Batch process large numbers of accounts quickly.
- Create your own reports and letters.
- Transfer information from and to other systems.
- Use the query system to build searches based on
any field in any record.
- Change the screen display to suit your business
more closely.
- Add pick lists to speed up and control data entry.
Other items you may find of interest are briefly described here:
| Feature | Usage |
|---|
| Report Writer |
Our built-in Report Writer offers flexible
output, including graphics, in a comprehensive, powerful
and easy-to-use interface. |
| Archiving |
Old accounts may be moved easily to the
archive database to free up space and improve performance. |
| Messaging |
Instant operator messaging may be
used to alert your operators to special conditions. |
| Web Host |
Your operators can work from
home using Collect!'s built-in internet interface. |
| Credit Bureau Reporting |
Collect! manages accounts reported
to credit bureaus throughout the life cycle of the
account. |
| Automatic Scheduler |
Several processes may be scheduled to
run in off hours, including reports, imports, recalculating
and more. |
| Letter Service Bureau |
You can send your batch letters to be
printed by an outside service bureau to save time and
money. |
| TCN Service |
You can schedule call campaigns and
process results using Collect!'s batch processing. All you
need is an account set up with TCN and Collect! Version 11.3
Build 2.1 or newer. |
| Billing Tree Service |
You can process credit card and
ACH payments electronically through Collect!'s
Billing Tree connection. This is a full-featured solution
for managing single and recurring payments made by
credit card or by bank draft. External payments posted
at the Billing Tree web site are also reconciled and
posted within Collect!. Recurring scheduled payments
are fully managed within Collect!'s promised payment
system. |

Processing Batches Of Accounts
Collect! offers extremely fast, flexible and powerful ways of
managing large numbers of accounts quickly and reliably.
With Batch Processing you can assign and reassign accounts
to different operators, run contact plans on batches of accounts,
run automated rule-based account management, and assign
credit reporting information to batches of accounts.
The following procedures are located in the Tools menu. You can
also use the Daily Administration menu to perform these tasks.
TO PROCESS BATCHES OF ACCOUNTS
1. Select Tools from the top menu bar.
2. Pick Batch Processing.
OR
1. From the Main Menu, choose Daily Administration.
2. Choose Daily Batch Processes.
3. Pick Process Scheduled Contacts.
The Batch Processing dialog is displayed when you pick
the command. Here you can perform fast, powerful batch
operations to process thousands of accounts per hour.
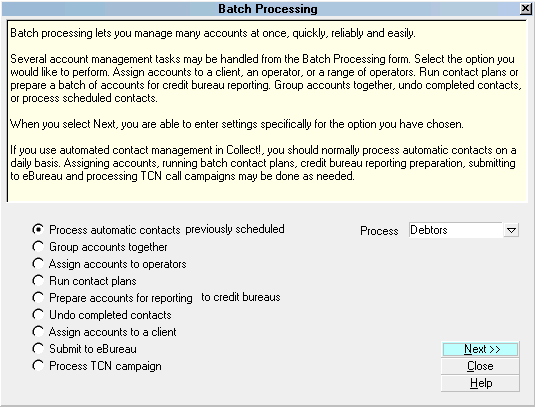
Batch Processing Dialog
The contacts described so far are handled by you in the
WIP List, but many contacts don't need your intervention.
These include printing batch letters (described above),
changing debtor status and mode, scheduling other contact
plans and much more, as described in the Help on
Contact Plans.

Macros And Automation
Macros work like a tape recorder. However, instead of recording
sounds they record your keystrokes and mouse activities. When you
play back a macro, the recorded keystrokes and mouse clicks are
automatically repeated in the same order in which you recorded them.
Macros save effort and time. You can use macros to perform any
complicated or repetitive task quickly.
For example, you could:
- Record a macro that performs a routine maintenance function
- Record a macro that scans through your database and allows you
to change all commission rates
- Record a macro that prints a group of related records
TO RECORD A MACRO
Press F11 and choose Record Macro from the menu. The word
RECORD appears in the upper right corner of your screen.
Press ESC to close the Macro menu.
Type the exact keystrokes for what you want to record.
Press F11 and choose Stop Recording.
Press ESC to close the macro menu.
TO PLAY BACK A MACRO
Press F11 and choose Execute Macro.
 Collect! can run a macro automatically when it starts.
Use this feature to perform automatic unattended operations at
specific times. For more information, look for Macro Menu in
the Help topics.

Designing Letters And Reports
You can design your own reports and letters to print
virtually anything you see in Collect! Many of the existing
reports and all the letters are built using the report system.
TO EDIT REPORTS AND LETTERS
1. Open the Print menu.
2. Choose Customize Printing, Edit Report Templates.
3. Choose a report to edit or press F3 to create a new one.
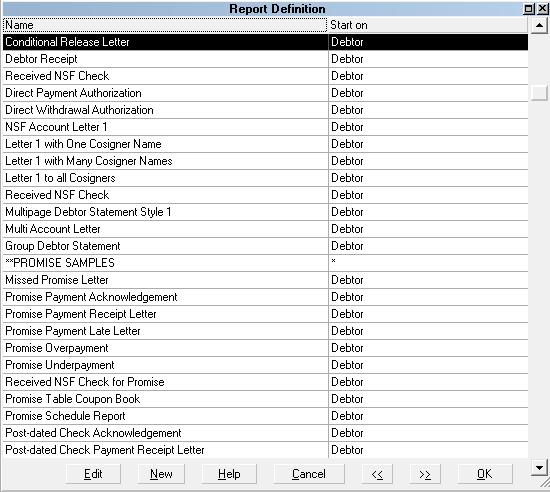
Selecting A Report
Reports can print any database information, can print totals
or any number of lists, and can use all the power of the Query
System to search the database for specific data.
 Please print and read the help in the Report Definition
dialog and when editing the report body. Press F1. Instructions
are included there, covering all the detailed aspects of designing
and printing reports.
To add a field code, date, page break or formatting code, place
your cursor where you want the item to display or occur and
press F2. Mark the item you wish to use and press NEXT.
You may pick the item you wish to use from the list which appears.

Flexible Queries
Collect! searches and groups records by almost any criteria.
For example, Collect! will display all debtors with a given
status or all contacts on a certain date or, it will list all clients
with less than 10 accounts, and whose listings total less
that $10,000. Once you have entered your selection criteria
and reduced the list, you can print reports on just the
selected records.
Here is an example:
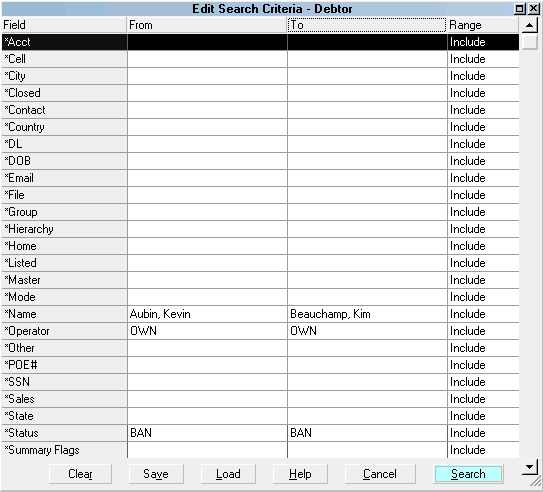
Edit Search Criteria Query Screen
TO START A DATABASE SEARCH
1. Press F6 to display the Edit Search Criteria form.
2. Enter the search criteria for the fields you want to search on,
using the Tab key to move to From and To and F2 to pick your range.
3. Select Search.
 When a query is active, the S status indicator is displayed
at the bottom of the screen. Note that queries can be built in any list,
and as soon as any query is active the S displays.
TO CLEAR A DATABASE SEARCH
1. Select Edit from the top menu bar.
2. Choose Clear Search Criteria.
 To view all information in your database, you must first clear
search criteria after a search.

Import/Export
The Import/Export program built into Collect! is a flexible
program which supports file transfers between Collect! and
other computer systems.
You can use the import/export system to:
- Import new accounts from clients
- Import data from legacy collection systems
- Transfer accounts to other agencies and parties
- Send comprehensive and up-to-date account status data to clients
- Exchange between Collect! systems
- Exchange between Collect! and almost any data source
Before you can import or export information, you must tell Collect!
what data is being imported and where to load it into the Collect!
database. You can import clients, debtors, financial transactions,
notes and contact histories.
TO SPECIFY A FILE FORMAT FOR IMPORTING OR EXPORTING
1. Select File from the top menu bar and choose Import/Export.
2. Choose Customize Import/Export, Edit File Format. .
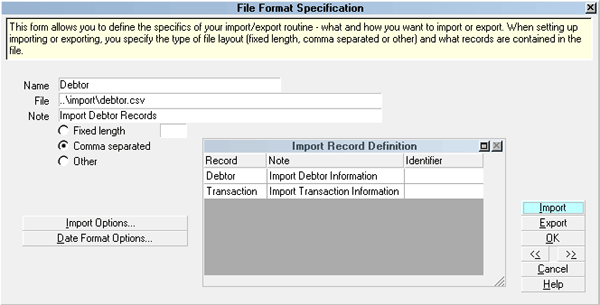
File Format Specification Dialog
When defining a file format, you set up basics such as a description
for the format and the name of the file to import, plus what record
type you are importing. For each record type you import, you need
to specify what fields in Collect! are loaded with the imported data.
Import stores file formats automatically, making them quickly
available to recall for later use.
TO IMPORT OR EXPORT A FILE
1. Select File from the top menu bar and choose Import/Export.
2. Click Import to import a file, choose Export to export a file.
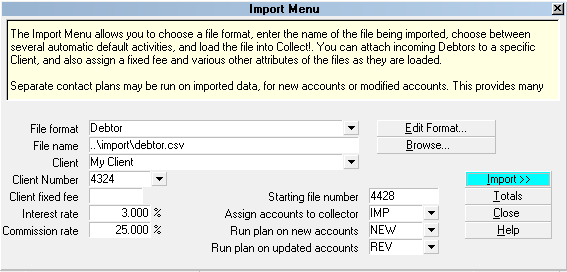
Import Menu
Import can be set up to ignore duplicate records based on
almost any criteria, and intelligently handles updating your
database with only the most current information. Import supports
Fixed Length and Comma-separated Value (CSV) files, numerous
date formats, allows you to apply multiplication factors for numeric
fields, and has many more features to provide an extremely flexible
system. Import loads data into your Collect! database quickly
and accurately.
You can also make Import automatically schedule reviews and
letters, calculate interest, set status and collector codes automatically,
and enter commission and interest rates and predefined charges
for records as they load.
 Definitions of field types and sizes are available from
the Import menu Field Definitions option. Be sure to read the
online help available in each dialog of the import/export system.

Adding Or Changing Pick Lists
Pick lists give you a list of choices to pick from when you
enter data into a field. When you pick an item in the list, it is
entered into the system as if you had typed it. You can
assign pick lists to virtually any field on any form.
TO ADD OR CHANGE A PICK LIST
1. Click the field you want to edit.
2. Choose Field Properties in the System, Layout and Languages
menu.
3. Double-click the Pick List File field in the displayed
form and follow the instructions displayed on your screen.
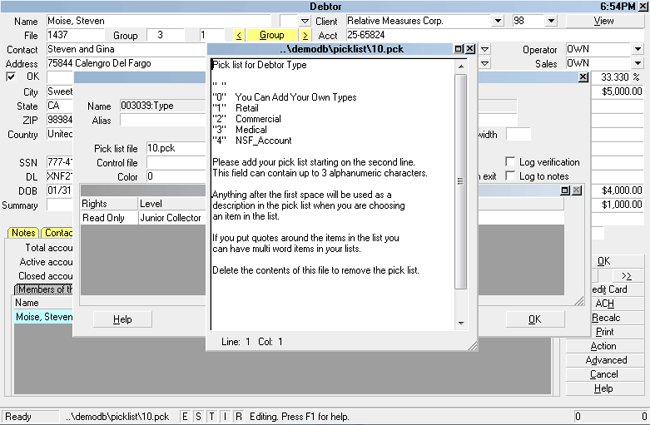
Editing A Pick List
 To get even more flexibility from your pick lists, add a
blank item that you can type information into. In the list add the
item " ". Be sure to put a space between the quotation marks.

Changing Field Labels
You can change the text displayed on forms. For example,
you might want to change the field called 'POE' to read 'Work'.
TO CHANGE FIELD LABELS
1. Click the field you want to edit.
2. Choose Field Properties in the System, Layout and Languages
menu.
3. Edit the Alias field, entering the new name for the field.
4. Select OK to save the changes.
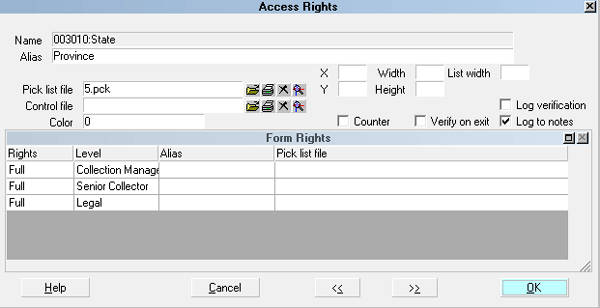
Changing A Field Label

Conclusion
We hope this guide has been helpful. Of course, Collect! can
do a great deal more for you. Available options include
a comprehensive report writer, an ODBC gateway and
performance-enhancing utilities. Please don't hesitate to
ask us about utility programs for Collect!.
For help on setting up Collect! to suit your company, search
for the Help topic " Setup Checklist."
For help on setting up Collect! for your network. Search Help
for " Network Setup" for setup instructions.
If you found this guide helpful, you may want to review the
additional user's guides under Help topic, Collect! User's Guides.
Thank You!
We appreciate any feedback you may have which will help us
make Collect! the best collection management software in the
world. Please send us any ideas or suggestions you have about
this product or manual.

| 
Was this page helpful? Do you have any comments on this document? Can we make it better? If so how may we improve this page.
Please click this link to send us your comments: helpinfo@collect.org